On October 20, 2006, Kevin Watson did another hurdling practice session, this time with spikes on. Again, my student Mason McNair took photos, from which I put together another hurdling sequence. This time, Kevin did what amounted to a hybrid of the Sprinting 5-step workout and the Jean Poquette back-and-forth workout. Like Poquette, we set up the hurdles 12 yards apart, and like Poquette, I had Kevin run an uneven five steps between the hurdles: two recovery steps followed by three sprinting strides, in order to mimmick the feeling of 3-stepping. But instead of going back and forth, Kevin would shuffle/bounce back to the start after passing over five hurdles, and then go again. He did two sets of 6 over 5 hurdles, for a total of 60 hurdles. After warming up with trail leg and lead leg drills over 39’s and 42’s, we began the workout over the 42’s. The photos below all come from the workout portion of the training session.
………………………..1……………………………………………………………2………………………………………………………………….3
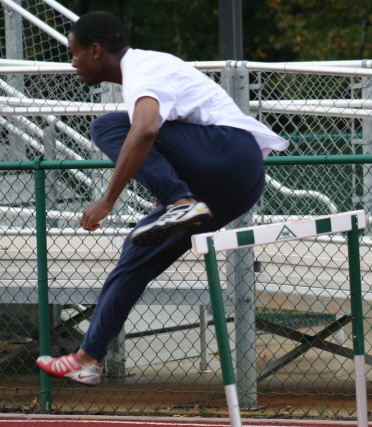
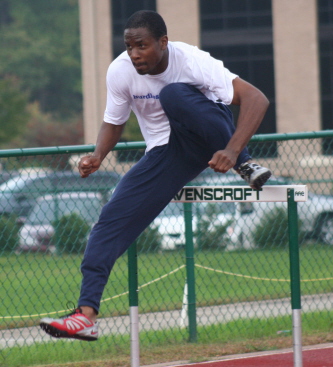
Photos 1-3: Hurdle Clearance, Side Angle. In Photo 1, Kevin has taken off and begun his dive into the hurdle. In this workout, we placed a heavy focus on the lead arm, as Kevin and I are both becoming increasingly convinced that the lead arm is the key to quick, efficient hurdle clearance. In Photo 1, the lead arm has reached its full height, even with the forehead. The knee of the lead leg is partially bent, and the toe of the lead leg is pointing up. In Photo 2, the lead arm is beginning to push down in a quick, tight, sharp motion. The motion is forceful, but not wild. The idea is to use force without exerting energy. Now look at the lead leg. Although the foot still hasn’t quite reached the crossbar, it has already begun its downward flight. In essence, the pushing down of the lead arm inevitably causes the lead leg to push down with more force as well. A wide, loping lead arm will slow the snap of the lead leg. In Photo 3, Kevin continues his downward flight on the other side of the crossbar. The lead arm continues pushing down in a tight motion, with the thumb pointing up, as close to its regular sprinting position as possible. The lead leg knee remains bent, the lead leg toe remains pointing up, the chest pushes down over the thigh, the chin stays up and the eyes stay up. Now look at the knee of the trail leg. It is well ahead of the foot, which means that the trail leg motion will be tight and efficient. So, the trail leg, like the lead arm and the lead leg, is staying as close to sprinting motion as possible. As long as the toe stays pointing up, the foot of the trail leg will not hit the hurdle.
……………………………….4………………………………………………………………….5…………………………………………………………………6

Photos 4-6: Descent and Touchdown, Side Angle. In Photo 4, it is noticeable that Kevin’s left hip is a tad slow in its rotation, causing the left shoulder to be slightly behind the right shoulder, which is where it stays in Photos 5 and 6. However, the lead arm continues to push down, with the thumb up, and the knee of the trail leg remains in front of the foot, driving upward underneath the armpit and forward toward the next hurdle. Kevin did clip this hurdle with the foot of the trail leg, but the contact was more a result of the hip taking its sweet old time than it was of the toe dropping. The knee of the lead leg stays bent, and the toe stays up as the chest continues to push down over the thigh, but begins to uncoil. In Photo 5, the lead arm is rotating back to the butt-cheek, and the trail arm is beginning to punch up in preparation for the first sprinting stride off the hurdle. Chin stays up, eyes stay up, lead leg knee stays bent, trail leg knee stays in front of the foot. It’s all about angles, son. It’s all about hitting your angles. By Photo 6, Kevin has touched down. Notice the excellent position of the trail leg knee. Kevin has total control of how long that next stride will be. If he needs it to be short so that he has more room to sprint to the next hurdle, he can go ahead and push it down without losing any speed because, with the toe pointing, he will land on the ball of his foot and keep driving. Also notice the excellent alignment of the lead foot, lead knee, and right hip. Meanwhile, the chest, although is has come back up, is still pushing forward. By not bringing his back up all the way to where it is directly perpendicular to the track, Kevin will be in better position to quickly negotiate the next barrier.
…………………………………7………………………………………………………………8……………………………………………………………….9
Photos 7-9: Hurdle Clearance, Diagonal Angle. Nothing new to be said here that wasn’t said in the analysis of Photos 1-3. Still, seeing the hurdle clearance from a different angle can sometimes be beneficial. One thing I do want to point out here is how, when we talk about “leaning” in hurdling, it is so important to lean from the lower back, not the upper back. If you look at Photo 7, you’ll see that Kevin is pushing his chest down over the lead leg thigh, but he is not inhibiting the motion of the lead leg. The motion of the lead leg is only inhibited when the head comes down instead of the chest. That’s when the lead leg straightens out too soon and cannot rotate up and over the crossbar.
……………………………….10…………………………………………………………….11……………………………………………………………..12

Photos 10-12: Descent and Touchdown, Diagonal Angle: Photos 10-12 show the same parts of hurdle clearance as Photos 4-6. You can still see problems with the left hip and how it’s causing problems with the left shoulder. But everything else is rotating nicely. You’ll notice how, in Photos 10 and 11, the arms look even with each other, almost like a double-armed lead. But that’s where still photos can be deceptive. In Photo 10, especially, you can tell that the lead arm is pushing down and pulling back, while the trail arm is punching up. The same is true in Photo 11. And by Photo 12 it’s obvious.
……………………………..13…………………………………………………………14……………………………………………………………………15
Photos 13-15: Take-off, Clearance, Touchdown, from Head-on angle. From this angle, you can get a good picture of how Kevin and I want the lead arm to function. As he begins his dive into the hurdle (Photo 13), the thumb of the lead arm brushes the forehead, without crossing over to the other side of the body, and without rising above the dome of the head. The lead leg attacks the hurdle knee-first. In Photo 14, the lead arm is already pushing down before the lead leg reaches the crossbar. If the lead arm waits too long to push down, the lead leg will hang in the air too long. That’s why we emphasize that as soon as you take off, start pushing the lead arm down. At the rate of speed that someone at Kevin’s level is moving, it’s virtually impossible to begin the downward flight too soon. Really, you have to think about getting back to the ground before you even leave the ground. By Photo 15, the lead arm has completed its full range of motion, and now the trail arm is punching up.
Nothing technical to discuss here. I just like this photo because,
in some odd way, it reminds me of why I love the hurdles.
