Teaching Trail Leg Mechanics to Beginners
Teaching beginning hurdlers proper trail leg mechanics can be one of the hardest tasks for a hurdle coach. Many beginners tend to bring the trail leg directly under their hip, with no opening of the groin at all, thereby forcing the hips to rise and increasing air time over the hurdle. Also, many beginners don’t run with the ankle dorsi-flexed. So, if the trail leg is coming directly under and the toe is pointing down, this is the easiest way to ensure a face-first crash and burn if the toe of the trail leg catches the crossbar. Therefore, this problem must be fixed before the hurdler can be allowed to go over the hurdles with any speed.
In this article, I will identify and demonstrate certain drills that the beginner can be taught to ensure effective and efficient trail leg mechanics during hurdle clearance.
[am4show not_have=”g5;”]
[/am4show][am4guest]
[/am4guest][am4show have=”g5;”]
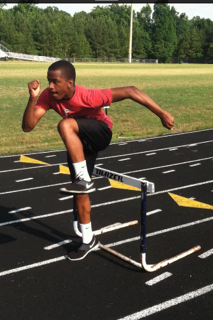
A good way to start is to have the hurdler straddle a hurdle with the lead leg in front of the hurdle, and the trail leg behind the hurdle, as in the photo below:
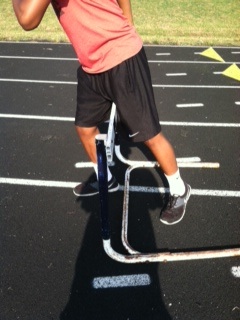 The only problem with the photo above is that the foot of the trail leg is pointed to the left. It should be facing the front. The hurdle should be low enough that the athlete can straddle the hurdle comfortably. For shorter hurdlers (the hurdler in the photo above is 5-9, and the hurdle is 30 inches), take off the top part of the hurdle and rest the crossbar against the bottom part. Or use fold-up practice hurdles that go down to 27 and 24 inches.
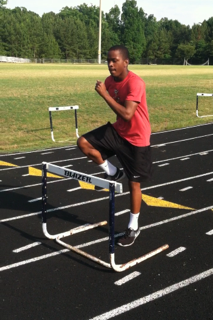
After the hurdler is in proper straddle position over the hurdle, have him or her drive the knee and heel up, while opening the groin slightly. Make sure the foot doesn’t kick back when it leaves the ground.
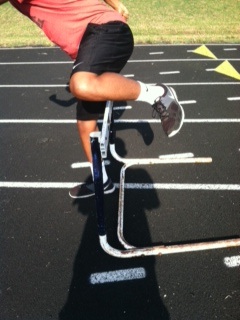 As shown above, when the hurdler raises the trail leg into hurdling position, the knee is facing forward, the knee is slightly higher than the heel, the heel is tucked, and the groin opens slightly. The hurdler also maintains a deep forward bend from the waist.
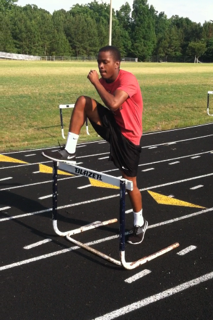
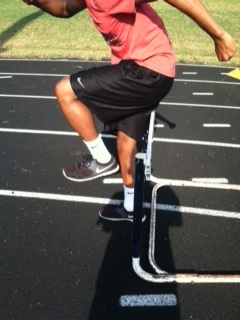 Next, as shown in the above photo, the knee drives upward/forward until it is facing the front. The heel remains tucked so that it remains slightly behind the knee, directly under the hamstring. I prefer that the heel be a little higher than demonstrated in this photo. Raising the heel will raise the knee so that the knee is parallel to the track, which is ideal for this drill. Meanwhile, the hurdler maintains the lean, and prepares to attack the track with the foot of the trail leg.
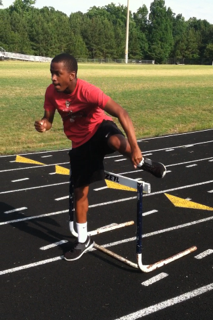
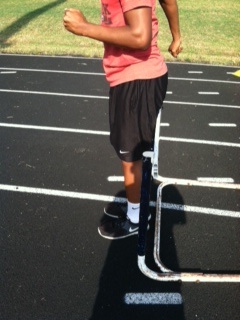 Next, the hurdler cycles the foot of the trail leg back on the ground. The ball of the foot absorbs the impact.
The hurdler can do this straddle drill over and over again. Upon completion of the motion, he or she should return the trail leg back behind the hurdle and repeat the motion. If the hurdler is doing anything wrong in the motion, the coach should grab his or her leg and guide him or her through the motion so he or she can learn to grasp what the motion is supposed to feel like when done correctly. Always make sure that the hurdler doesn’t cheat by twisting the hips. Hips should be facing the front at all times. The bend from the waist negates the need to twist the hips.
***
Once the hurdler has mastered the straddle drill, he or she can move on to walk-overs. I prefer to do walk-overs to a 3-step rhythm as opposed to the usual 0ne-step rhythm, because I like for my hurdlers to get the race rhythm ingrained in their muscle memory. First let me show the steps of the hurdle motion in the walk-over, then I’ll show a short video of it being done by one of my athletes.
Upon take-off, the athlete begins his forward bend from the waist, the lead leg drives at the crossbar, and he prepares to push off.
 Next, the knee of the lead leg drives up and over the crossbar, with the ankle staying dorsi-flexed. Remember, with the walk-overs, one foot will be on the ground at all times, so the “push” off the back leg will not be forceful in this drill. Here, the back leg must remain straight, and the hips must remain straight.
 Next, the lead leg cycles to the ground, with the ball of the foot absorbing the impact. The forward bend is maintained. The trail leg knee drives upward/forward, under the armpit of the lead arm, with the ankle remaining dorsi-flexed. If the athlete’s toe were to drop, it would hit the crossbar! Also notice that the groin opens just enough to allow the passage of the trail leg to be smooth. The good thing about walk-overs is that they force the groin to open up. So, beginners who tend to bring their trail leg directly under the glute cannot do that in this drill, so it helps to break them of that habit.
The hurdler finishes the trail leg action by continuing to drive it upward/forward until the knee is directly facing the front and the thigh is parallel to the track. The deep bend from the waist enables a forceful stride off the hurdle. Again, the ankle remains dorsi-flexed so that the leg will cycle back to the track instead of dropping straight down.
Here’s what the 3-step walk-over looks like in action:
If the athlete has flexibility issues and isn’t able to do the walk-overs without twisting the hips or kicking out the foot of the trail leg, then it might be easier to start with side walk-overs, where the lead leg steps past the crossbar and the trail leg clears the crossbar, like so:
The walk-overs and side walk-overs should be done with at least three hurdles, and you can add as many hurdles as you like. Ten is not too many. My standard spacing for this drill is 12 feet, but that may be adjusted a little bit one way or the other depending on the athlete. It’s important that the athlete be doing everything between the hurdles that he or she needs to do over the hurdle. In other words, between the hurdles, the ankles need to be dorsi-flexed, significant force should applied to the track with each stride, there should be high knee lift as a result of the force being applied, and there should be no back-kick.
Once the walk-overs have been mastered, the hurdler can graduate to 3-step marching pop-overs. The difference between pop-overs and walk-overs is that, with pop-overs, both legs will be off the ground at the same time during hurdle clearance. So pop-overs more closely resemble the actual hurdle motion. Again, the hurdles should be low enough that the hurdler can execute proper mechanics. My general spacing for this one is 15 feet between each hurdle. Again, at least three hurdles is the minimum, and there is no real maximum.
This drill was demonstrated in the May issue instructional video by another of my athletes, but here’s another version:
With the pop-overs, the push off the track becomes more important than in the walk-overs. The trail leg must push then immediately drive to the front. Both legs should feel like they’re cycling over the hurdle. Do not attempt the pop-overs if the hurdler has yet to break the habit of bringing the trail leg directly under the glute in the walk-overs. Also, if the hurdler has yet to break the habit of dropping the toe, then he or she is definitely not ready for pop-overs.
Finally, the hurdler can graduate to high-knee pop-overs. Instead of marching to the first hurdle and between the rest, the hurdler will use a high-knee approach. This drill should be done with the hurdles spaced 15-18 feet apart. If you want to expand it into a quick-step drill in which the hurdler runs to the first hurdle (but not at full speed), then the hurdles should be more in the range of 21-24 feet apart. Again, the May instructional video provides examples of this, but here’s a quick example over one hurdle:
Of course, in addition to all these drills, the basic fence drill should be a staple for teaching the hurdler to open the groin, drive the knee to the front, and drive the foot back to the ground, all while keeping the ankle dorsi-flexed and the hips facing the front. The good thing about the fence drill is that it impels a forward bend from the waist, so the hurdler doesn’t even have to think about doing that. Here’s a quick demo of the fence drill:
If you have a keen eye, you’ll notice that my athlete doing the fence drill does slightly kick his leg back prior to driving it up to the front. But he does everything else right – opens up the groin, keeps the heel tucked, and cycles the foot back to the ground.
Once the hurdler is able to do the high-knee pop-overs effectively, and can do some quick-step hurdling without major issues, then you can continue to increase the spacing and add more speed, even if the trail leg mechanics aren’t flawless. What you’ll find is, once the athlete gets to a certain level of proficiency, his or her body will start correcting itself just by getting in reps.
Special thanks to my athlete Arthur Njemanze for demonstrating the drills.
[/am4show]
