Yoga for Hurdlers: A Matter of Balance
All right hurdlers, it’s time to get your yoga on. Say what? Yoga? Heck yeah, you heard me right. Yoga.
Though I’ve only dabbled in yoga myself, I’ve always been curious about the benefits that a regular yoga routine could provide for hurdlers in their training. My curiosity was initially sparked by my observation that both hurdling and yoga require the individual to put the body in positions that are quite unnatural. I also noted that both seemed to require not only exceptional flexibility, but exceptional strength.
So I recently called upon Elise Dorsett, a 26-year-old yoga instructor who operates out of Raleigh, NC, and asked her thoughts on the topic. She promised to do some research on hurdling while I did some research on yoga. Then we met for an interview, and what I came to realize from her responses to my questions is that yoga can provide numerous significant benefits for a hurdler, both physical and mental. Also, I came to recognize that yoga and hurdling have much more in common than I had ever imagined.
Many of us in the US assume that yoga is an eastern practice associated with Buddhism and Hinduism. But yoga actually has no religious affiliation at all. According to the website of the American Yoga Association, yoga is more than 5,000 years old, and predates Hinduism by thousands of years. It even predates written history. In the olden days, yoga was not practiced by groups of people, but was “passed on individually from teacher to student through oral teaching and practical demonstration.” Yoga most likely arrived in the US in the late 1800s, and became popular in the 1960’s, when the young generation of that decade held an infatuation with Eastern schools of philosophy and spiritual practices. (www.americanyogaassociation.org/general.html).
The word “Yoga,” according to the site, means “to join or yoke together, and it brings the body and mind together into one harmonious experience.”
Dorsett, who played tennis in high school and for two years at a Division III college, started practicing yoga when she was 18 years old. She went to a Bikram Yoga class (also known as Hot Yoga) with her mother. Bikram Yoga involves 26 postures, 2 breathing exercises, and is done in a room with the temperature set at 105 degrees Fahrenheit. “I remember feeling nauseous,” Dorsett said, “but I really loved it.” Despite the heat, Yoga served as a welcome contrast to the intense tennis practices she endured every day. “I’m naturally flexible,” she said, “so that part came easily to me. I was doing a lot of drills and sprints and footwork for tennis, so yoga was a good way to calm down and focus on something different.”
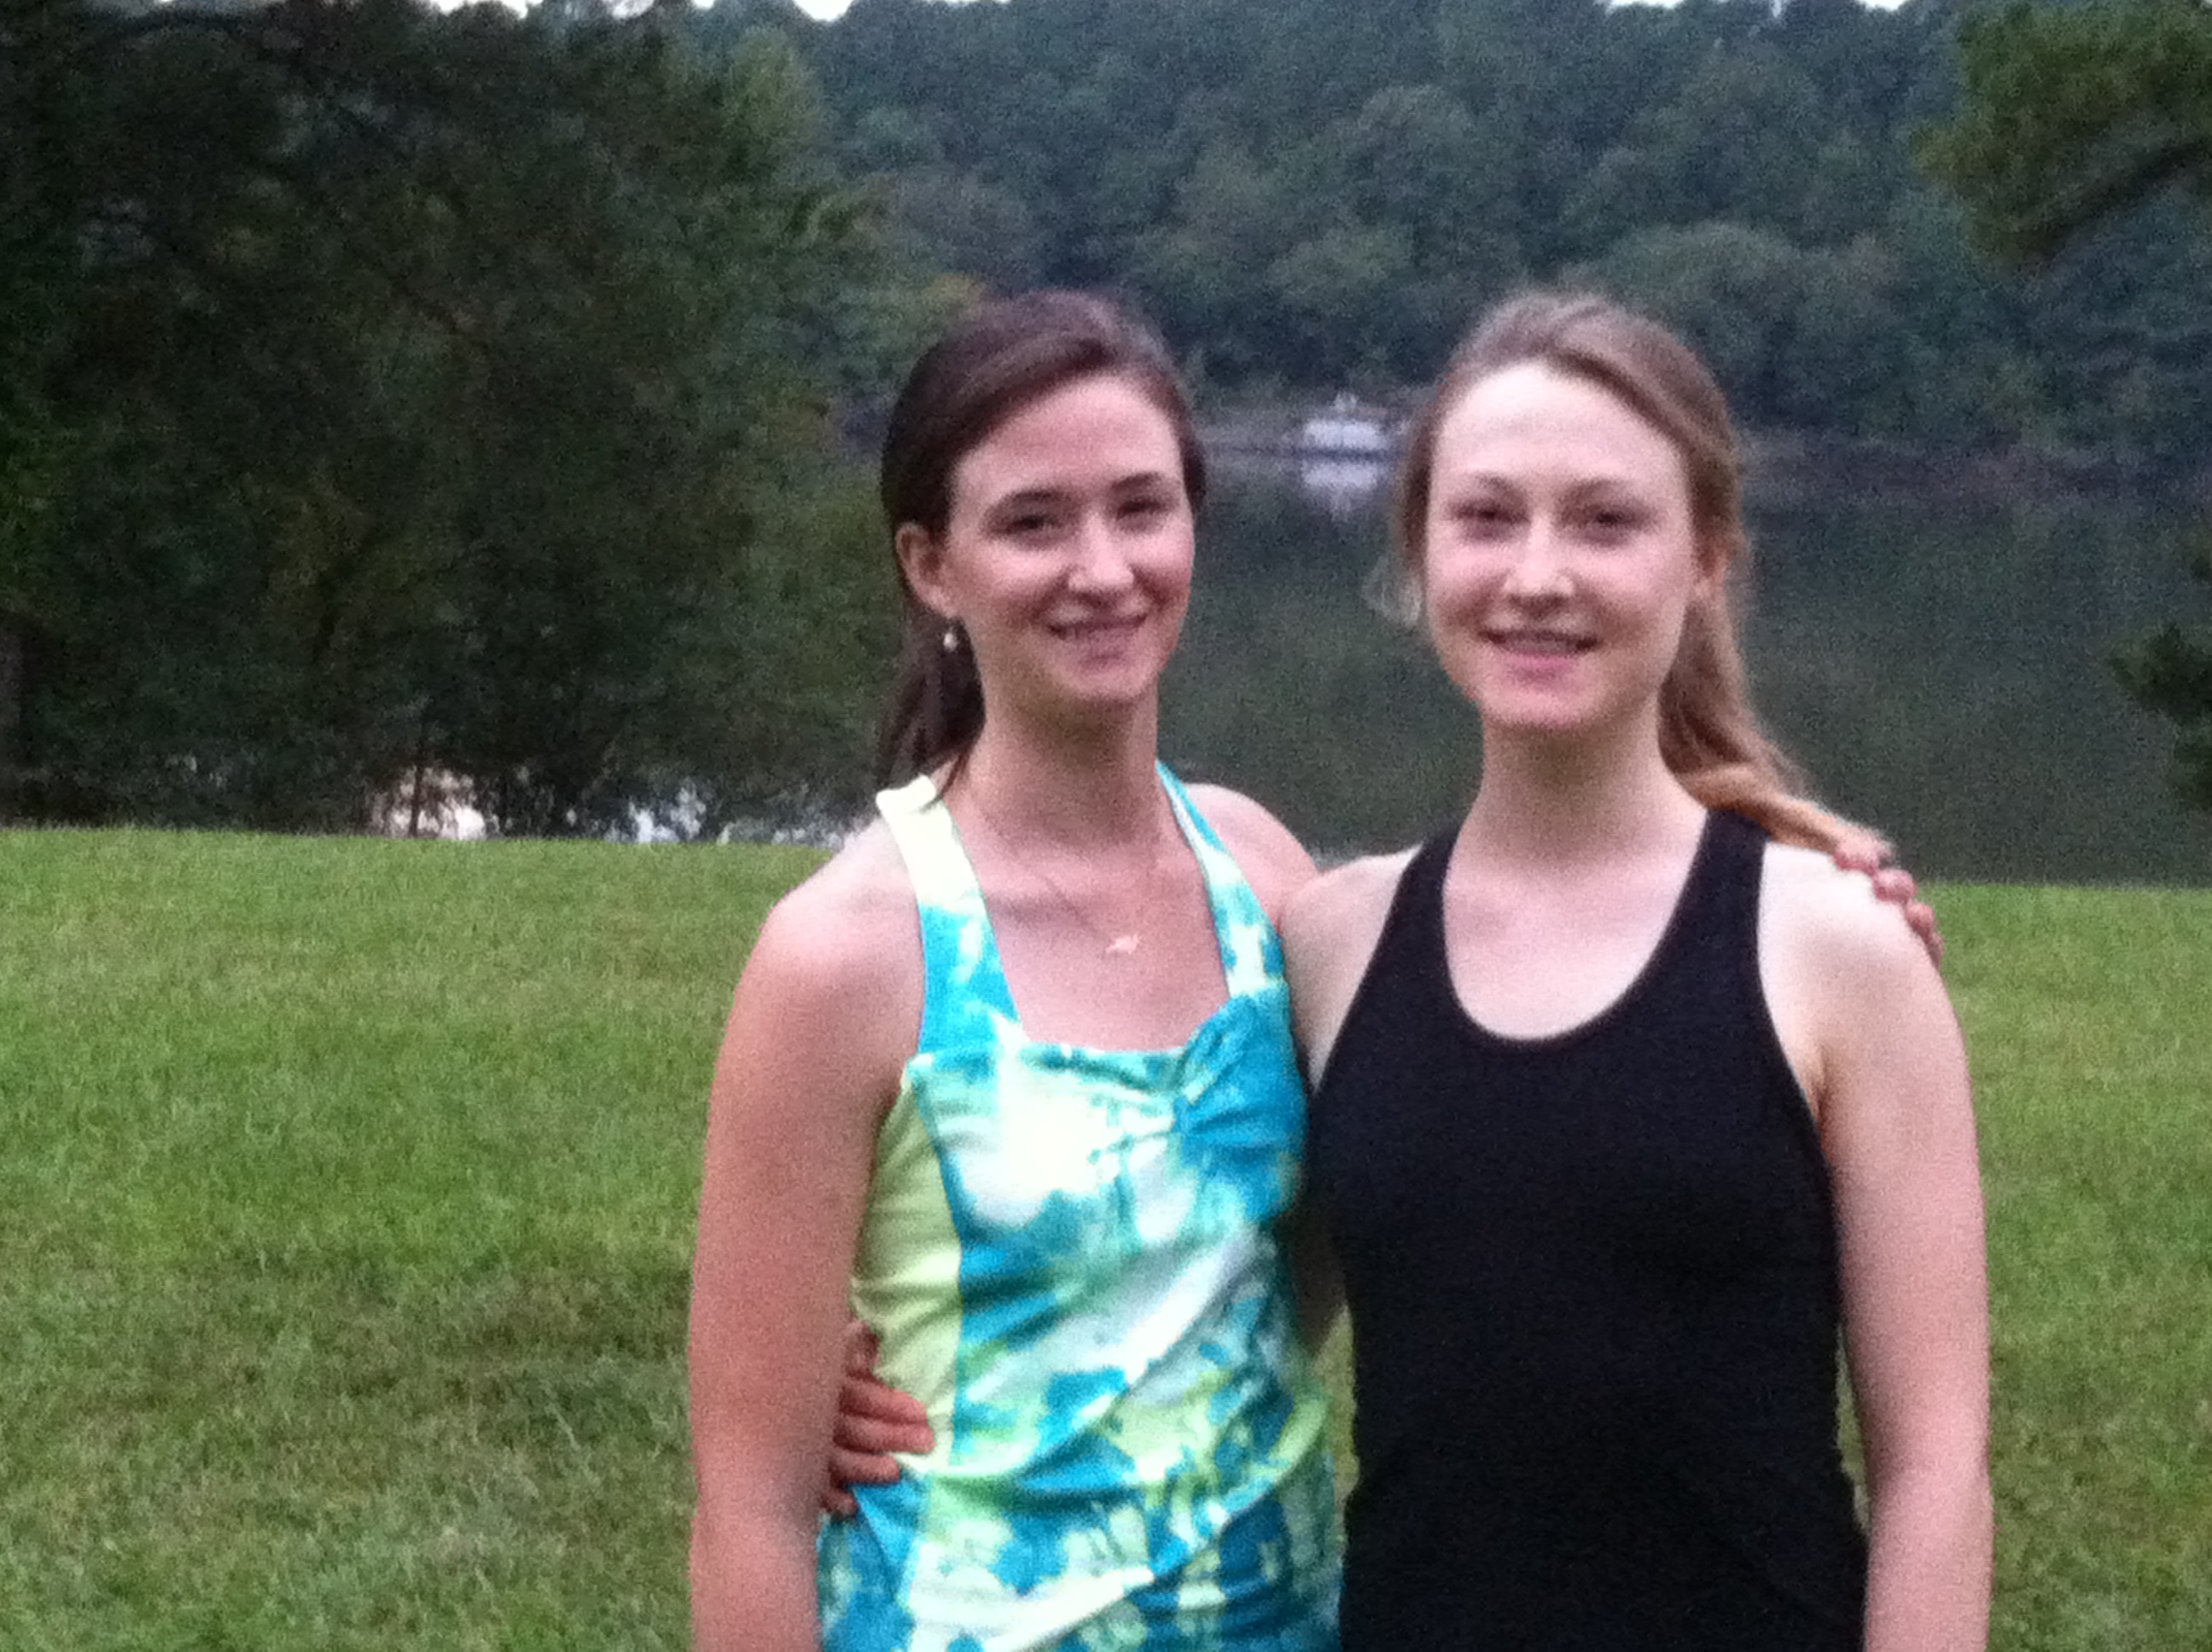
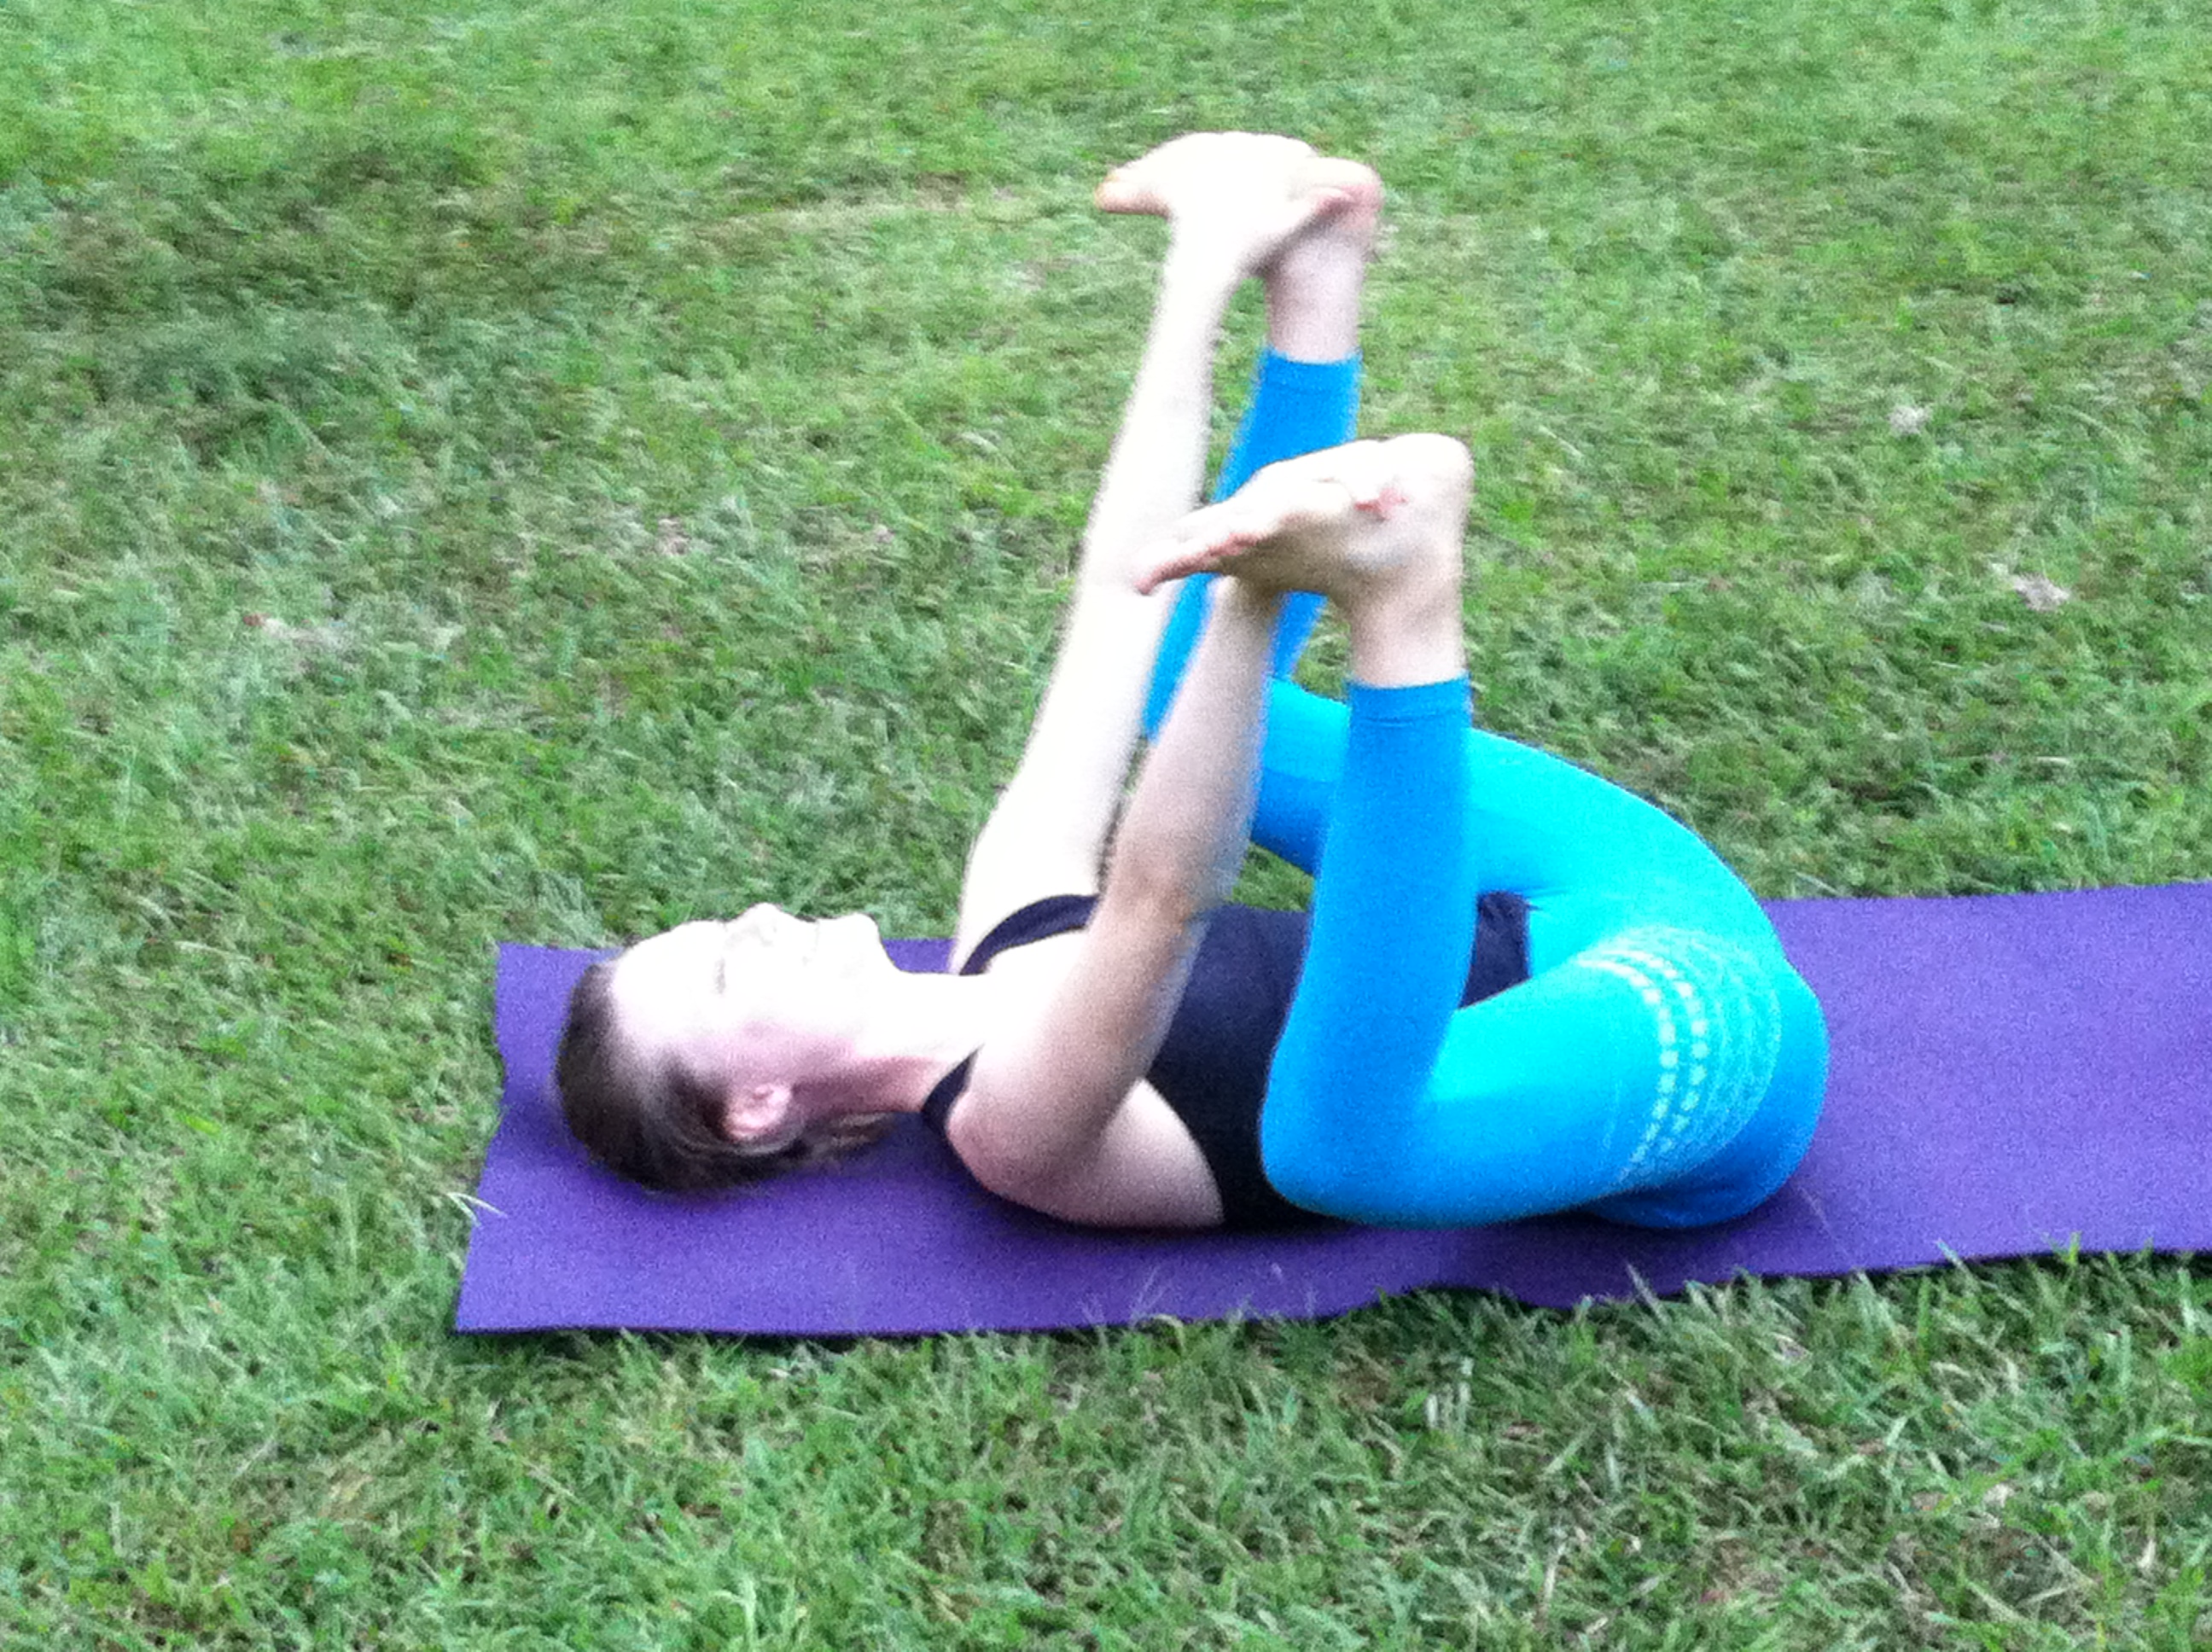
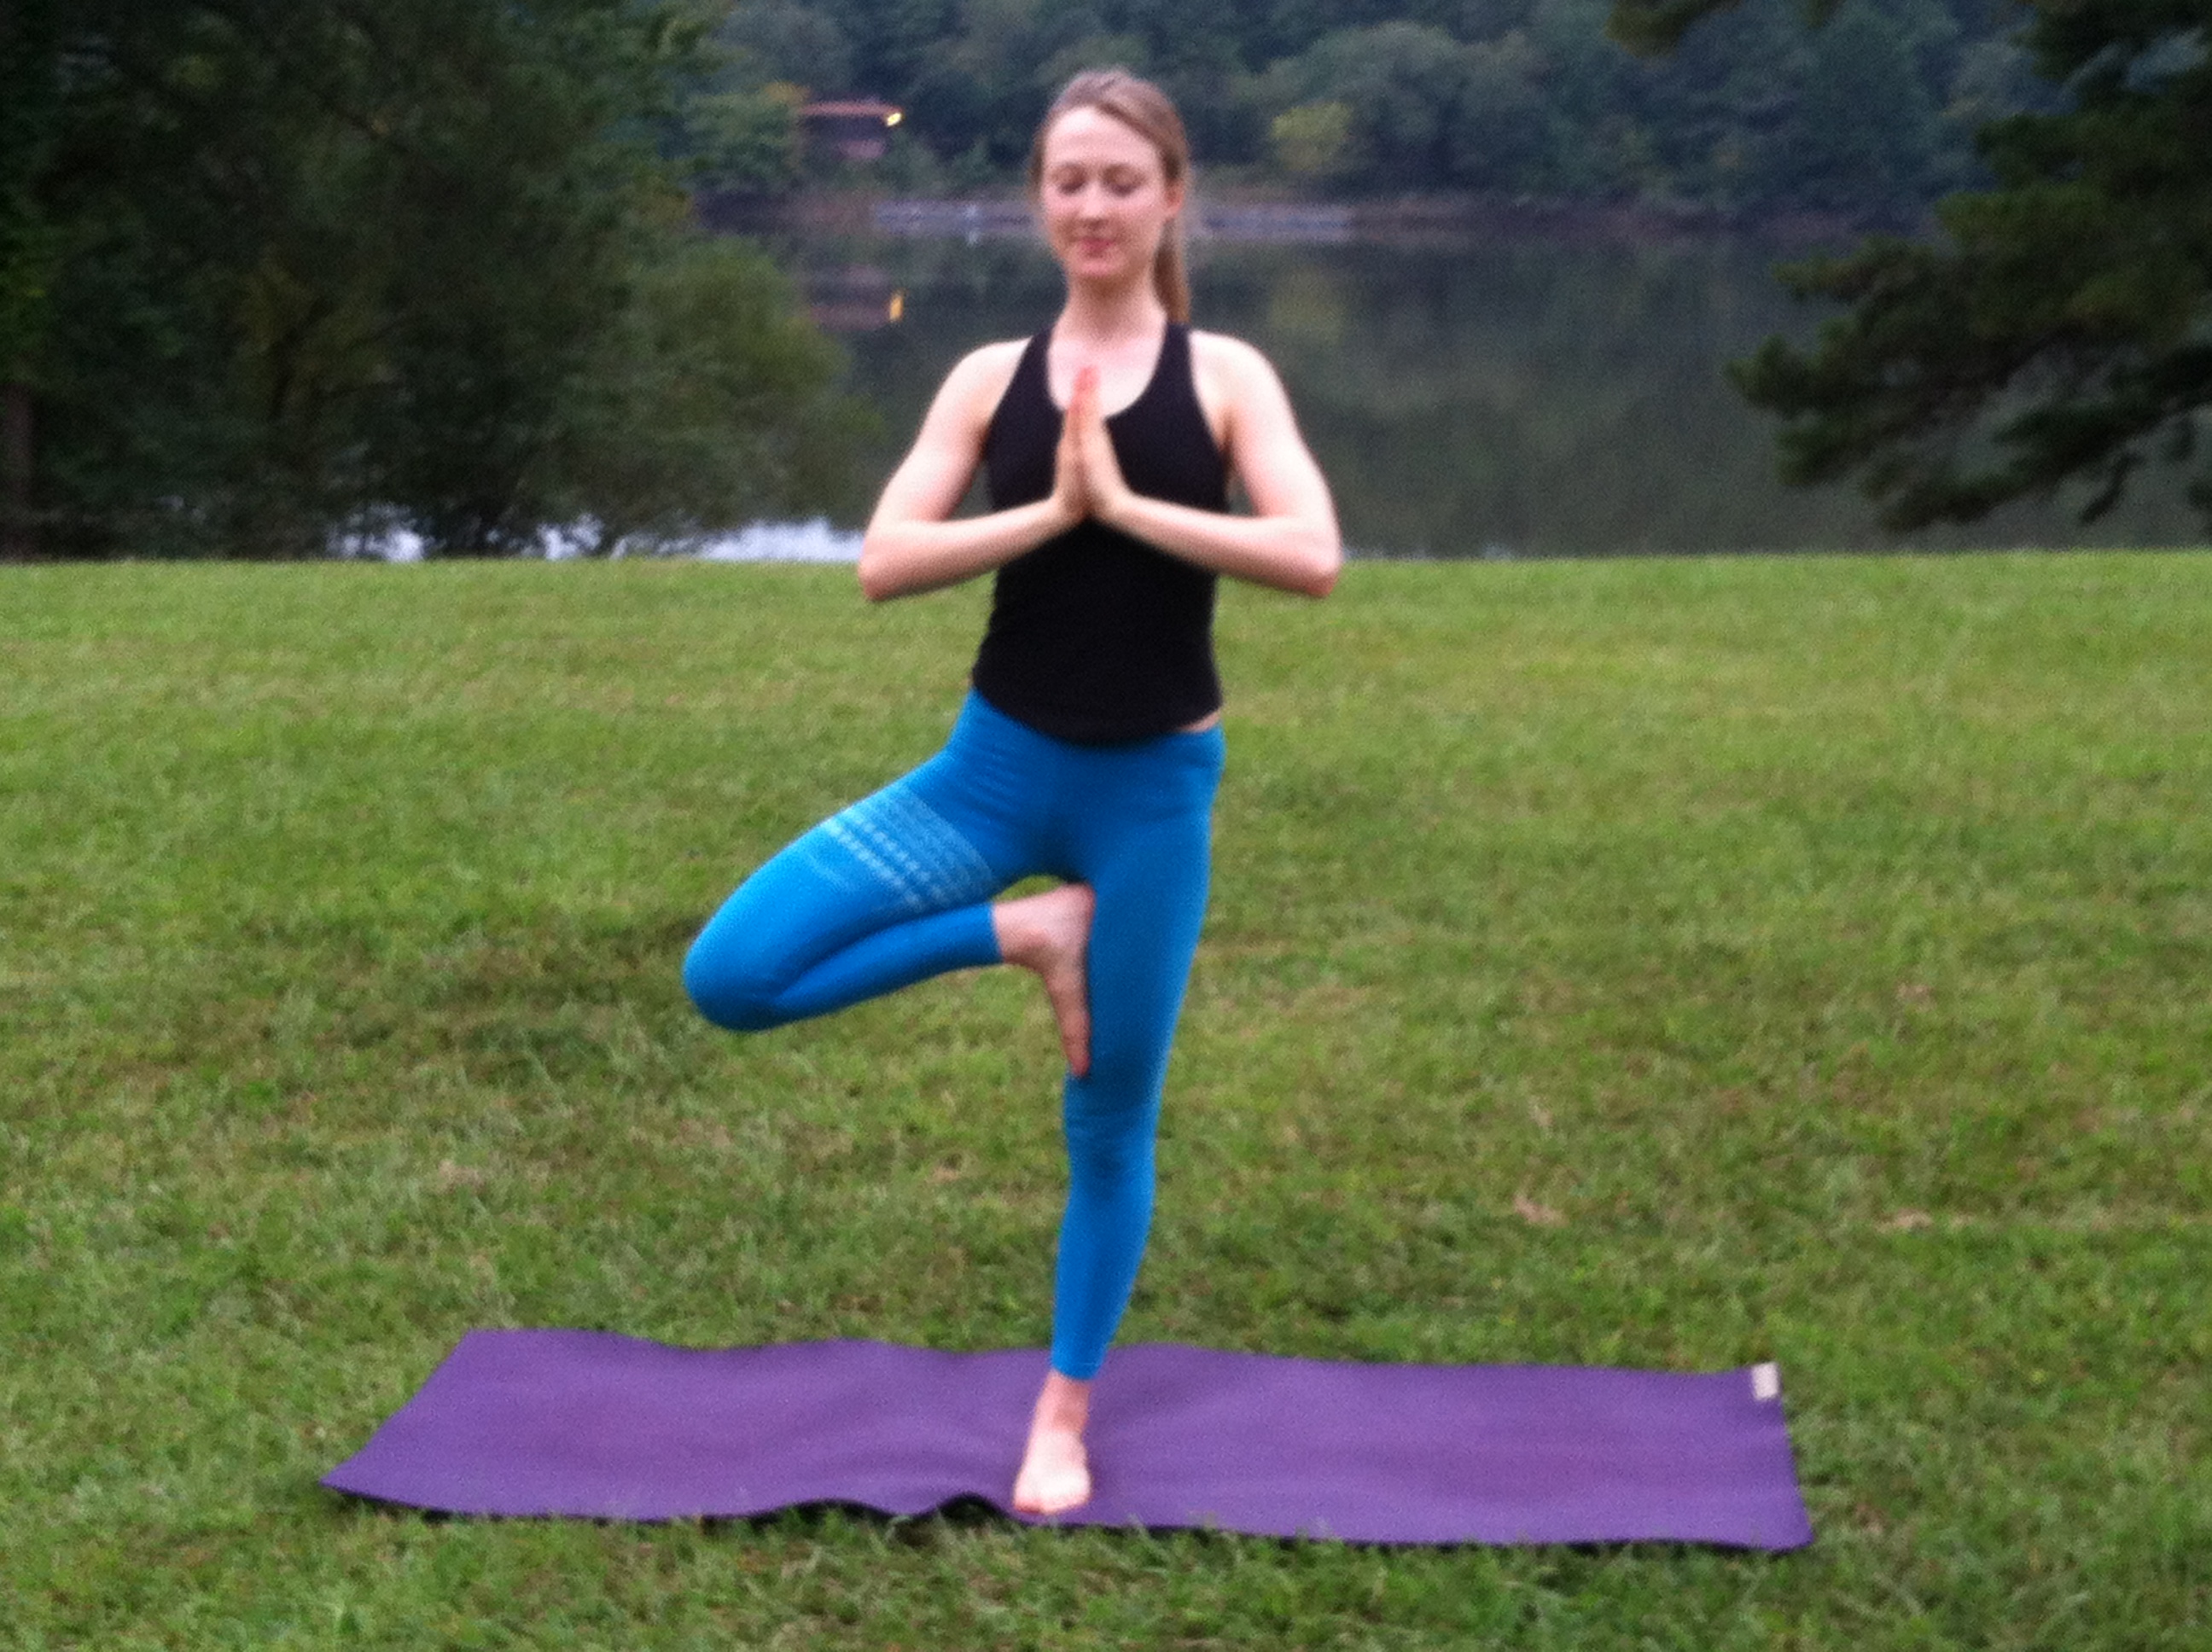
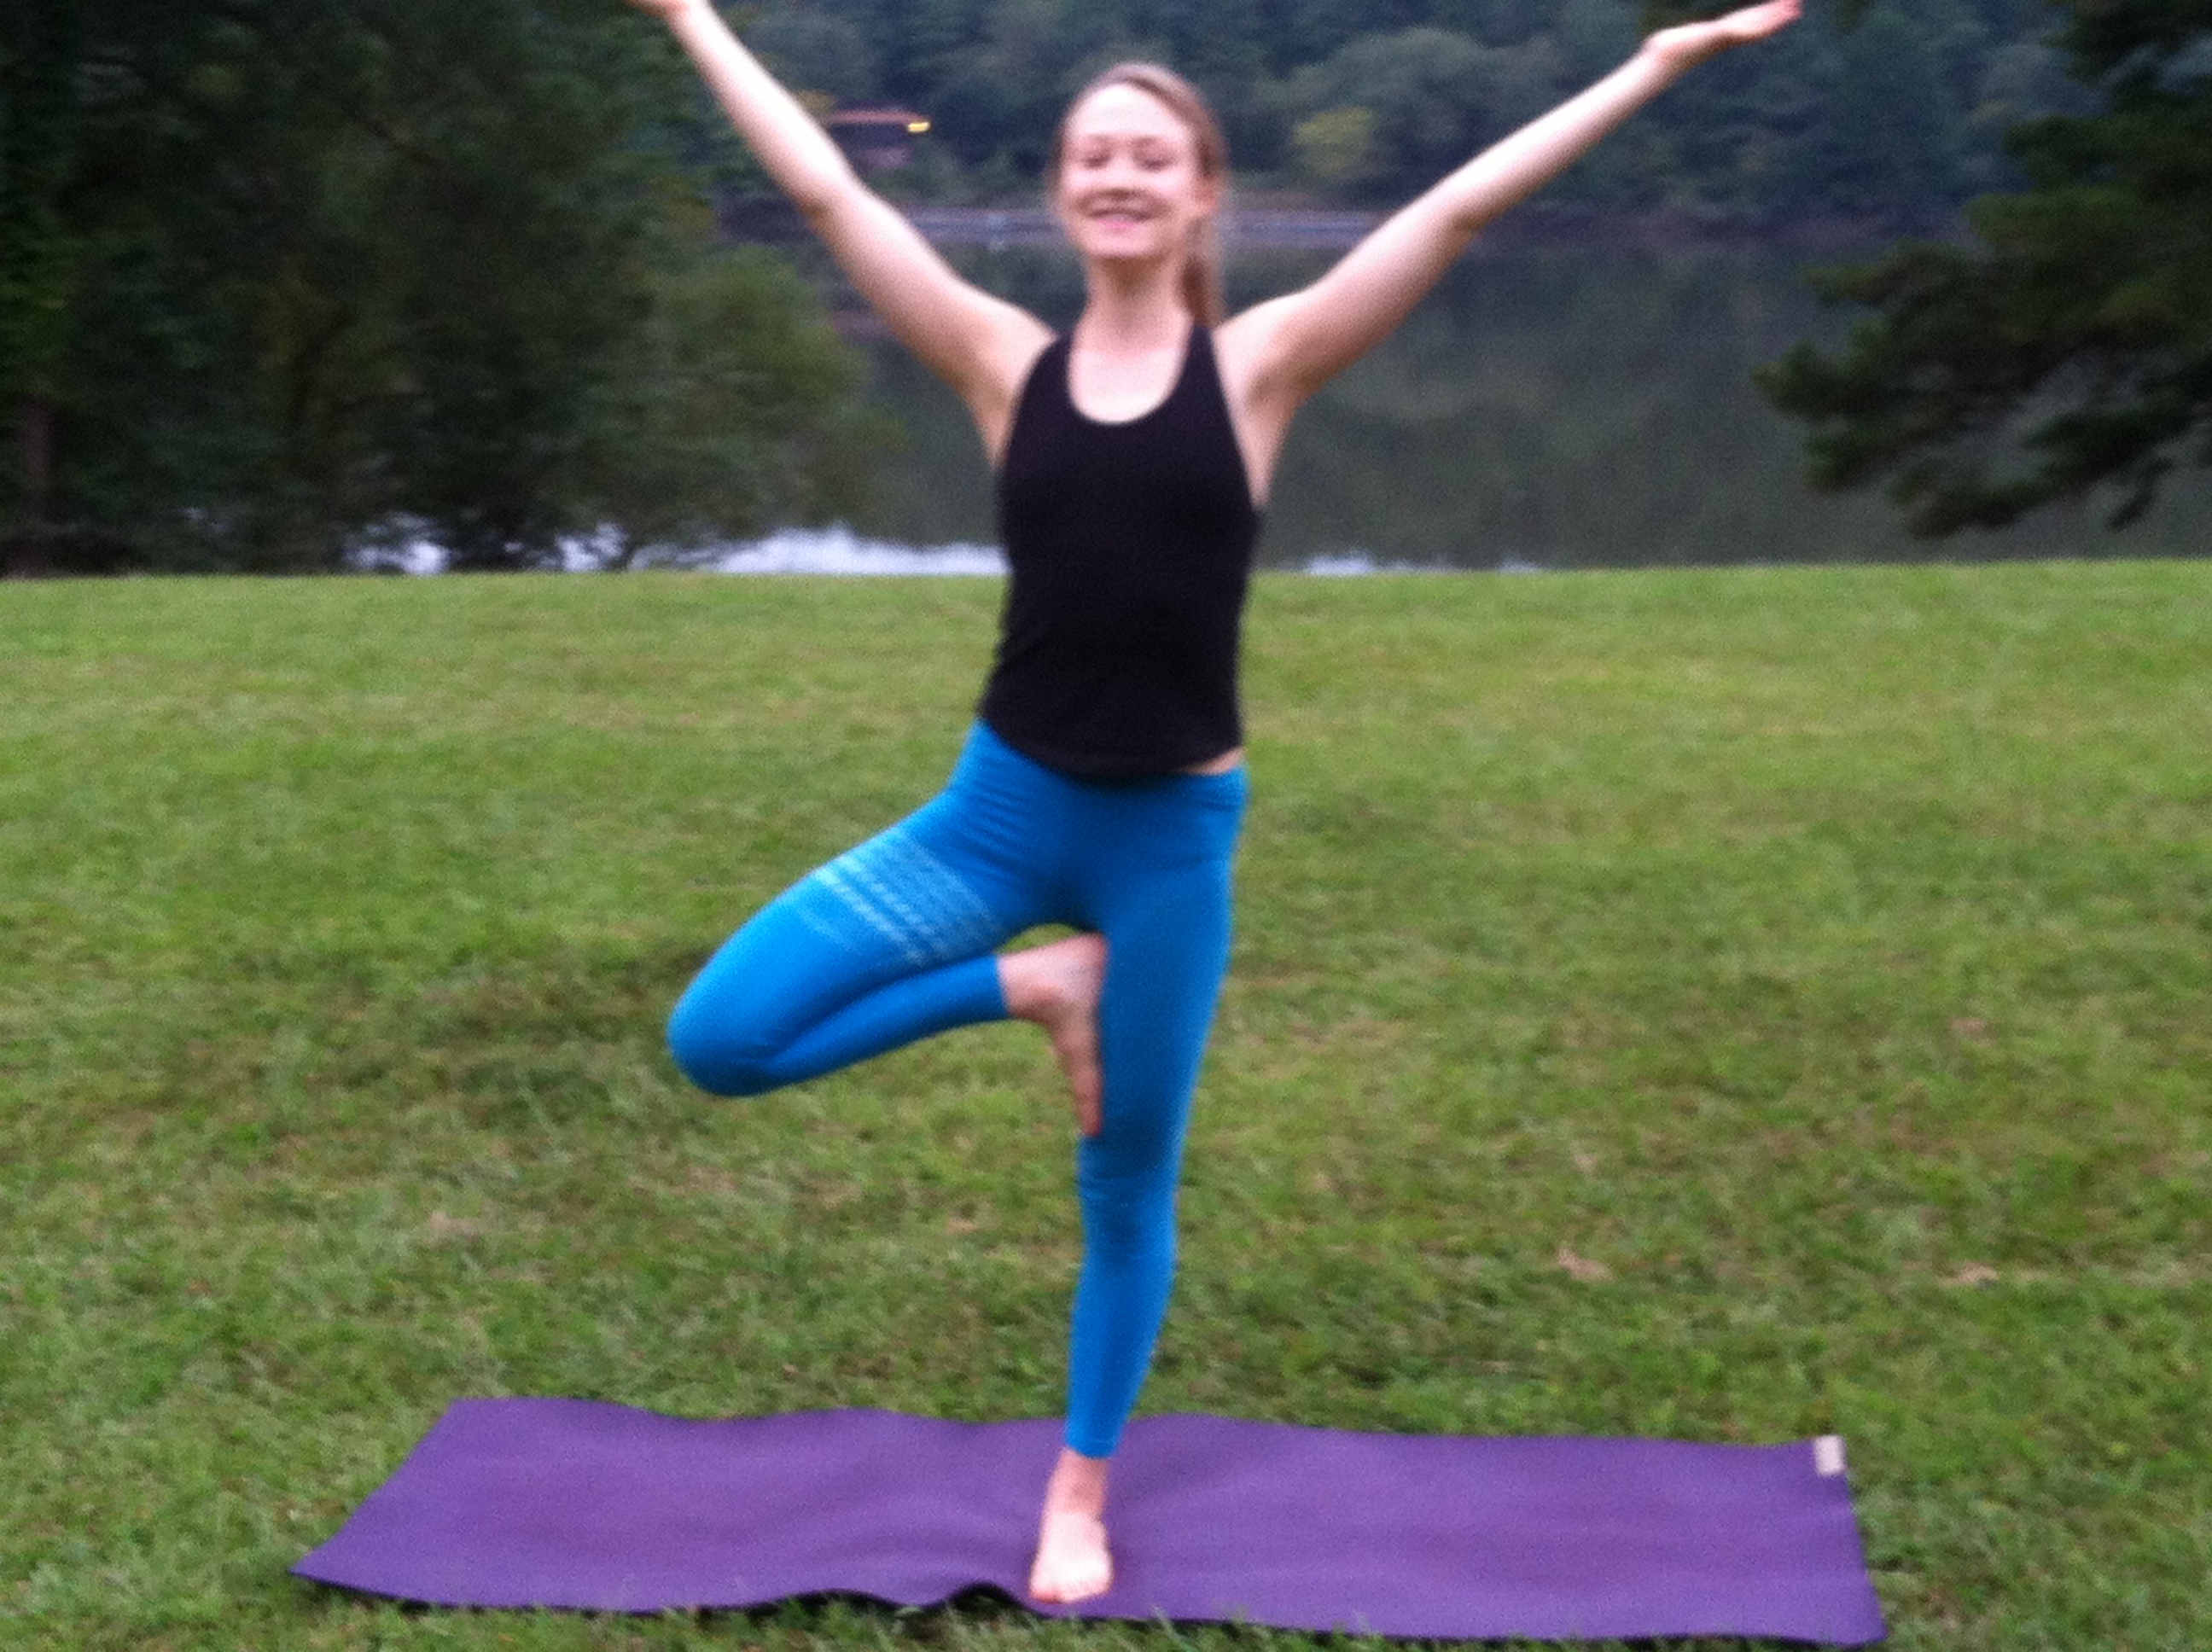
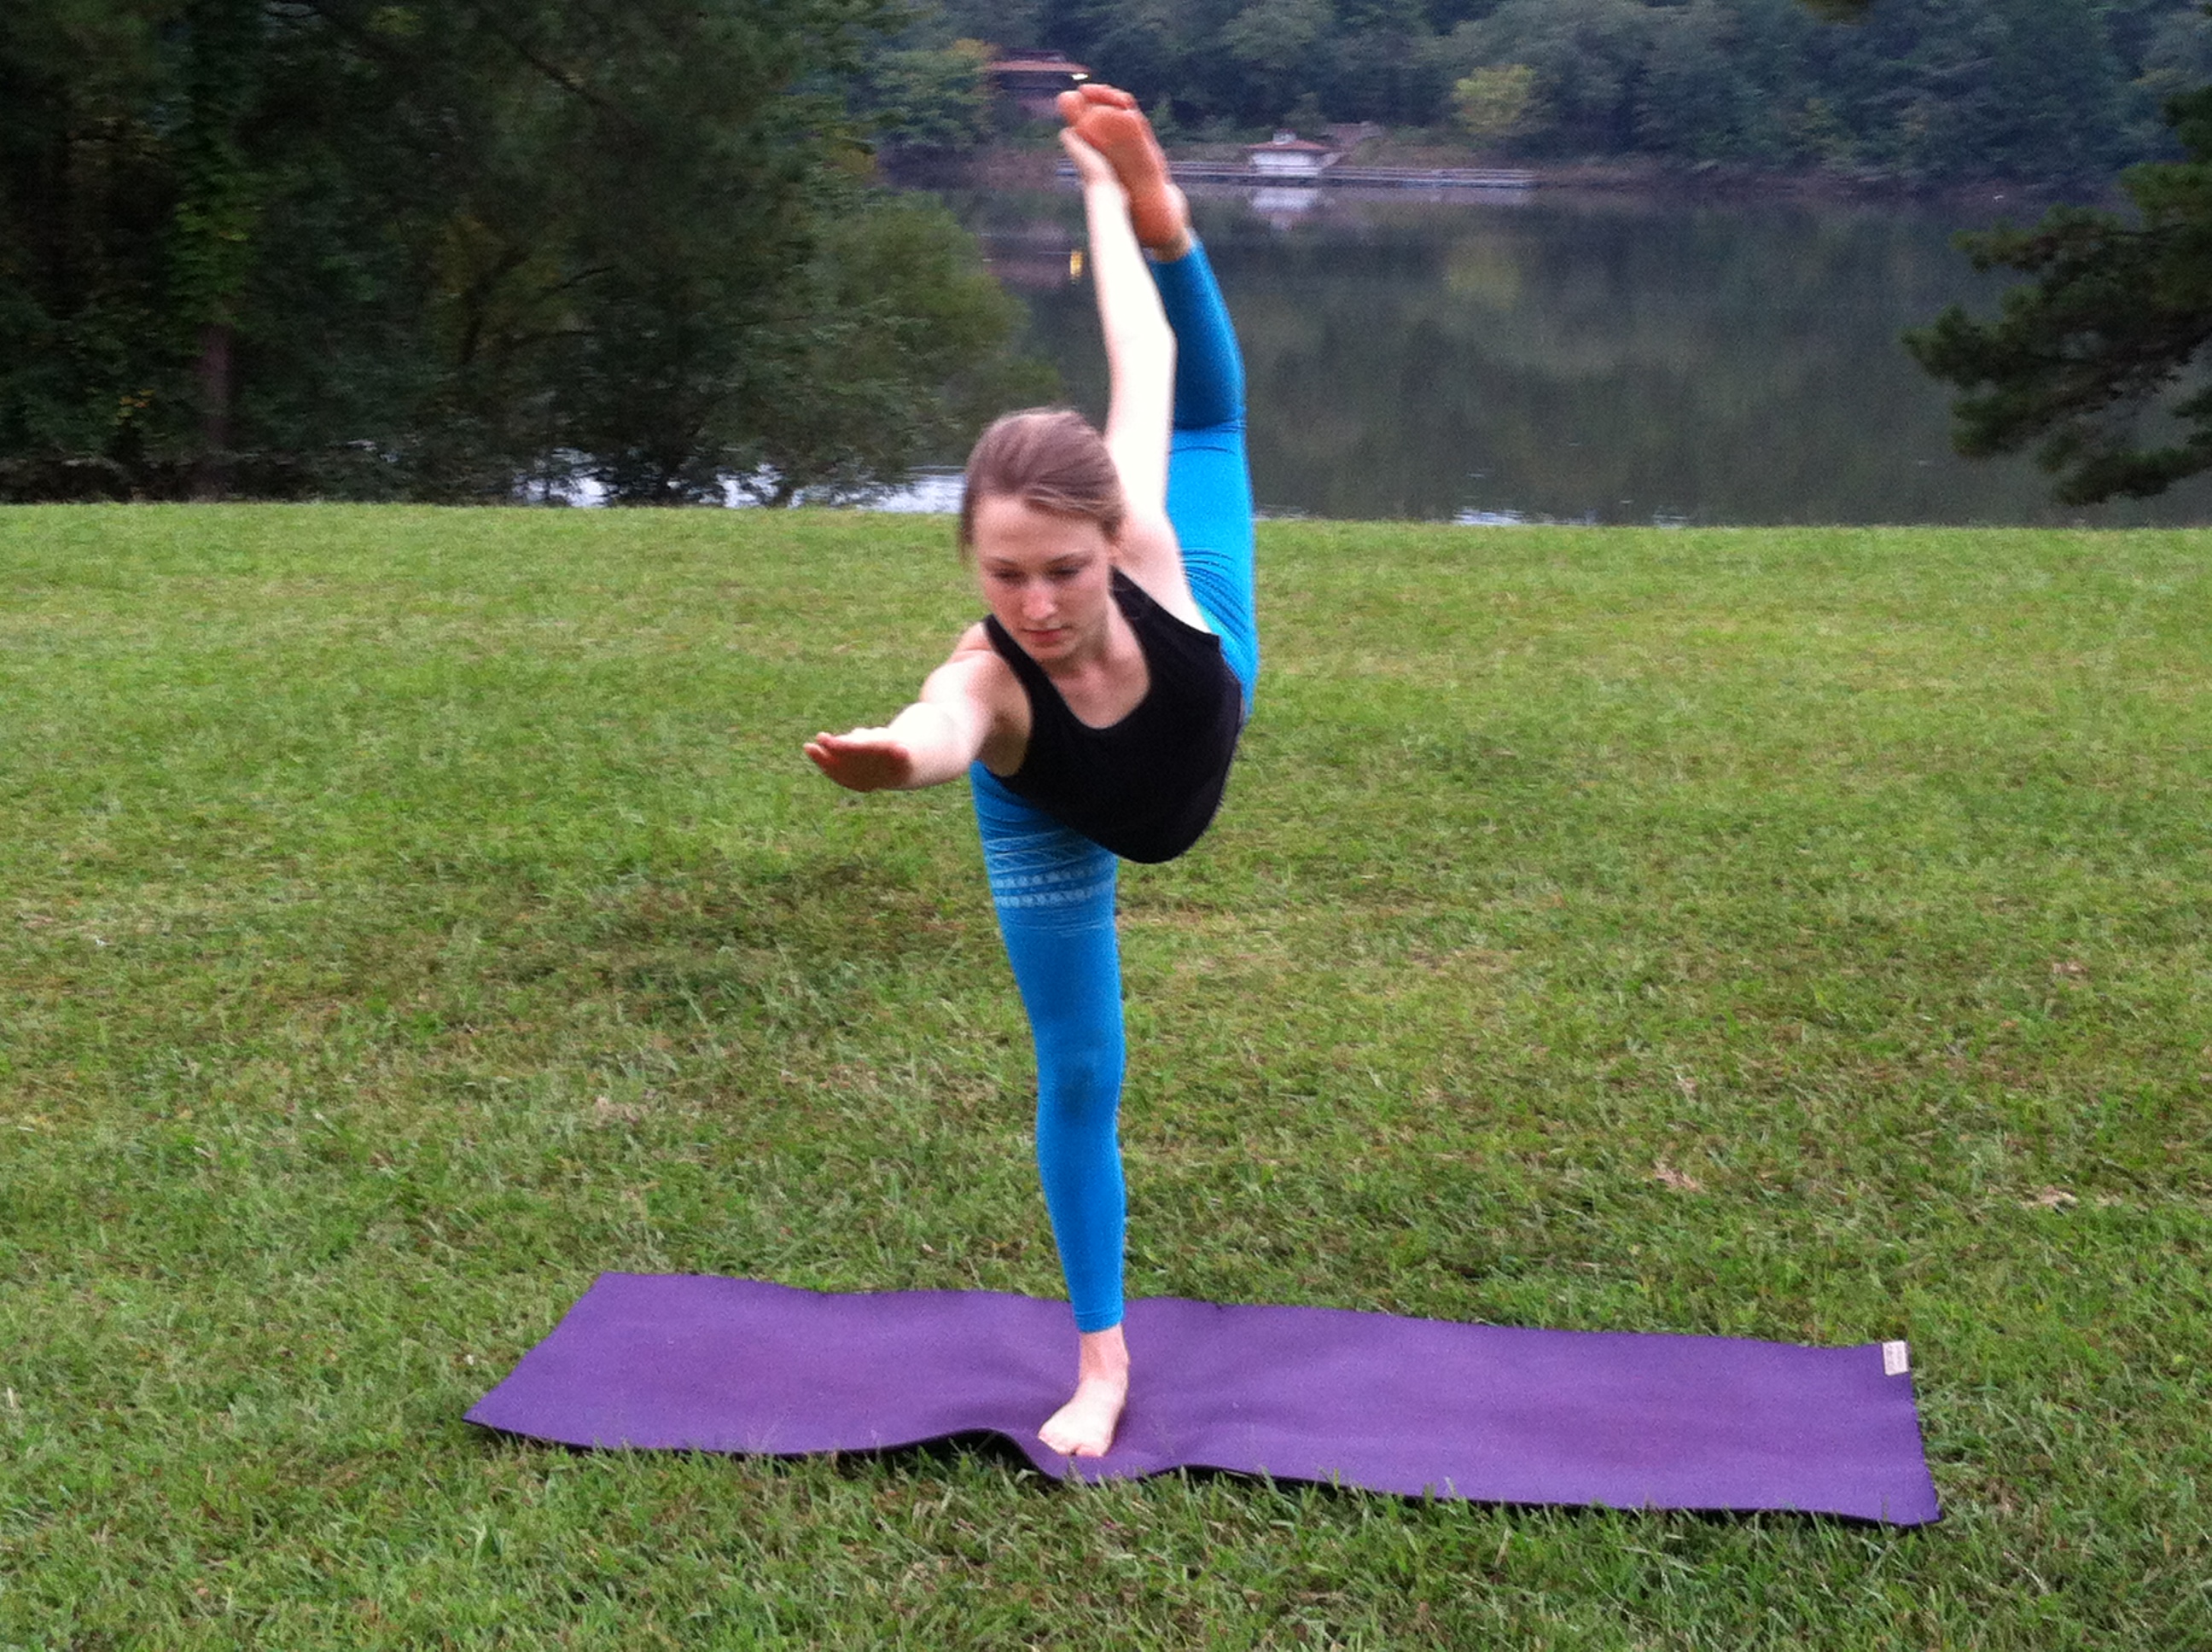
Elise Dorsett (left), with her sister Rush.
Dorsett continued to practice yoga off and on throughout college. Then, a year and a half ago, during a two-year backpacking trip in Peru, she started practicing every day. She studied Ashtanga Yoga – a method that “involves synchronizing the breath with a progressive series of postures” (www.ashtanga.com). Dorsett says that she “practiced yoga poses – asanas – twice a day for an hour and a half, studied yoga philosophy and the history. That was two months intensive, and it really spurred my passion for yoga. Before, I considered yoga just a form of stretching. But after that training, I discovered that it’s a much deeper practice. What you invest into it, you get out of it. It can be just stretching, but it can also be something more holistic. You can shape it to your life, and for your purposes.”
Dorsett’s time in Peru inspired her to become a yoga instructor herself. She started teaching last year, at age 25, at various fitness clubs in the Raleigh area. Her clients have ranged from the elderly to muscle-bound muscle heads. She has also taught many runners – “people who train for marathons.” But when she describes the positives that distance runners gain from practicing yoga, it sounds like she could be talking about hurdlers:
“Distance runners’ muscles tend to be very tight, so they need that lengthening. They also benefit from the intense focus on the breath that is kind of mimicked in running. Yoga helps you develop an ability to control your breath, which is really powerful for sports, especially running. It’s also a practice where you can get inside your rhythm, your own body, the movement, the breath.”
[am4show not_have=”g5;”]
[/am4show][am4guest]
[/am4guest][am4show have=”g5;”]
Because weightlifting is such an integral part of a hurdler’s training regimen, yoga can serve as a vital practice to keep those strengthened muscles flexible. According to Dorsett, “If you lift weights, yoga helps balance what lifting does. It helps open up the muscles. You develop a full range of motion with the body, so you’re less prone to injury. As an athlete, you have to find that balance between strength and flexibility.”
Dorsett emphasizes that flexibility is not just a function of the body, but of the mind as well. “Flexibility of the body helps fluidity,” she explained, “while flexibility of the mind helps you to be present, focused. Physically, yoga aligns all the muscles, bones, and joints so you have better posture, which gives you more control over your movements. Mentally, it helps you listen to your own body, be aware of your own body, be more aware when you’re competing.”
To elaborate on the latter point, Dorsett says that “if you combine yoga with meditation, you can really develop the ability to focus the mind and focus the breath just prior to competition. A regular practice of yoga will help your ability to clear your mind and develop a trust in what you can do at that ‘choke’ moment. There are lots of breathing techniques that could help with that.”
Getting back to the physical side of things, Dorsett makes a convincing argument that yoga can be a key component to injury prevention and to the fluidity of motion that can take a hurdler to new heights.
“Over the long-term, you’re gonna improve your balance, joint health and alignment, you’ll nourish the vertebral disc (spine), and fluid circulation (blood, etc.) improves. Balancing poses help anchor your bones and make your bones denser. For hurdlers, focusing on the lower body, opening up the hips, opening up the hamstrings and the quads releases a lot of tension in the lumbar spine (lower back). There are also poses that focus on the feet and the calves. Twisting poses will open up the spine and upper torso. In hurdling you use every single part of your body.”
Dorsett believes that one of the most powerful benefits for a hurdler doing yoga is that it increases the fluidity through the joints. Since hurdlers spend a lot of time pounding their feet into the track and putting their body into gymnast-like positions, fluidity in the joints is vital. “It’s like a bike,” she said. “When you grease up the bike, it takes less energy to go, and it goes faster. If your joints are lubed up and the fluids are flowing through them freely, you’re gonna be a well-oiled machine, moving more efficiently through a wider range of motion.”
Another beautiful thing about yoga is that, while it can help you to compete better, it’s not about competition. When asked what she says to people who don’t think they’re flexible enough to try yoga, Dorsett handed me a card that read, “To say you’re not flexible enough for yoga is like saying you’re too dirty to take a bath.” She went on to say that yoga “is not about trying to achieve a pose. It’s about listening to what’s going on in your body. The poses are designed to help open you up in a fluid way. You don’t have to be a yogi to do yoga. You make the yoga yours.”
Ultimately, as I’ve stated in one form or another many times on this website, if you love what you do, you’ll do it better. So, ironically, you compete best when you’re not being overtly competitive, but engaging in the activity with a complete awareness of the joy you have for it. In yoga, this concept is referred to “ahimsa,” which means nonviolence in Sanskrit. But according to Dorsett, “it also translates into respect for your body and releasing inhibitions, releasing tension, and trying to embody a more natural way of movement that doesn’t put any stress or strain on the physical body. As athletes, you’re always competing, trying to beat somebody. Yoga can serve as a really good balance to that. You want to compete, but you also want to do the thing you love – in this case hurdling – for the thing itself, not just push so hard to accomplish a goal. Yoga is like hurdling because it’s is all about coming back to your true center, doing what feels right for you in each moment, in each motion.”
For anyone who wants to get started practicing yoga, Dorsett advises against hopping onto a mat and striking difficult poses. Just like with any workout on the track, it’s important to prepare the body for the activity. In the case of yoga, some light stretching to loosen tight muscles will do the trick. Then, in regard to the yoga routine itself, it’s important to have a “proper sequence that is balancing. Don’t focus too much on one body region.”
Dorsett also notes that a regular, consistent yoga practice is necessary to reap significant gains. “It’s not something you do once and suddenly see improvements. It’s a practice you have to be dedicated to in order to really gain the benefits of it.”
So how often, and for how long, should a hurdler practice yoga? “I think three times a week. Maybe four shorter sessions. I think there’s a lot of power in shorter sessions (20-30 minutes) because doing it that often keeps you engaged with it, and gives you more chance to experiment with different routines to figure out what works best for you. Plus, fluidity and flexibility will come faster that way.”
The best times of day to practice yoga would be after a workout or before going to bed. Also, certain breathing techniques and sitting poses can help calm the mind prior to competition.
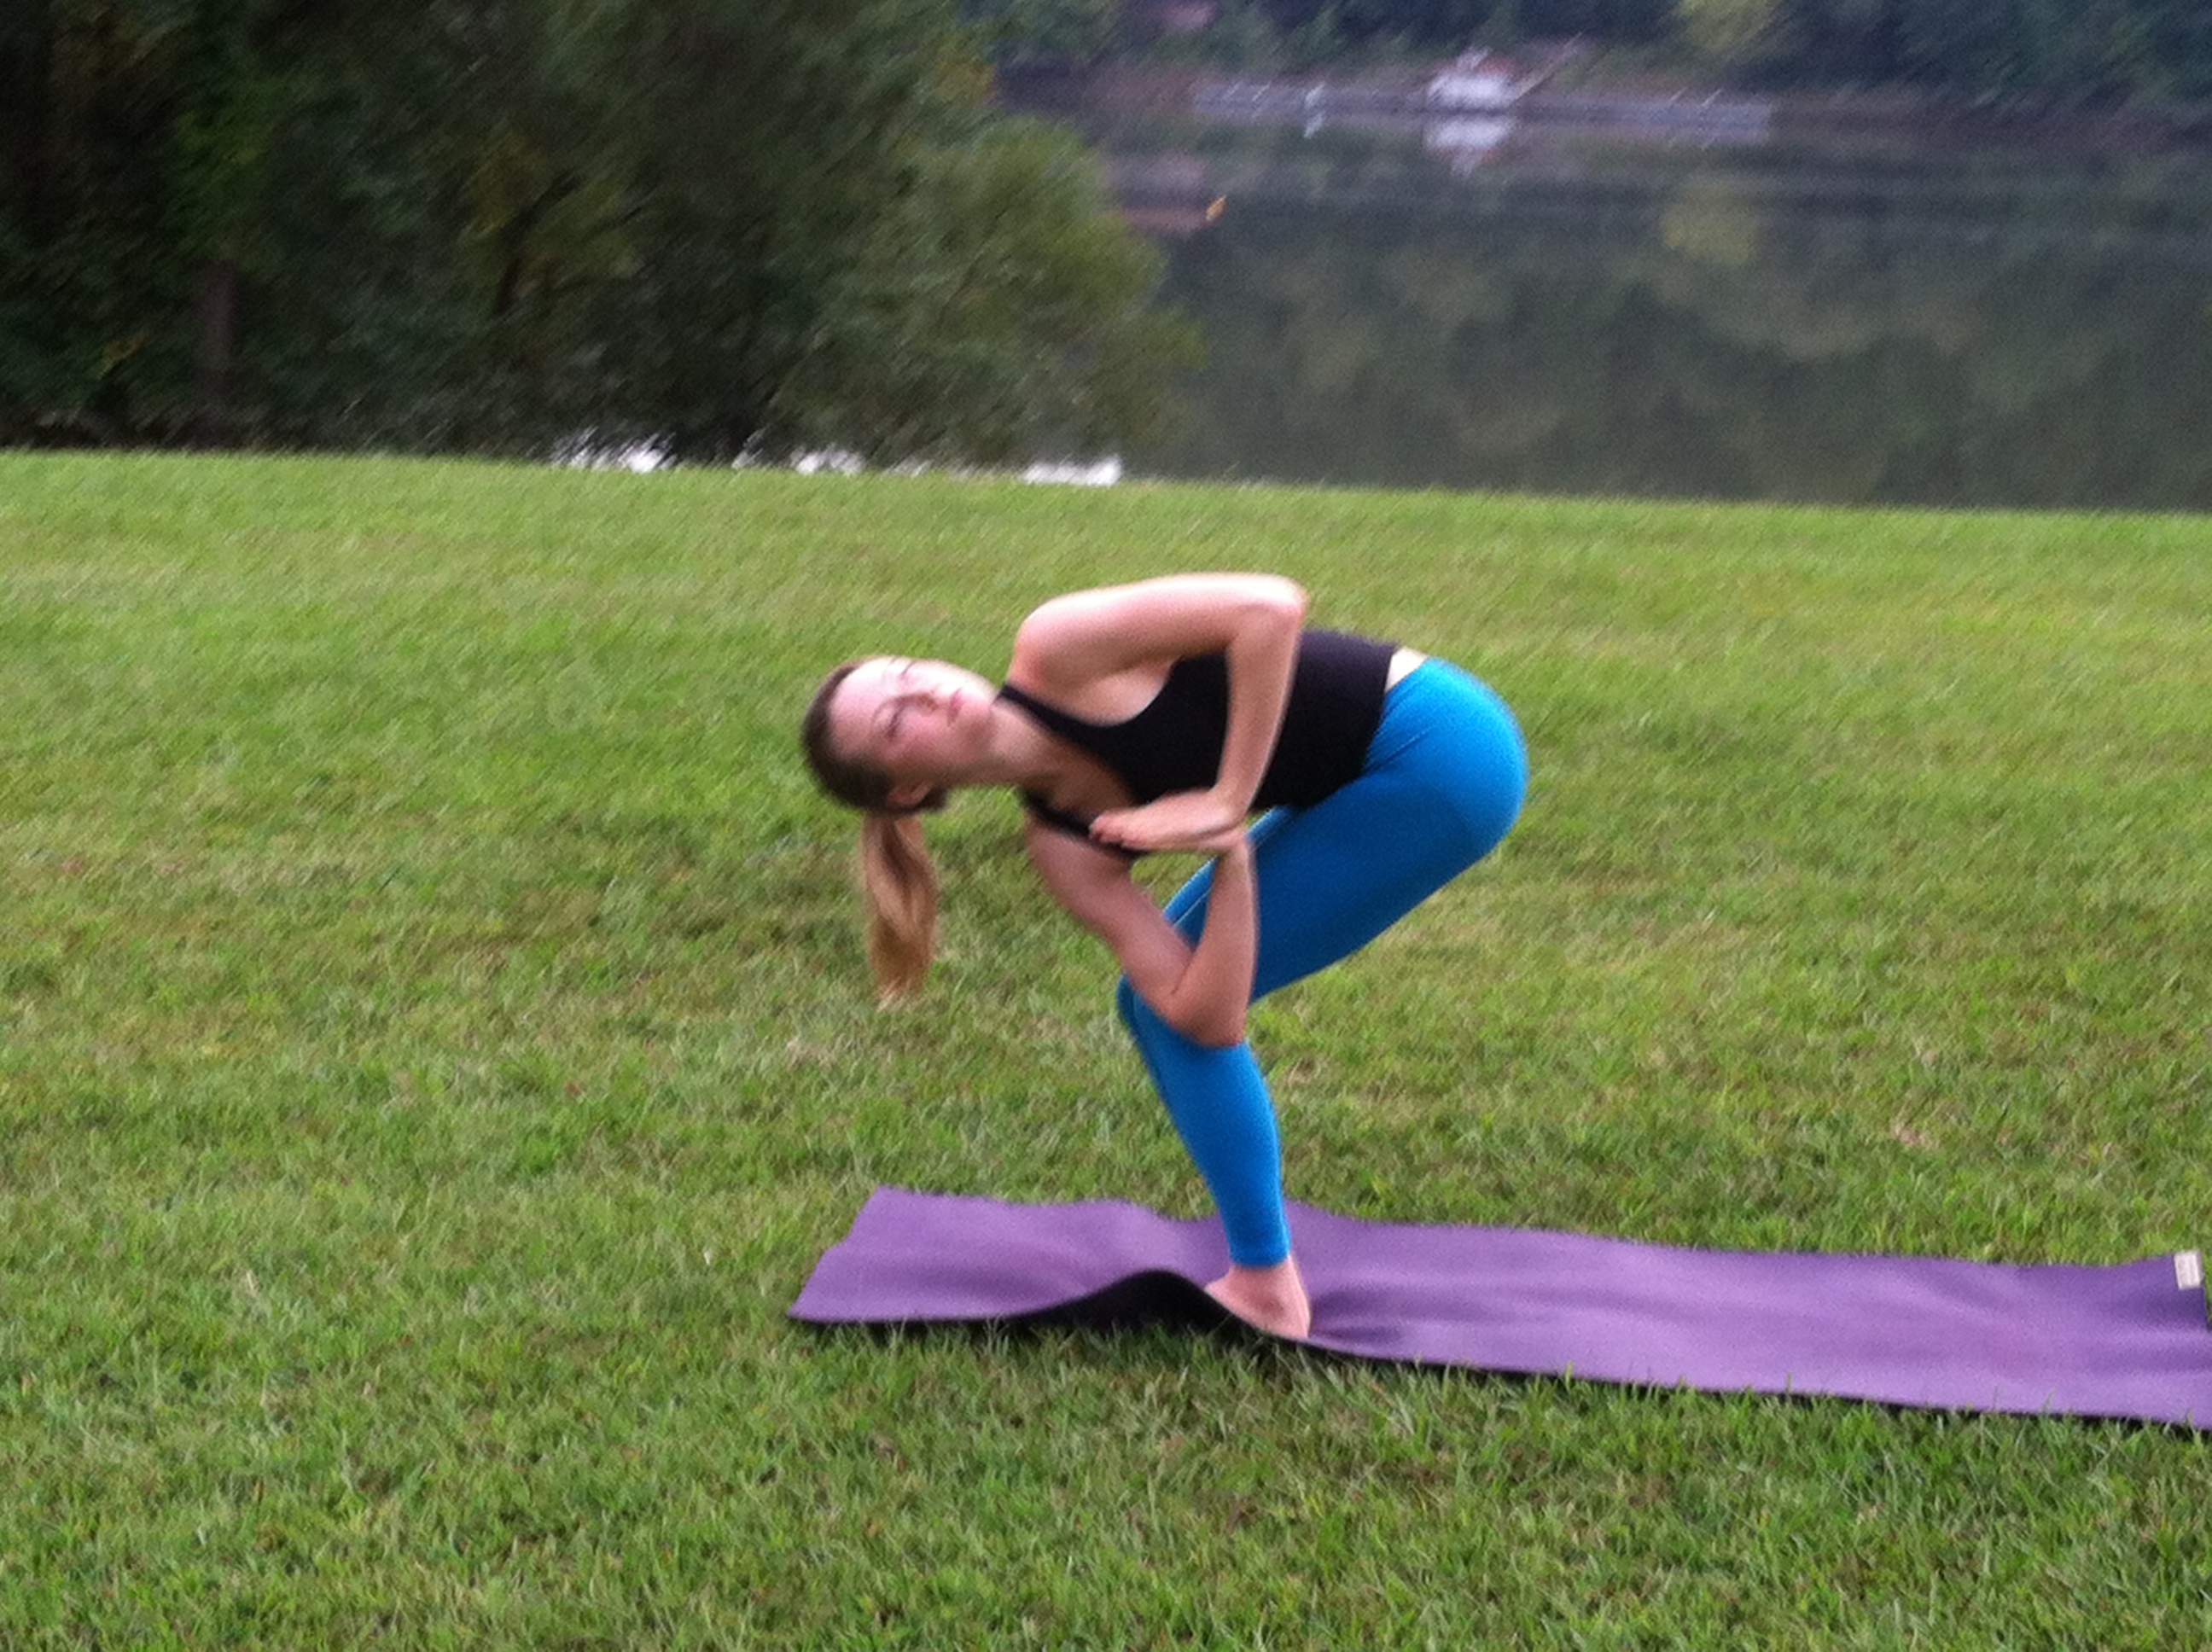
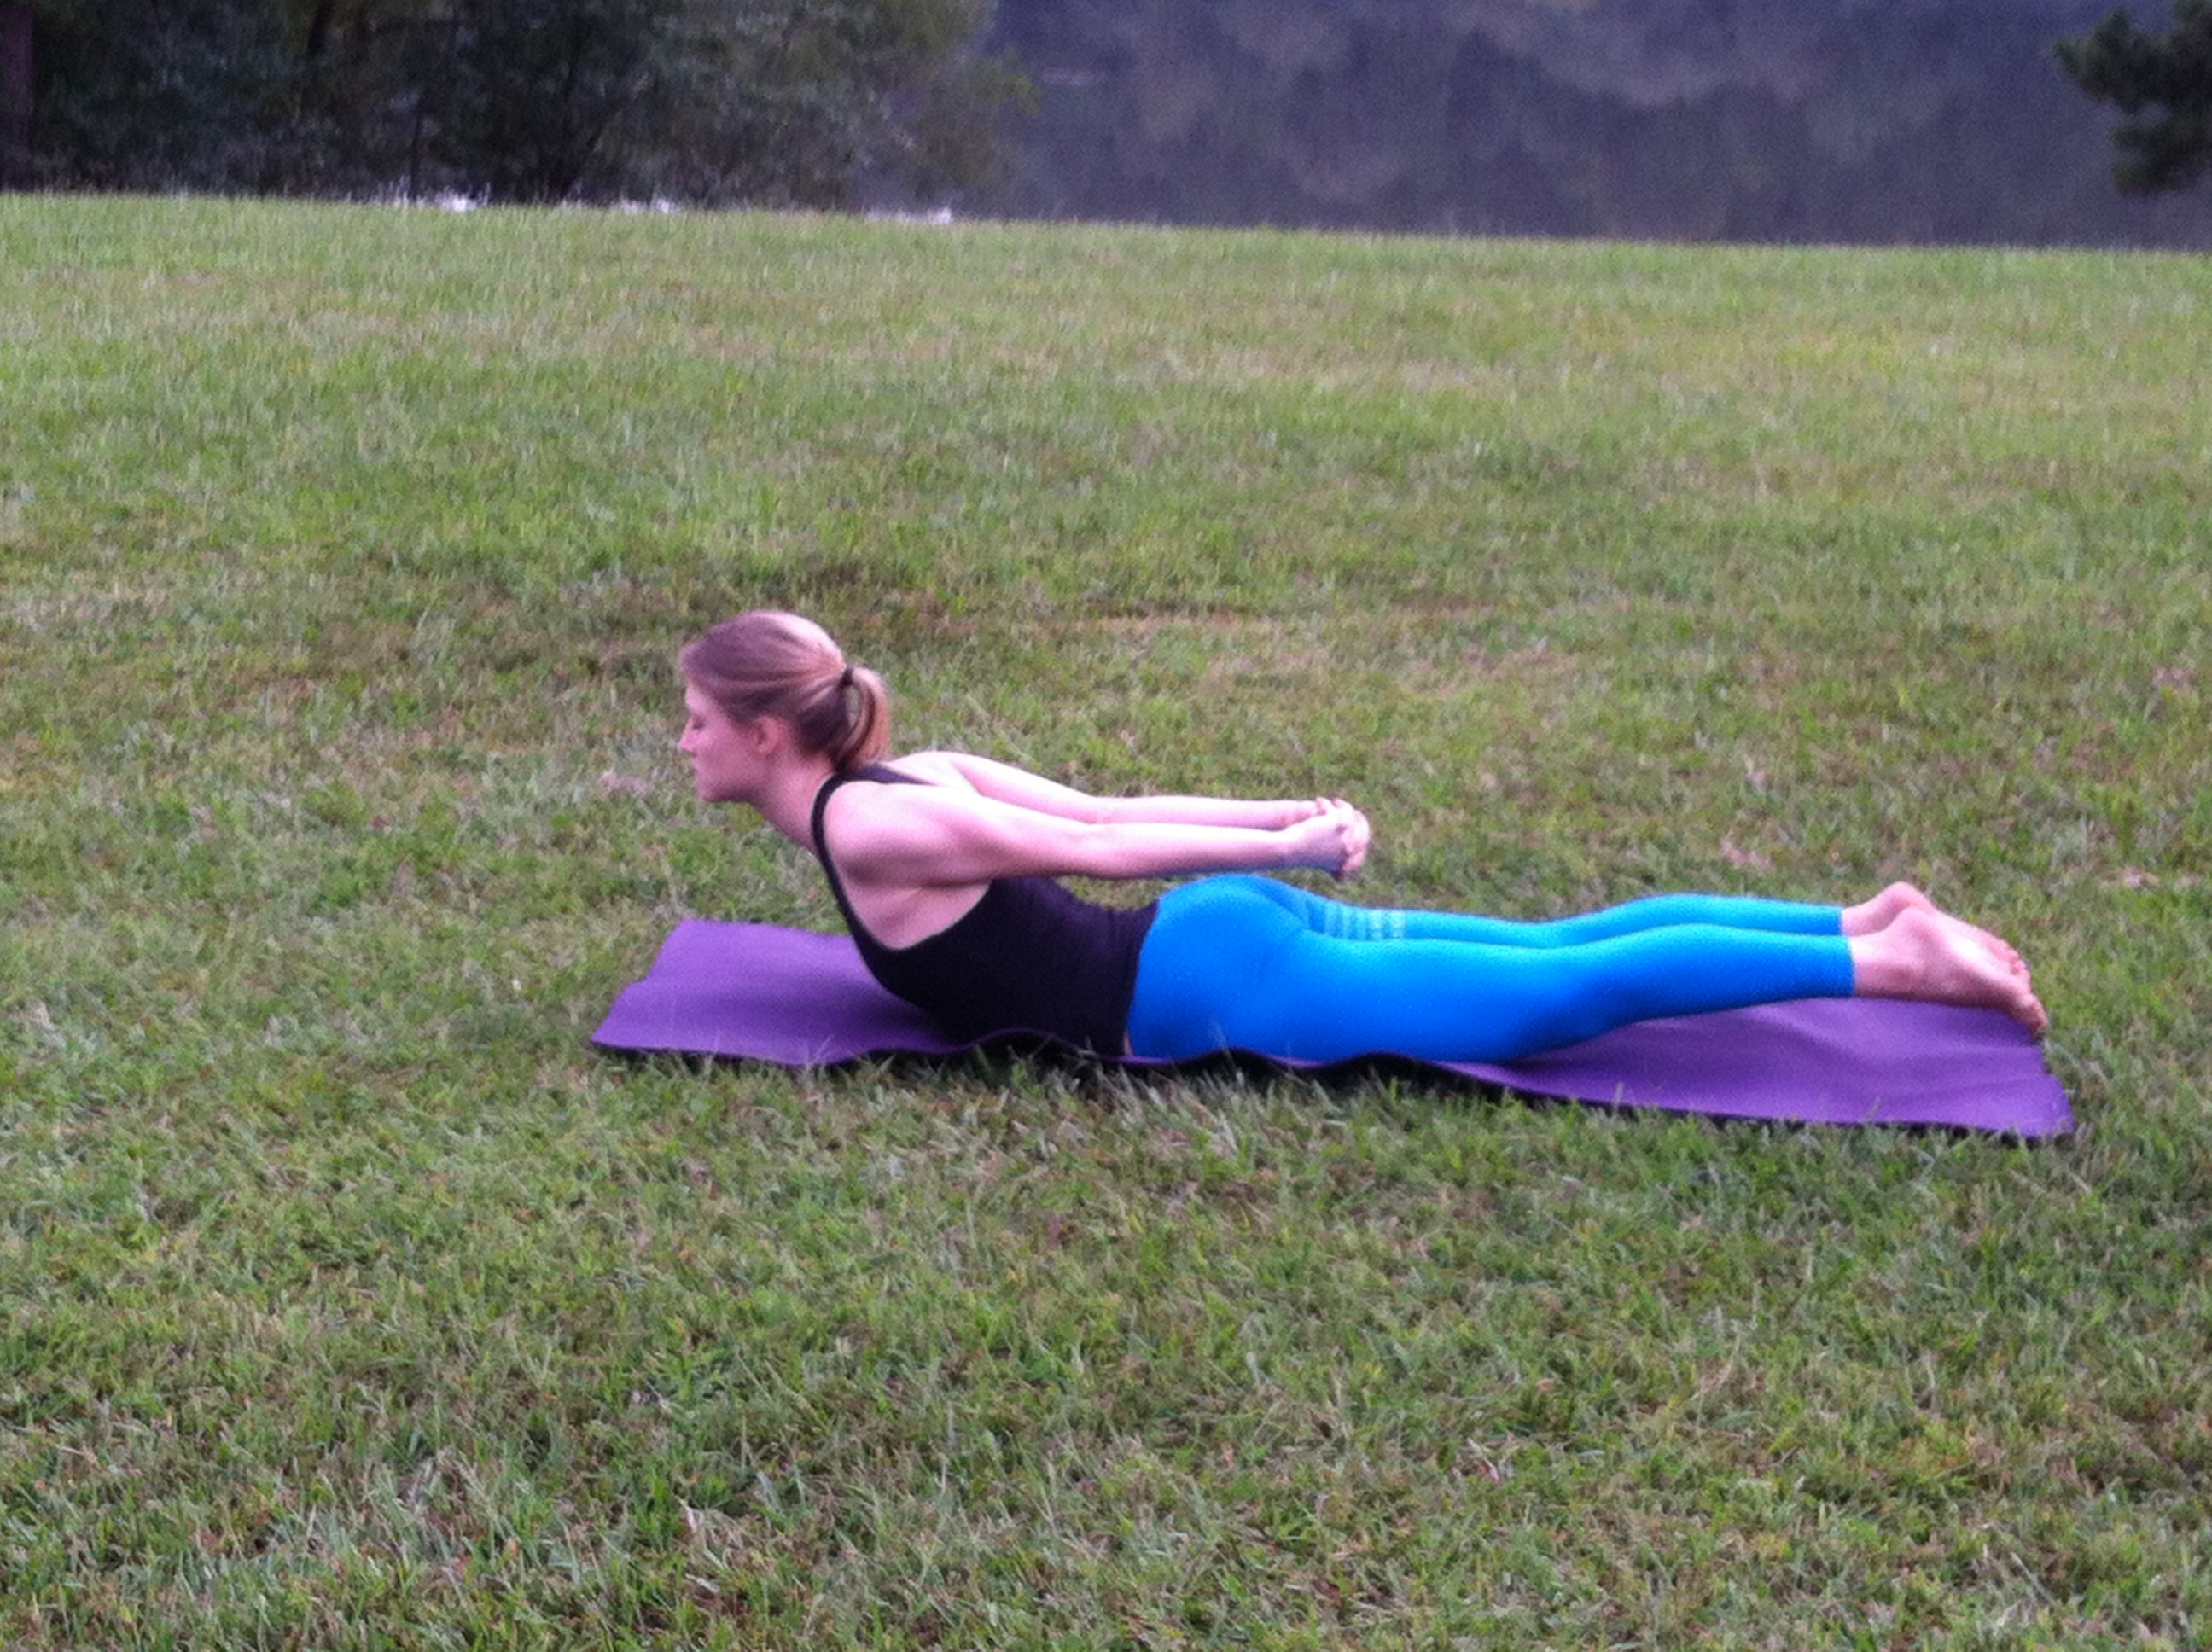
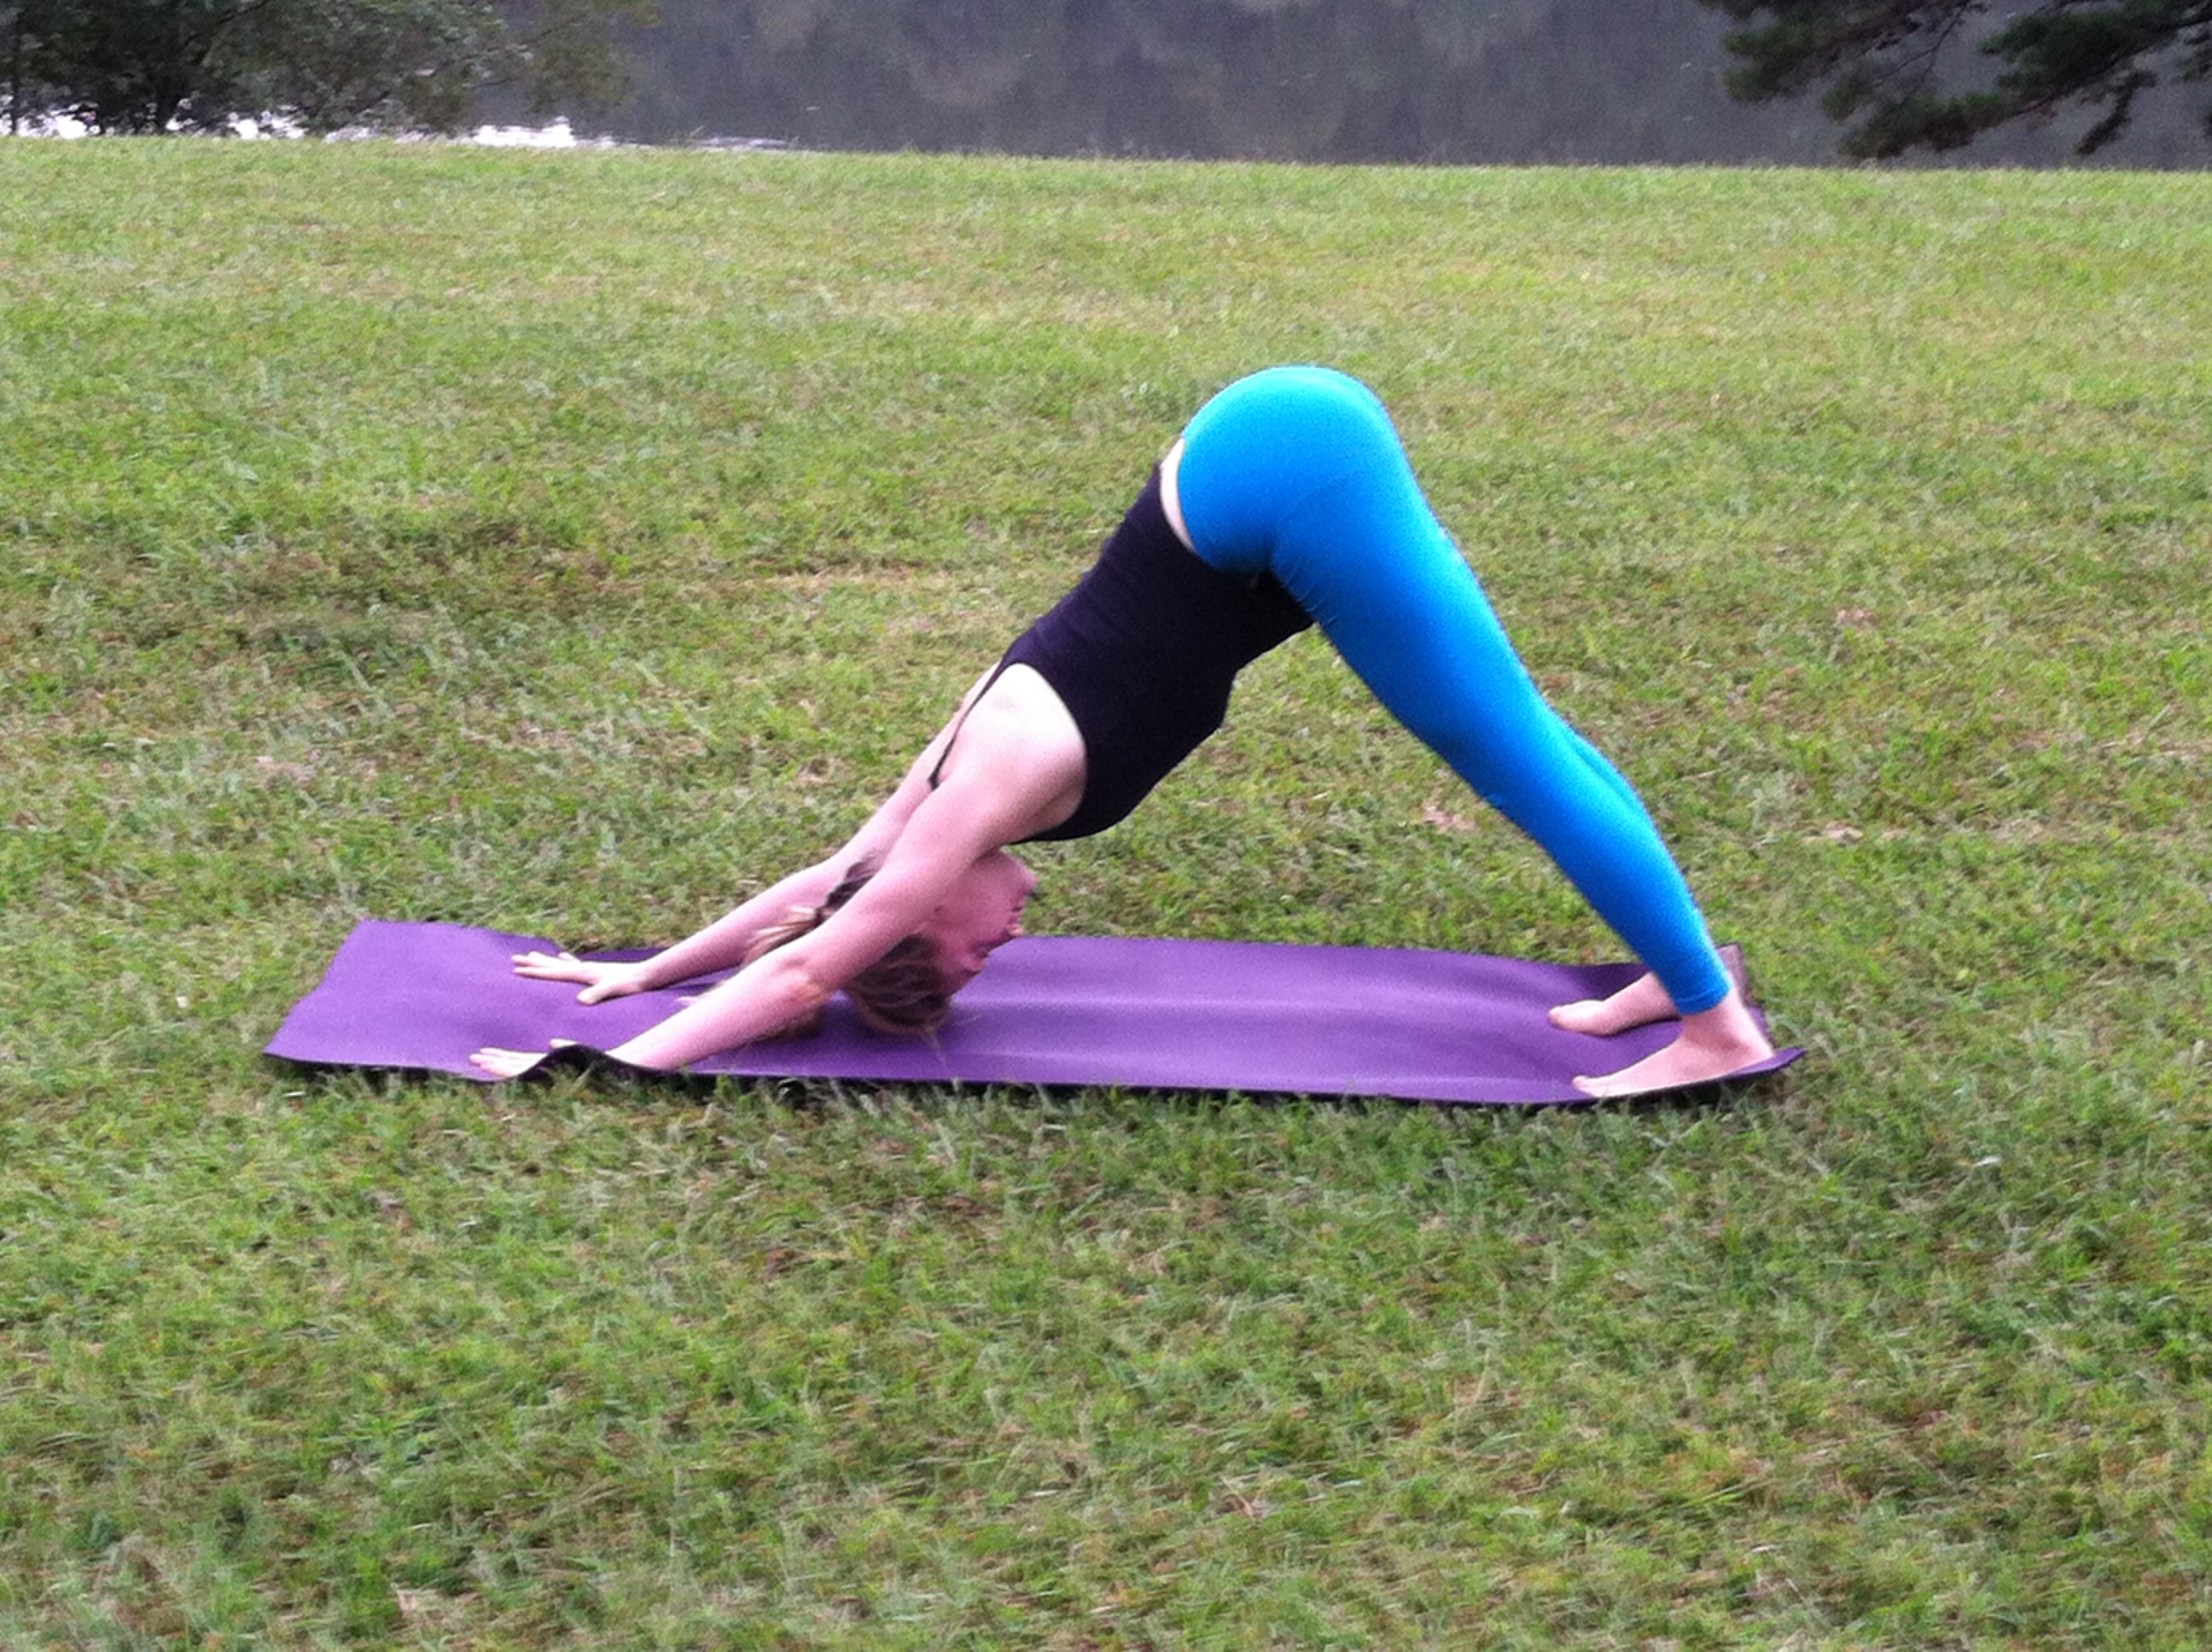
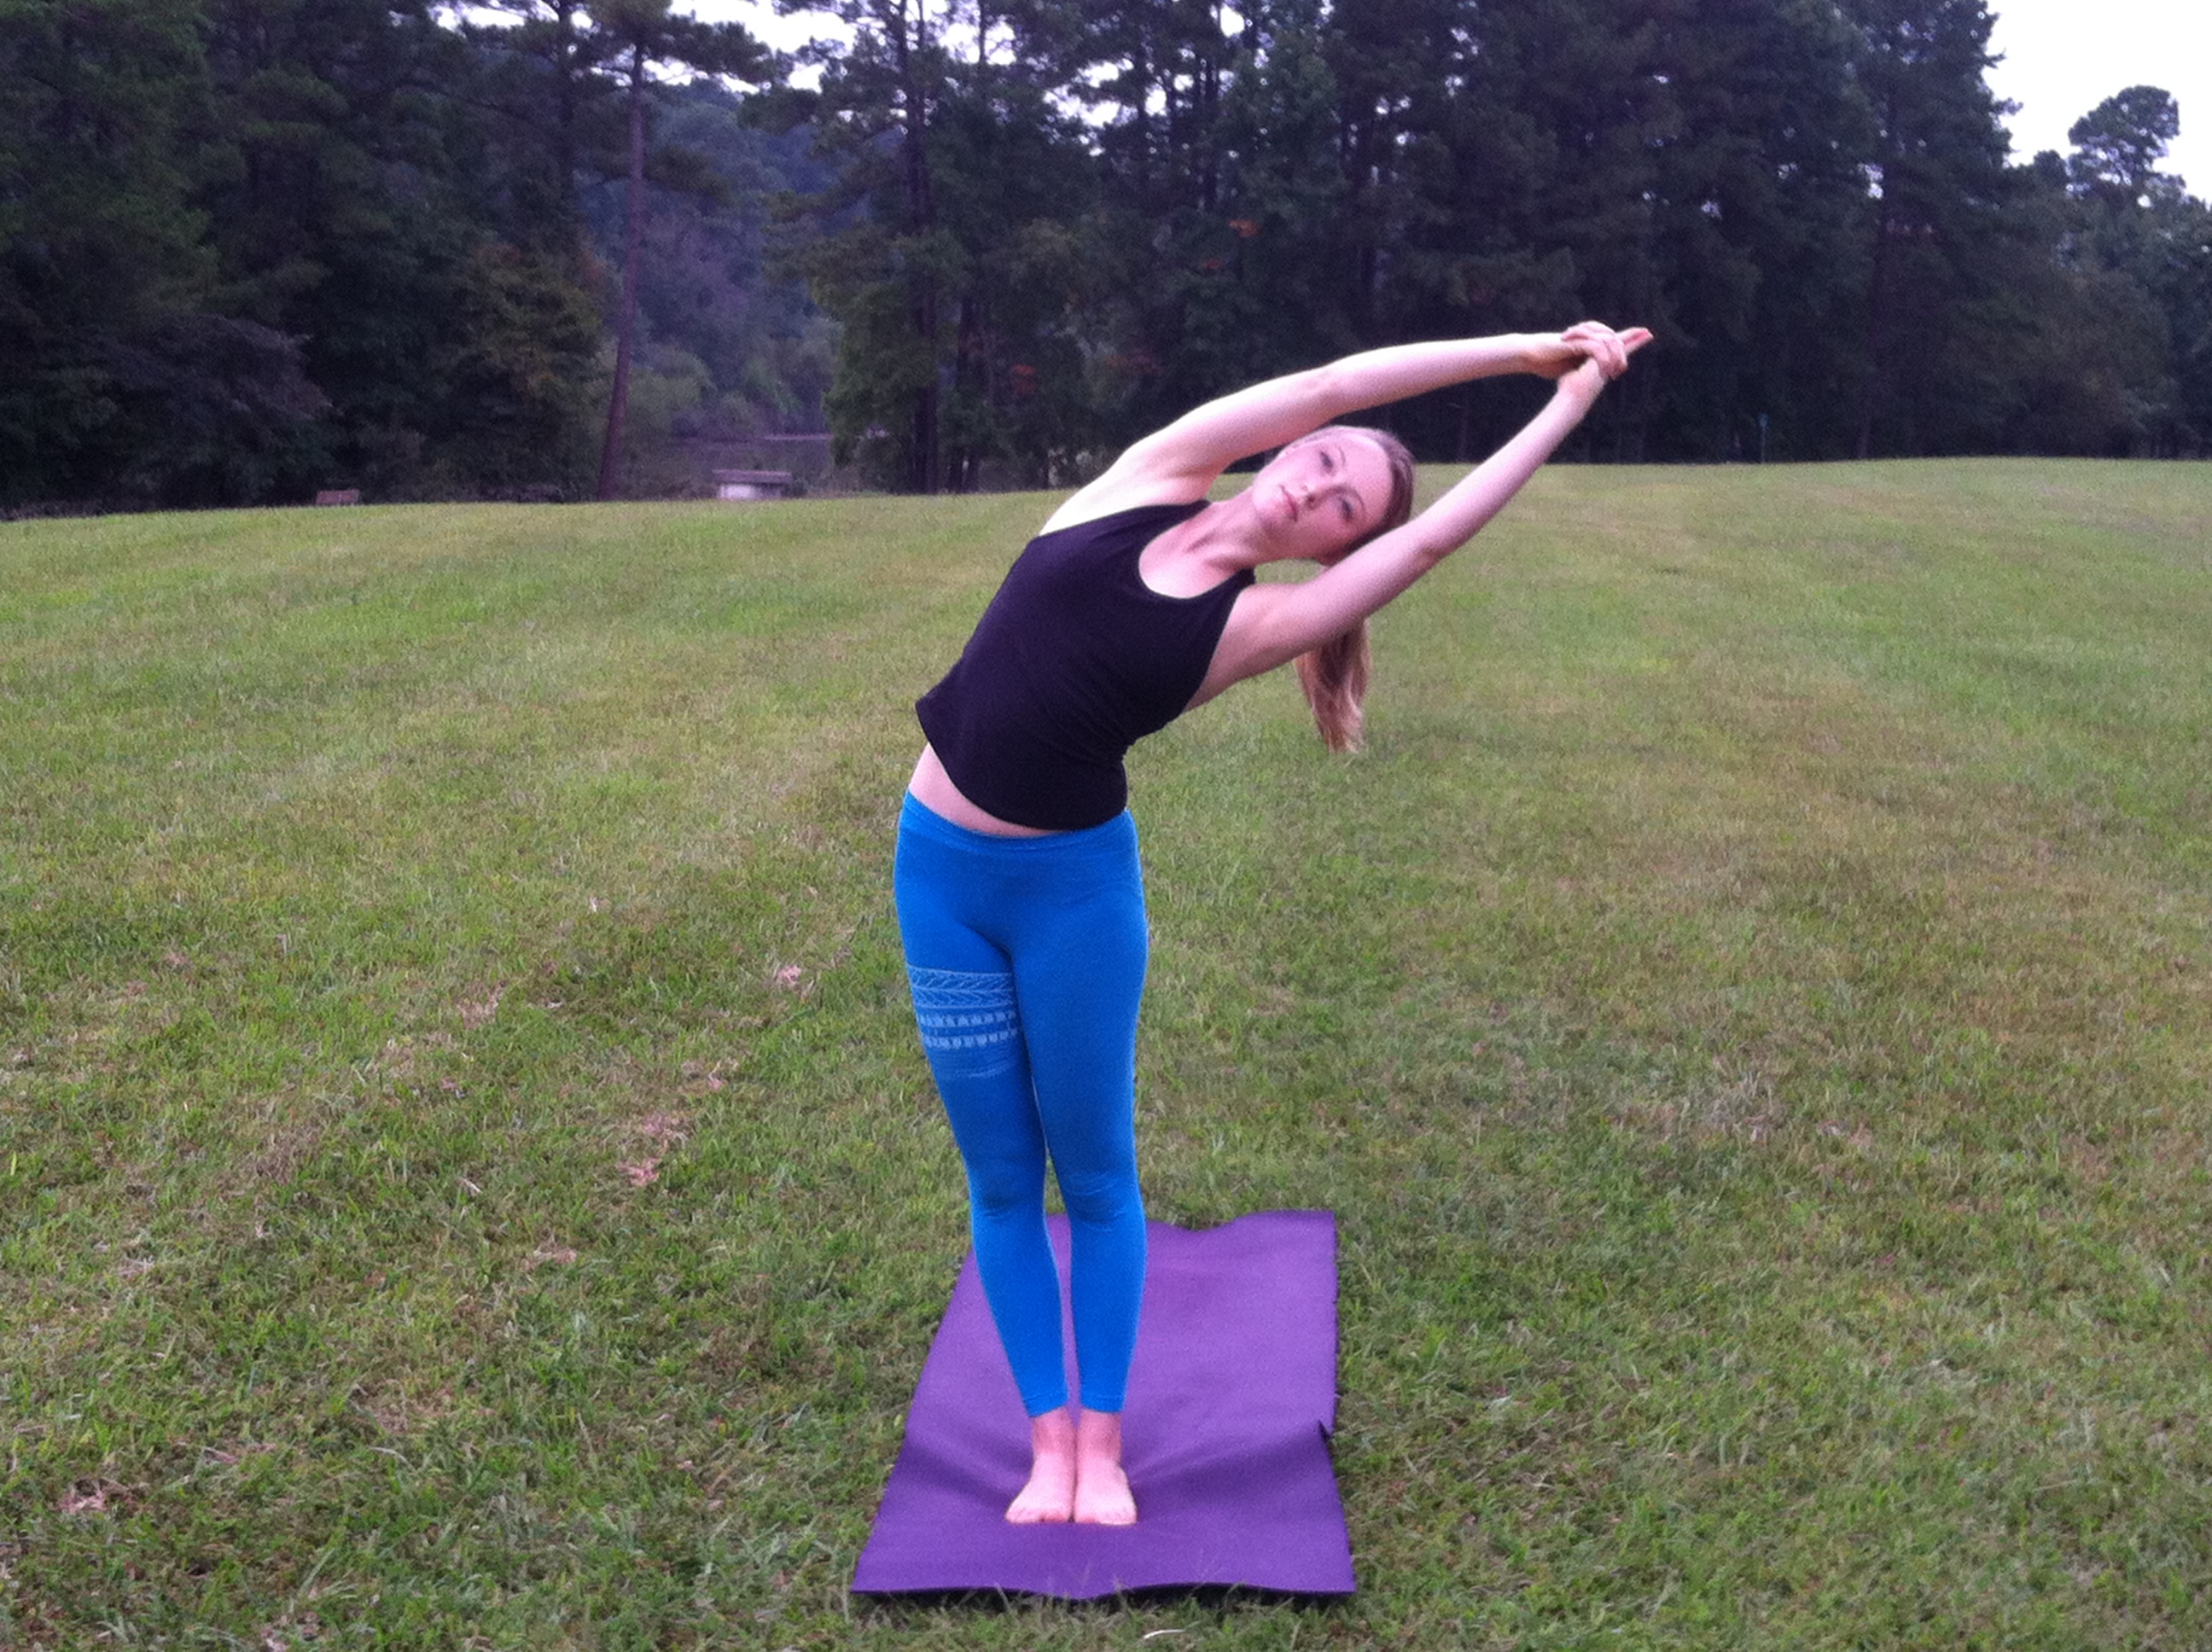
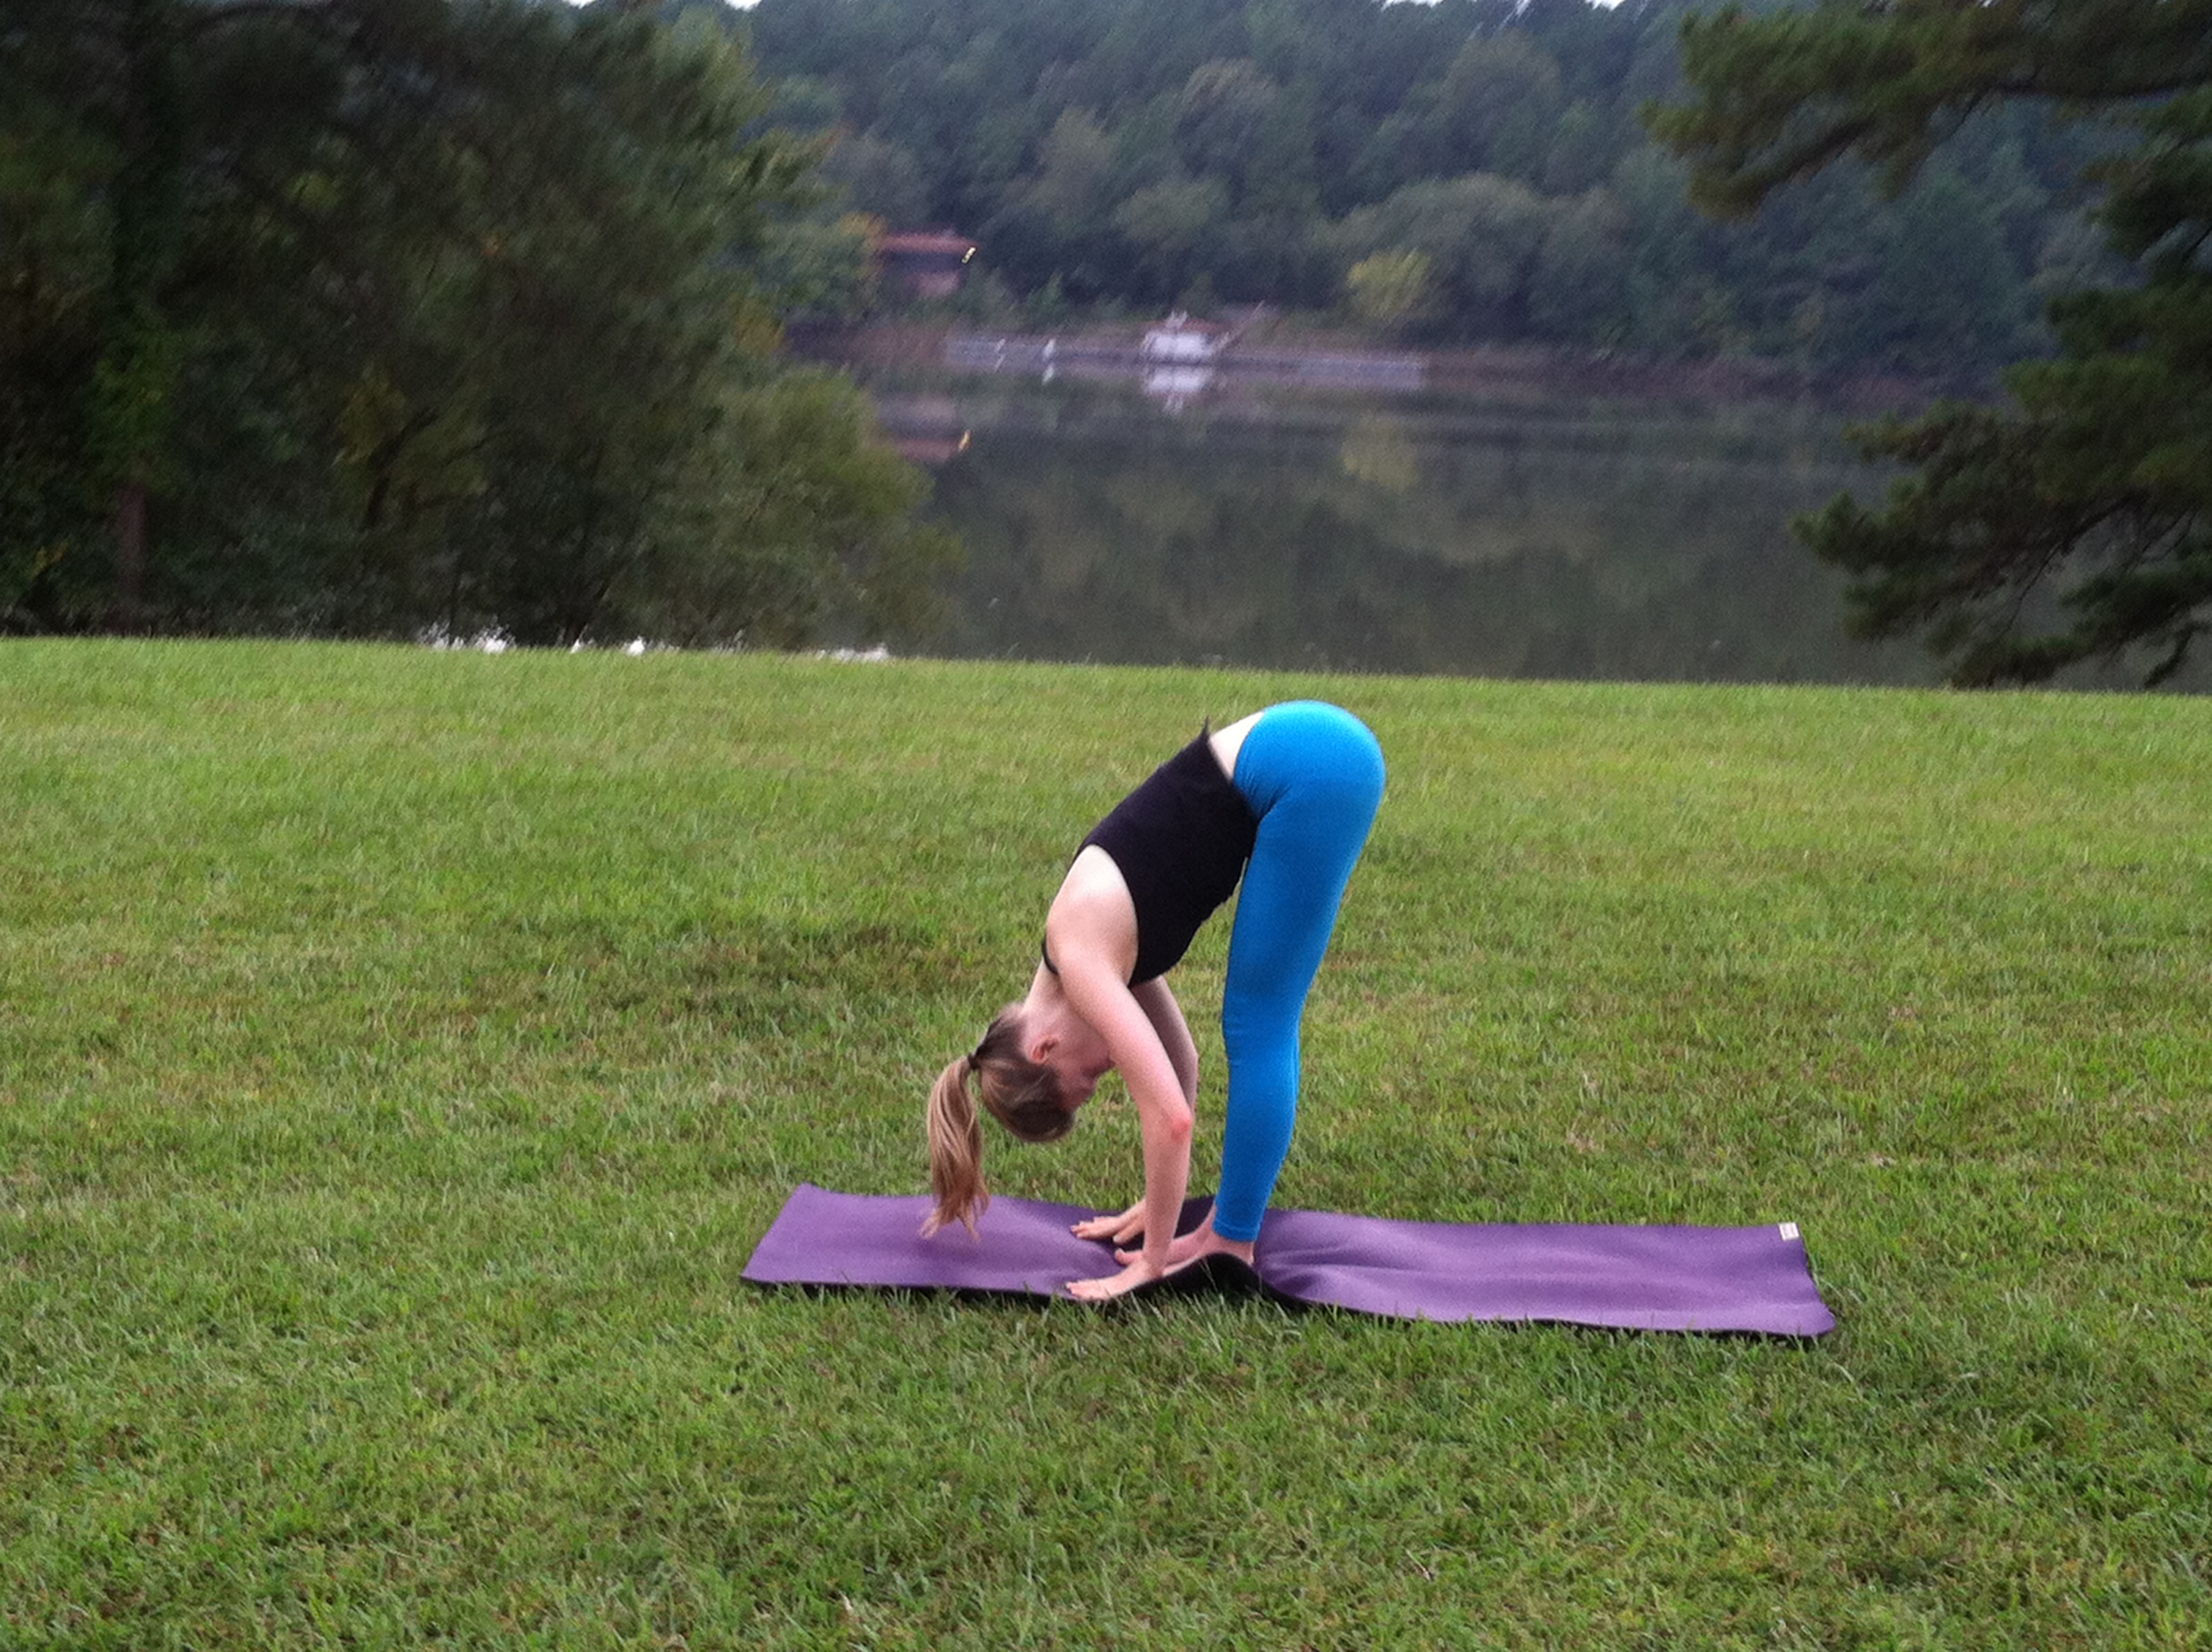
In the next part of this article, we’ll have photos of Dorsett’s younger sister, Rush Dorsett, demonstrating various yoga poses. Above each photo, Elise will provide a description of the pose and an explanation for how to do it, and which part of the body it benefits. In putting together your own yoga routine, you’ll want to experiment with all of the poses, then choose a routine(s) that include poses from each body part grouping. Remember, if you can’t do a pose as depicted, don’t force it; go as far as you can go.
*****
A few notes before you begin your practice:
- Aim to hold all poses for 5-8 breath cycles.
- Be sure to complete the Warm Up and Cool Down series each time you practice to avoid injury and to get the full benefits of your practice.
- A vinyasa is a series of dynamic poses performed between stationary poses in yoga to find “flow” between the poses. A typical vinyasa consists of the following:
- Inhale arms overhead
- Exhale into Forward Fold
- Inhale into Extended Forward Fold
- Exhale into Plank
- Optional
- Chaturanga Dandasana
- Cobra
- Downward Facing Dog
- For more information about each pose, www.yogajournal.com is a great resource.
WARM UP
Purpose: Warm up the body with these dynamic stretches that get the blood flowing into muscle fibers and help release synovial fluid through the joints. Prepare the body and focus the mind for deeper practice and training.
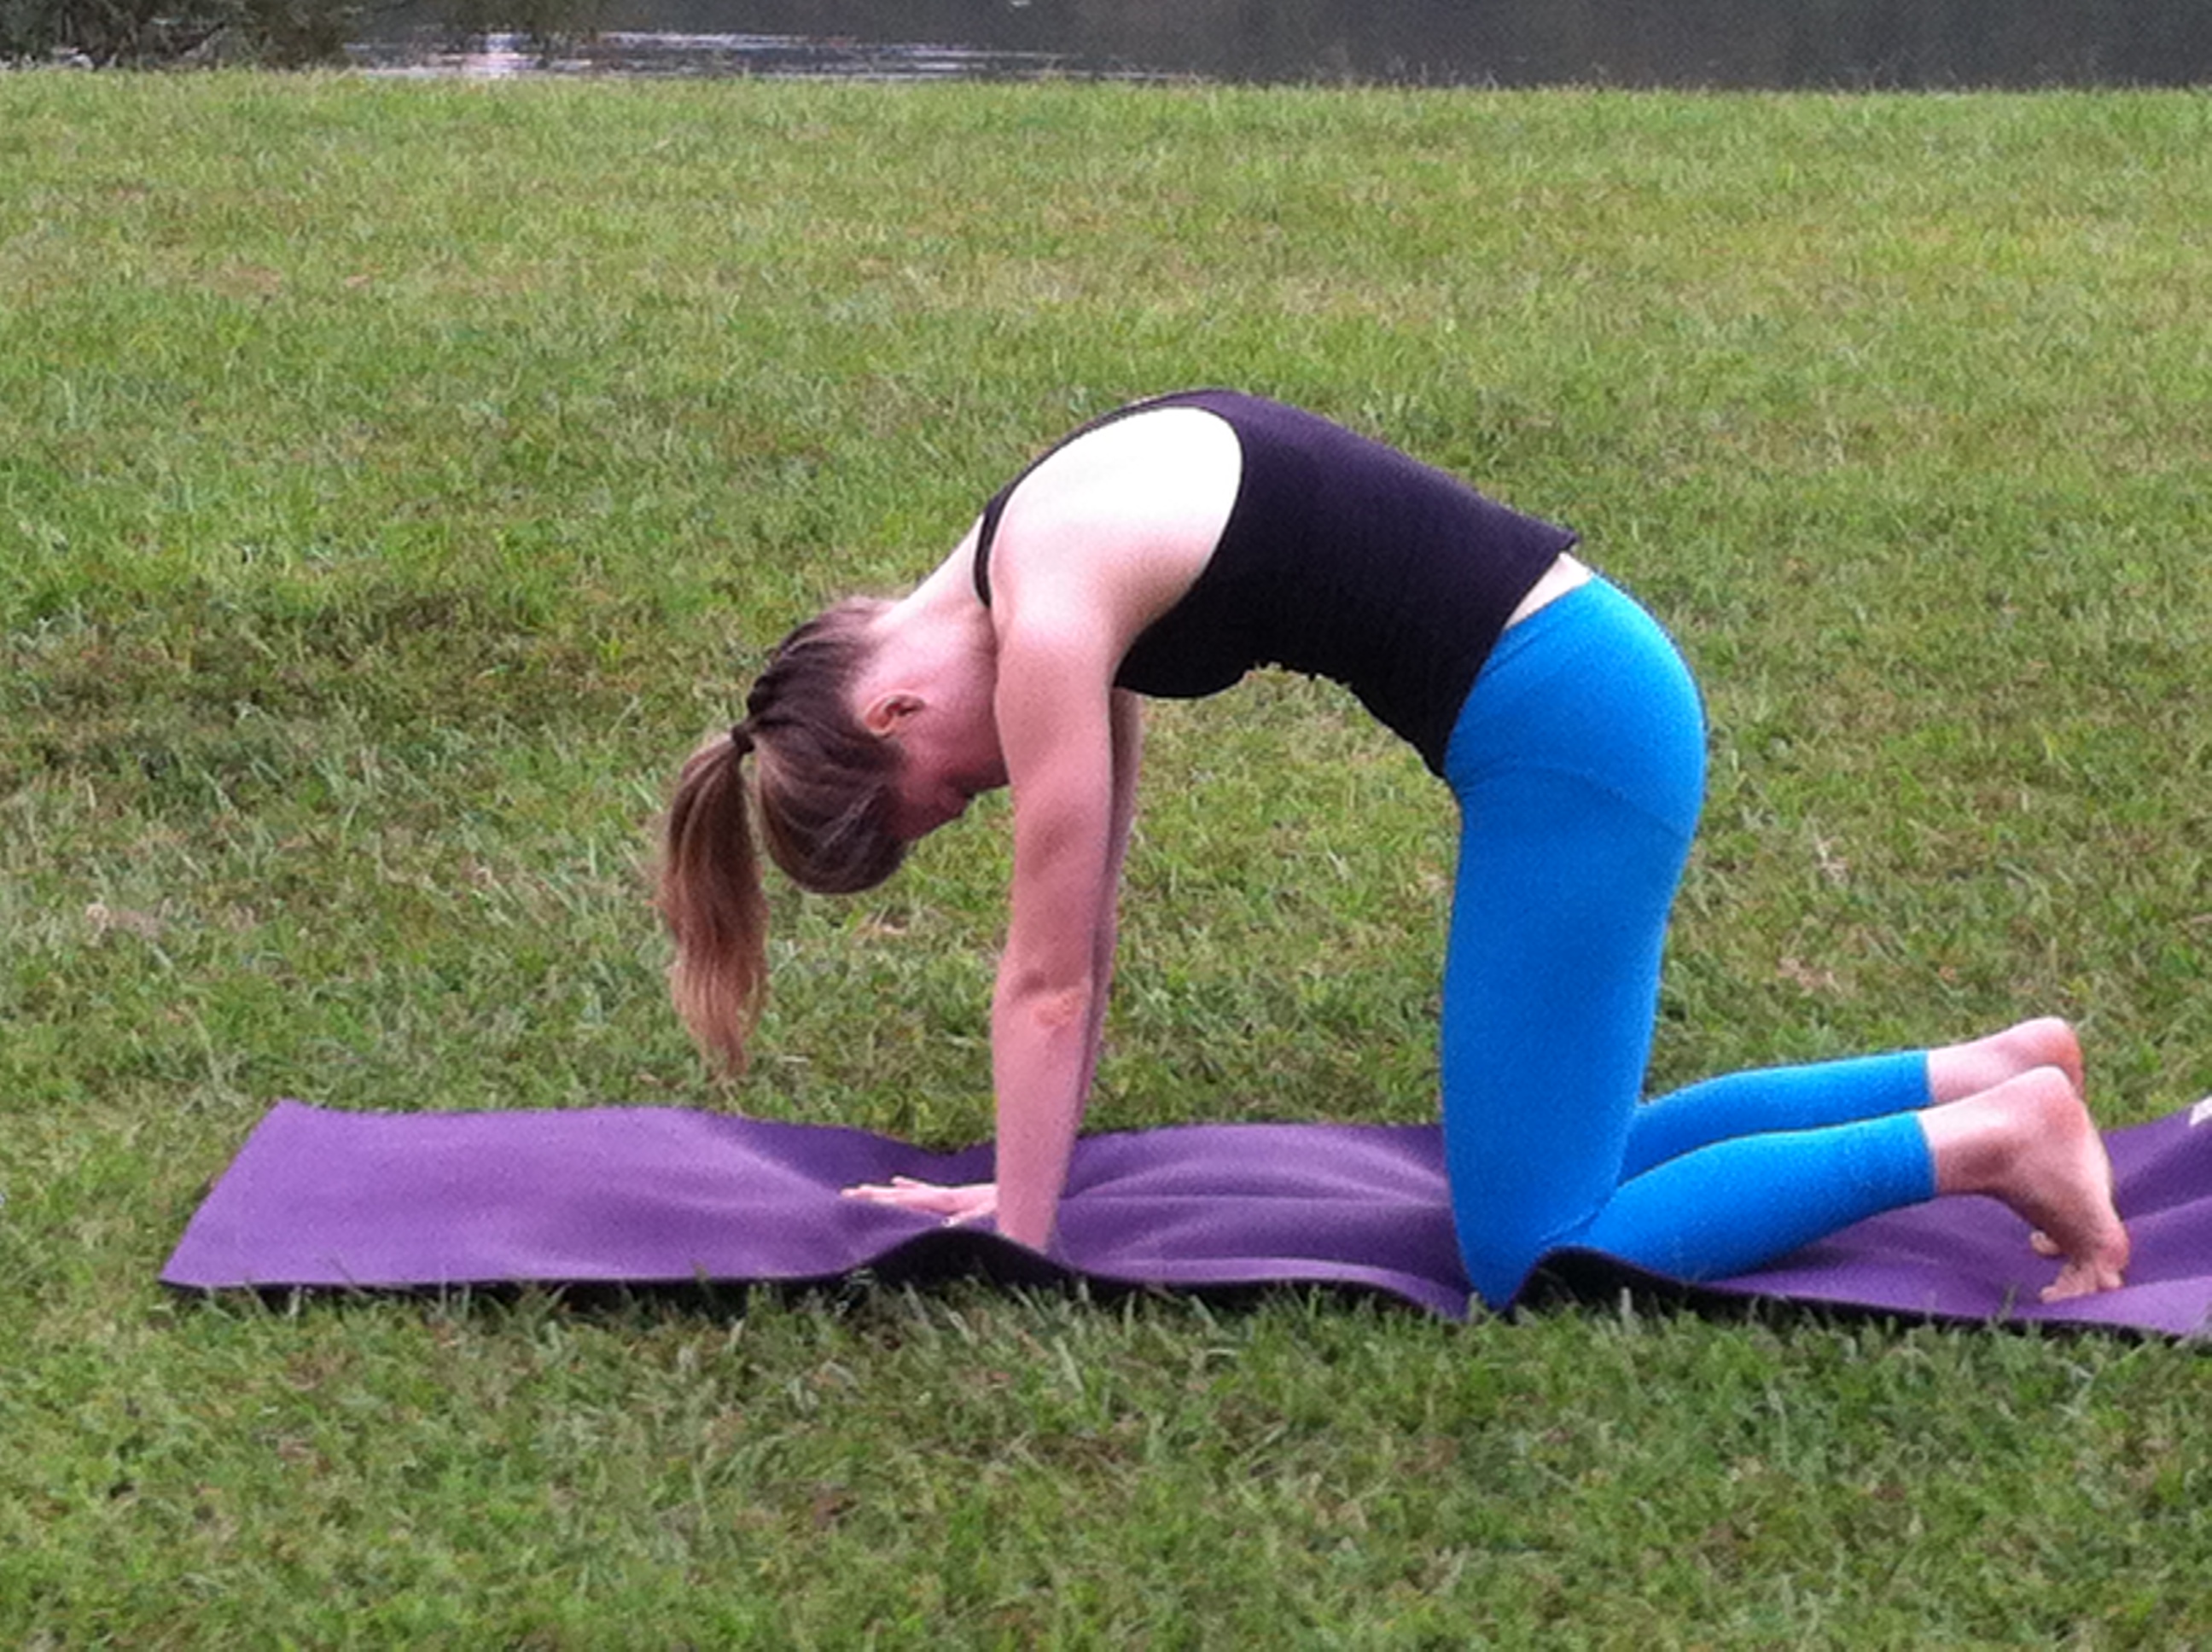
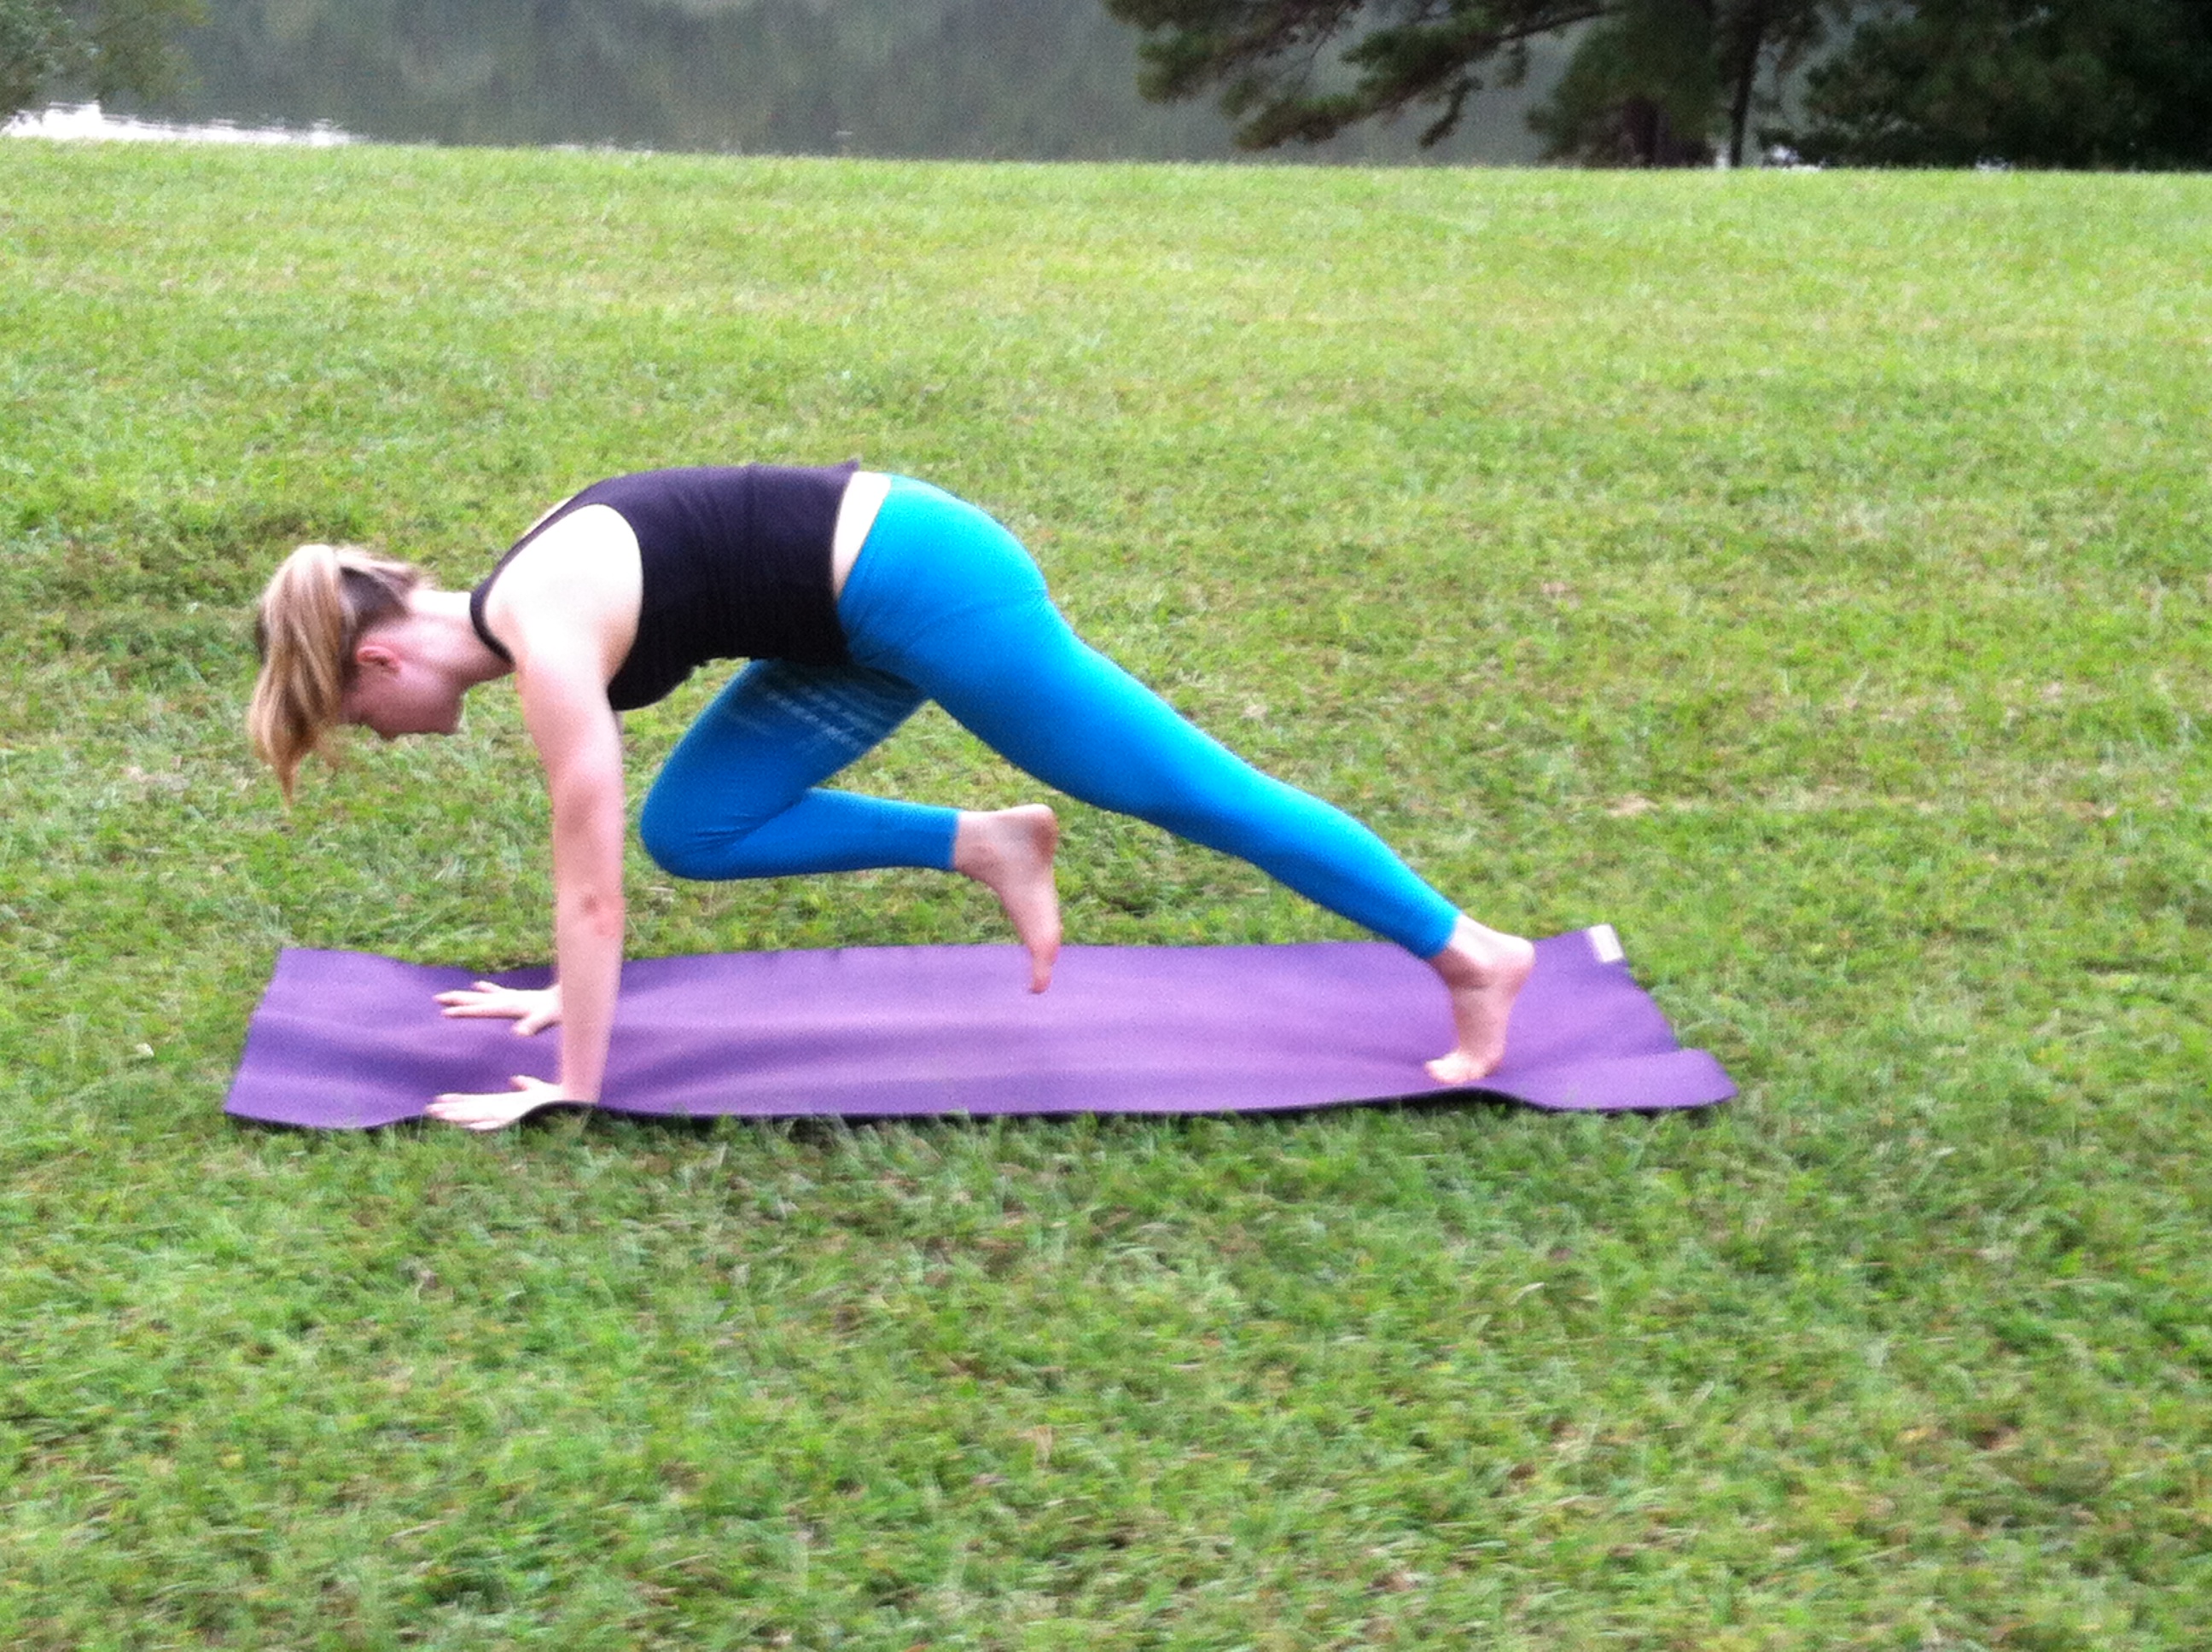
Cat-Cow
Start on your hands and knees in a “tabletop” position. Place knees directly below hips. Stack shoulders and wrists in alignment. Be sure your index fingers are parallel to each other. Bring the weight of your hands into the index finger and thumb pads to protect wrists. Center your head in a neutral position, eyes looking at the floor.
Cat
- As you exhale, press your hands into the earth and round your spine toward the ceiling. Make sure to keep shoulders and knees in position. Release your head toward the floor, but don’t force your chin to your chest. Squeeze belly button up and in toward the spine.
Cow
- Inhaling, extend the spine, lift the head up, reach forward through the heart and tip the tailbone up toward the sky. Belly soft.
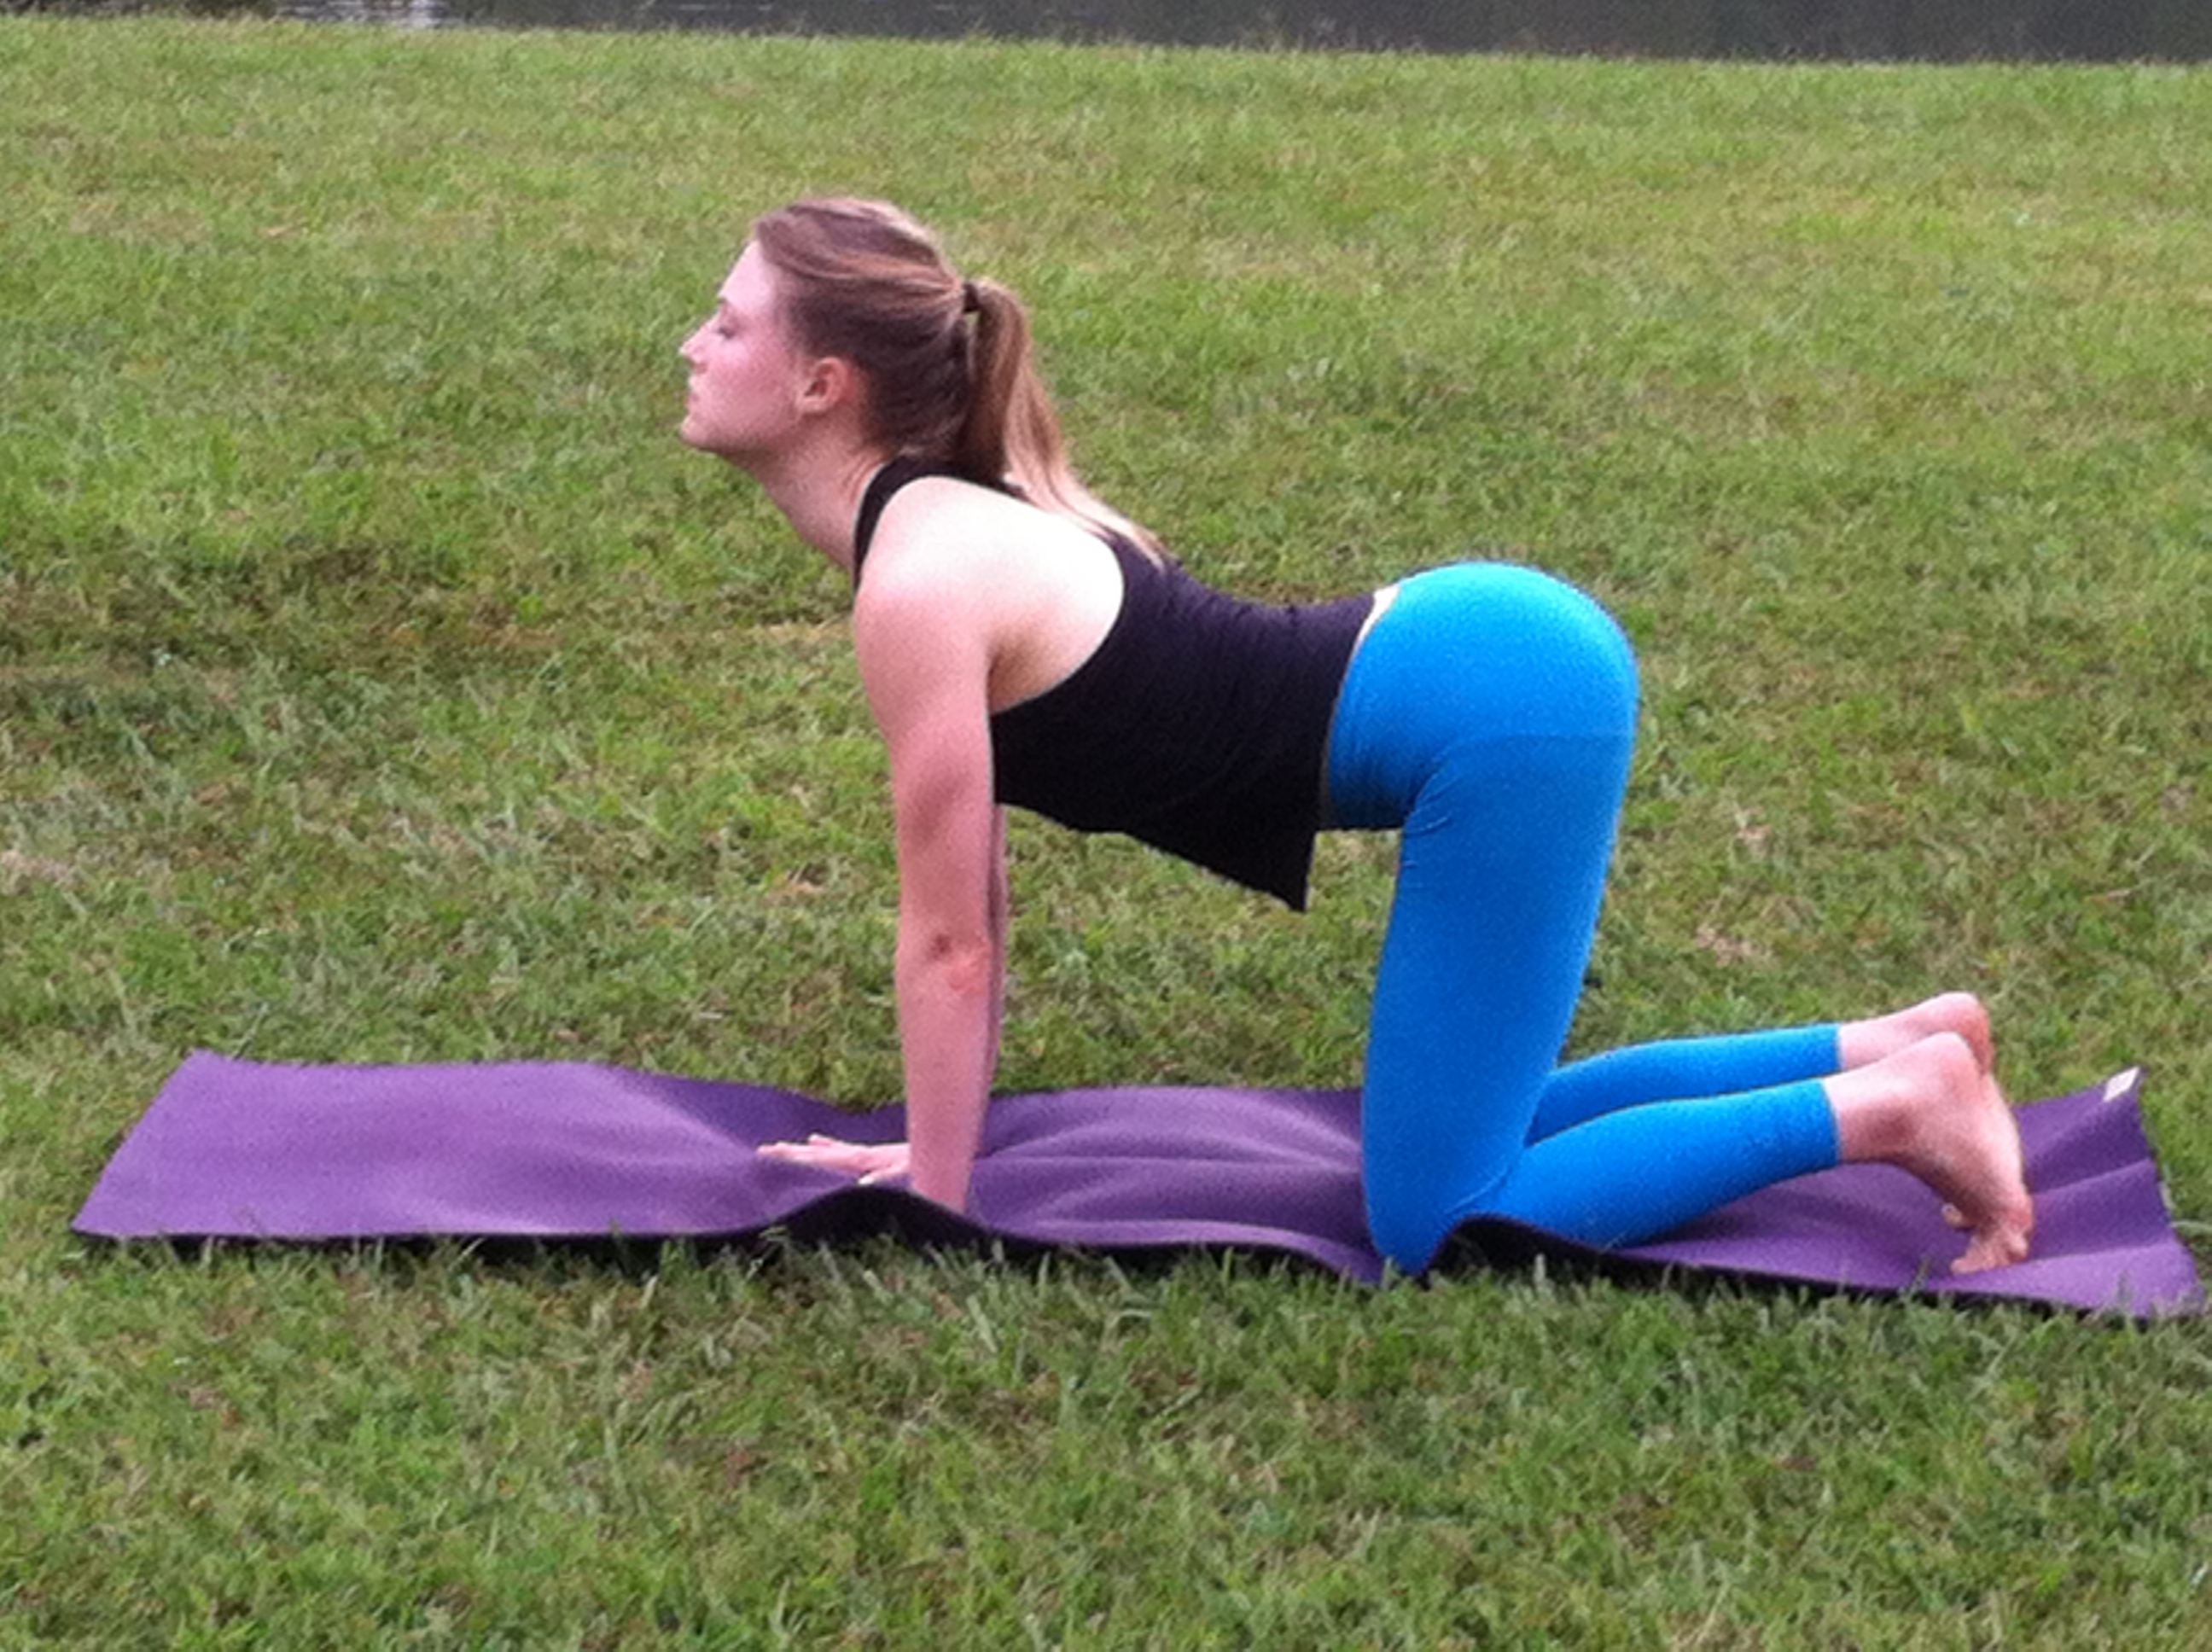
Move between Cat pose and Cow pose, following your breath.
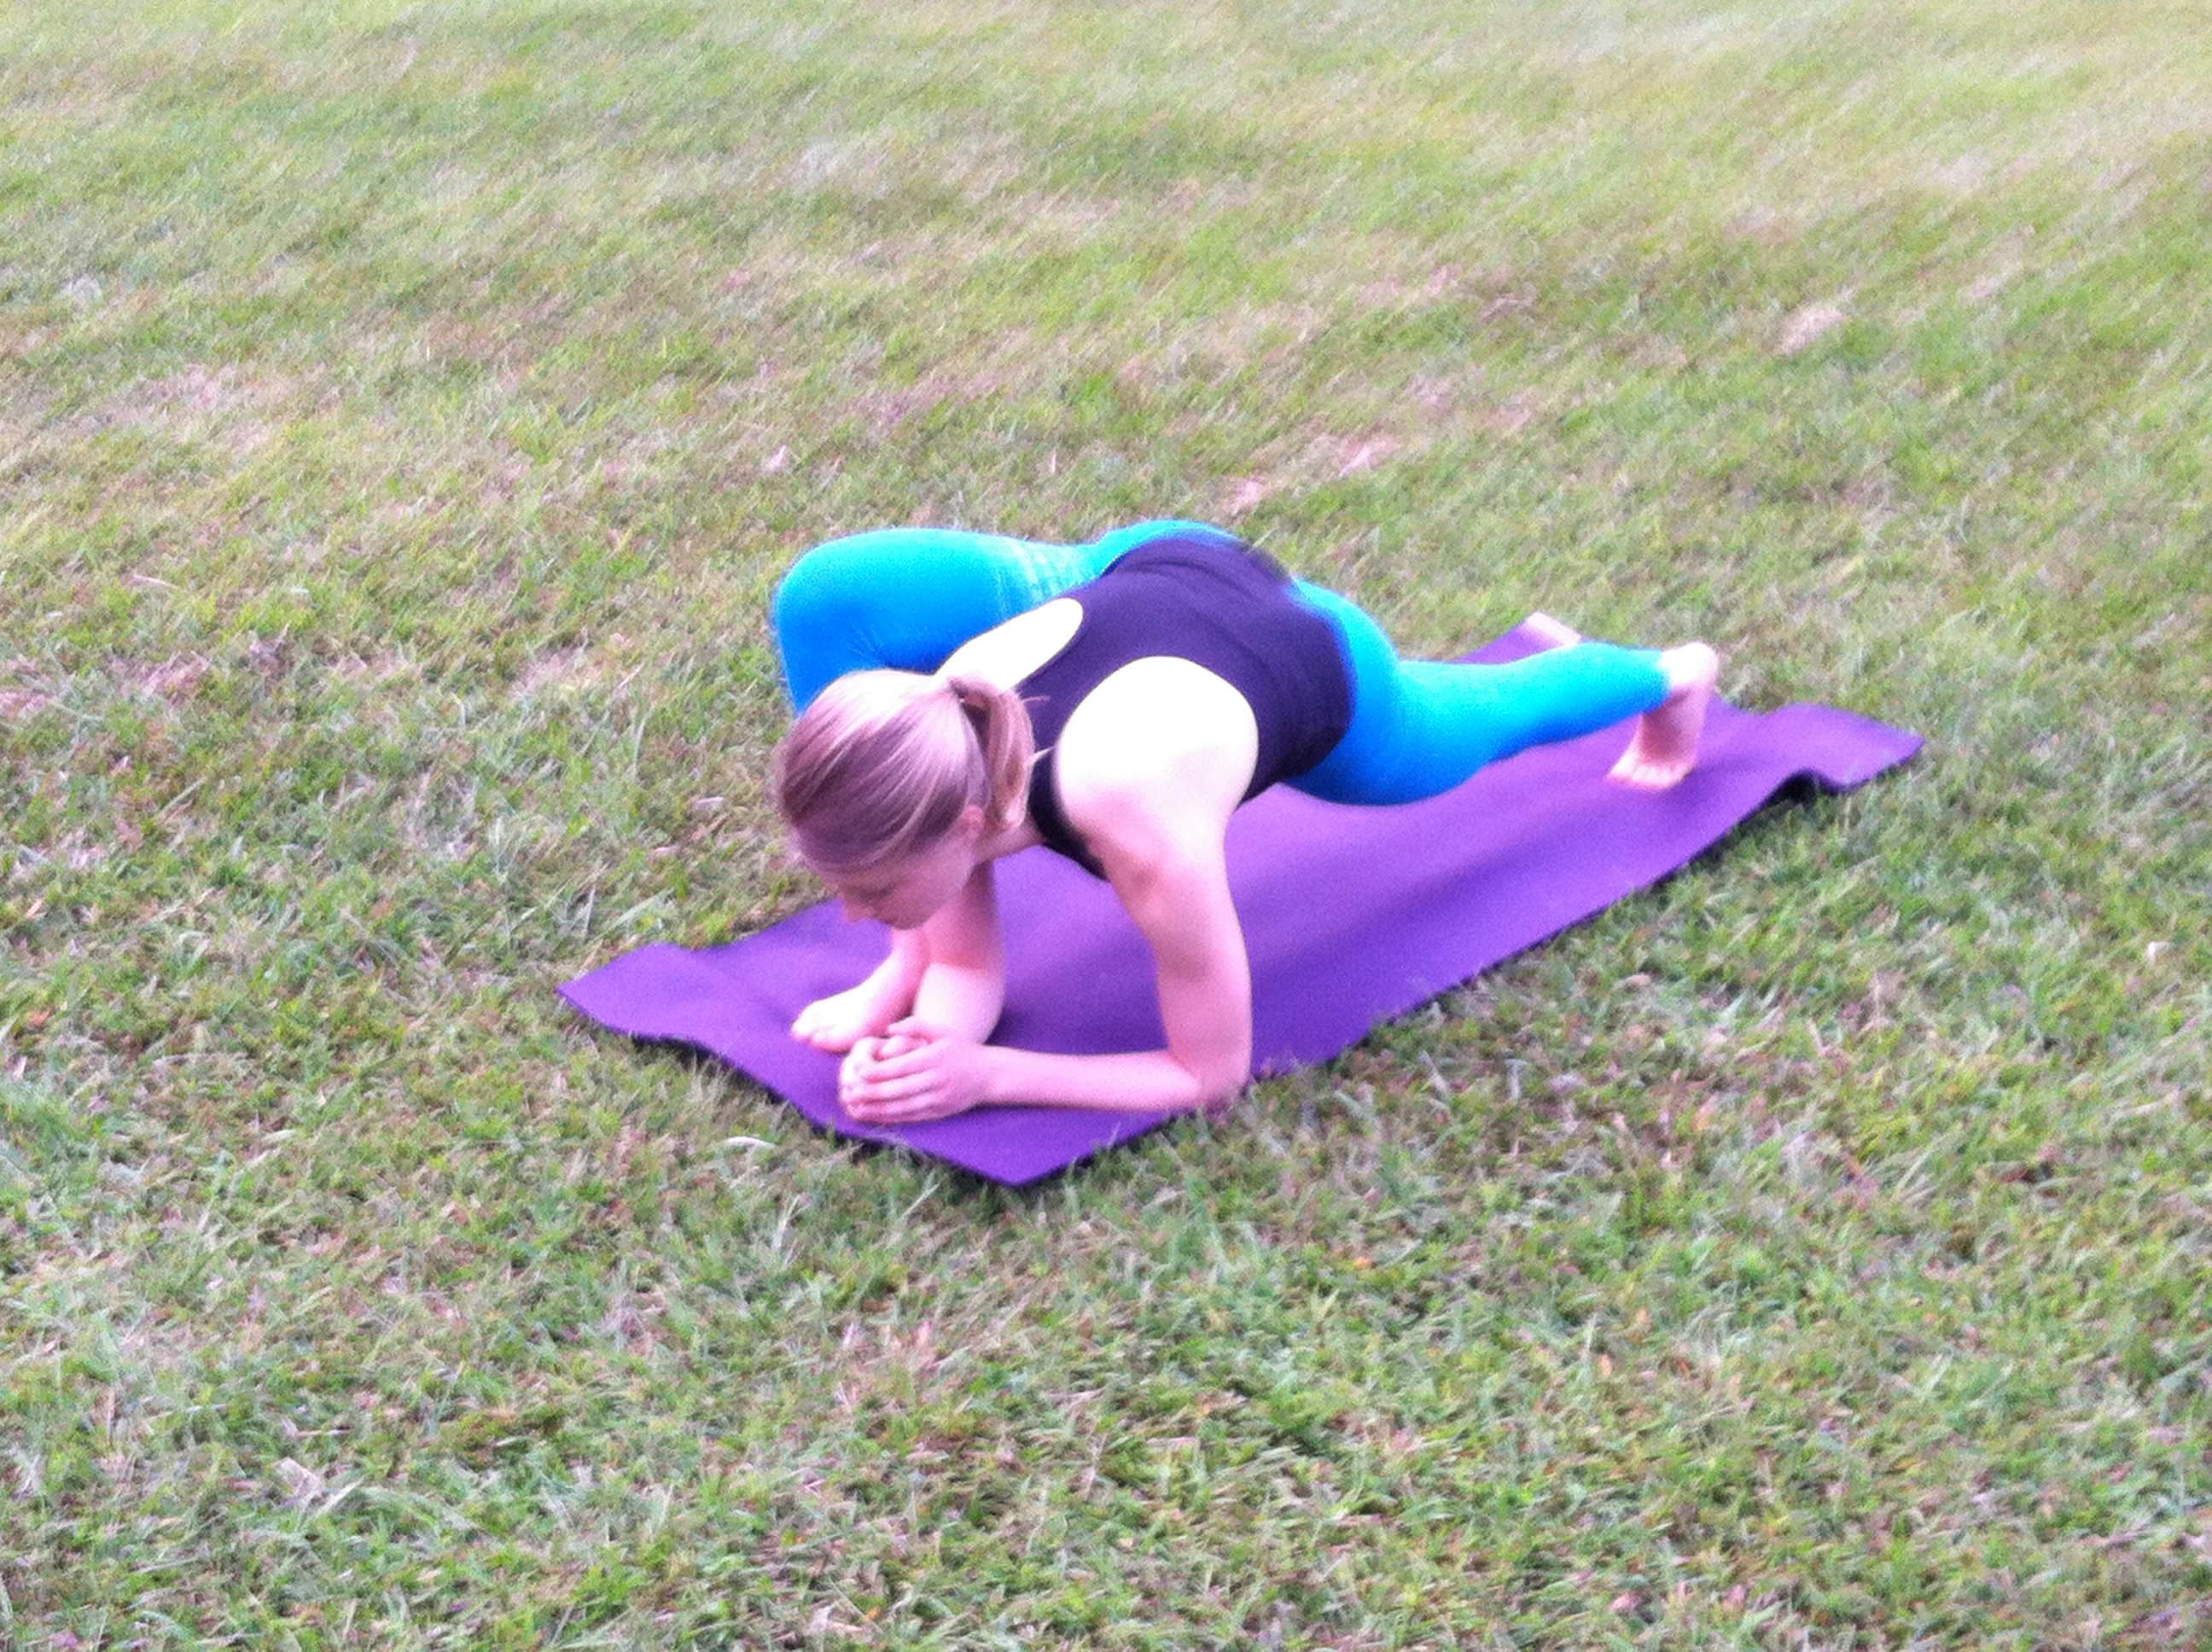
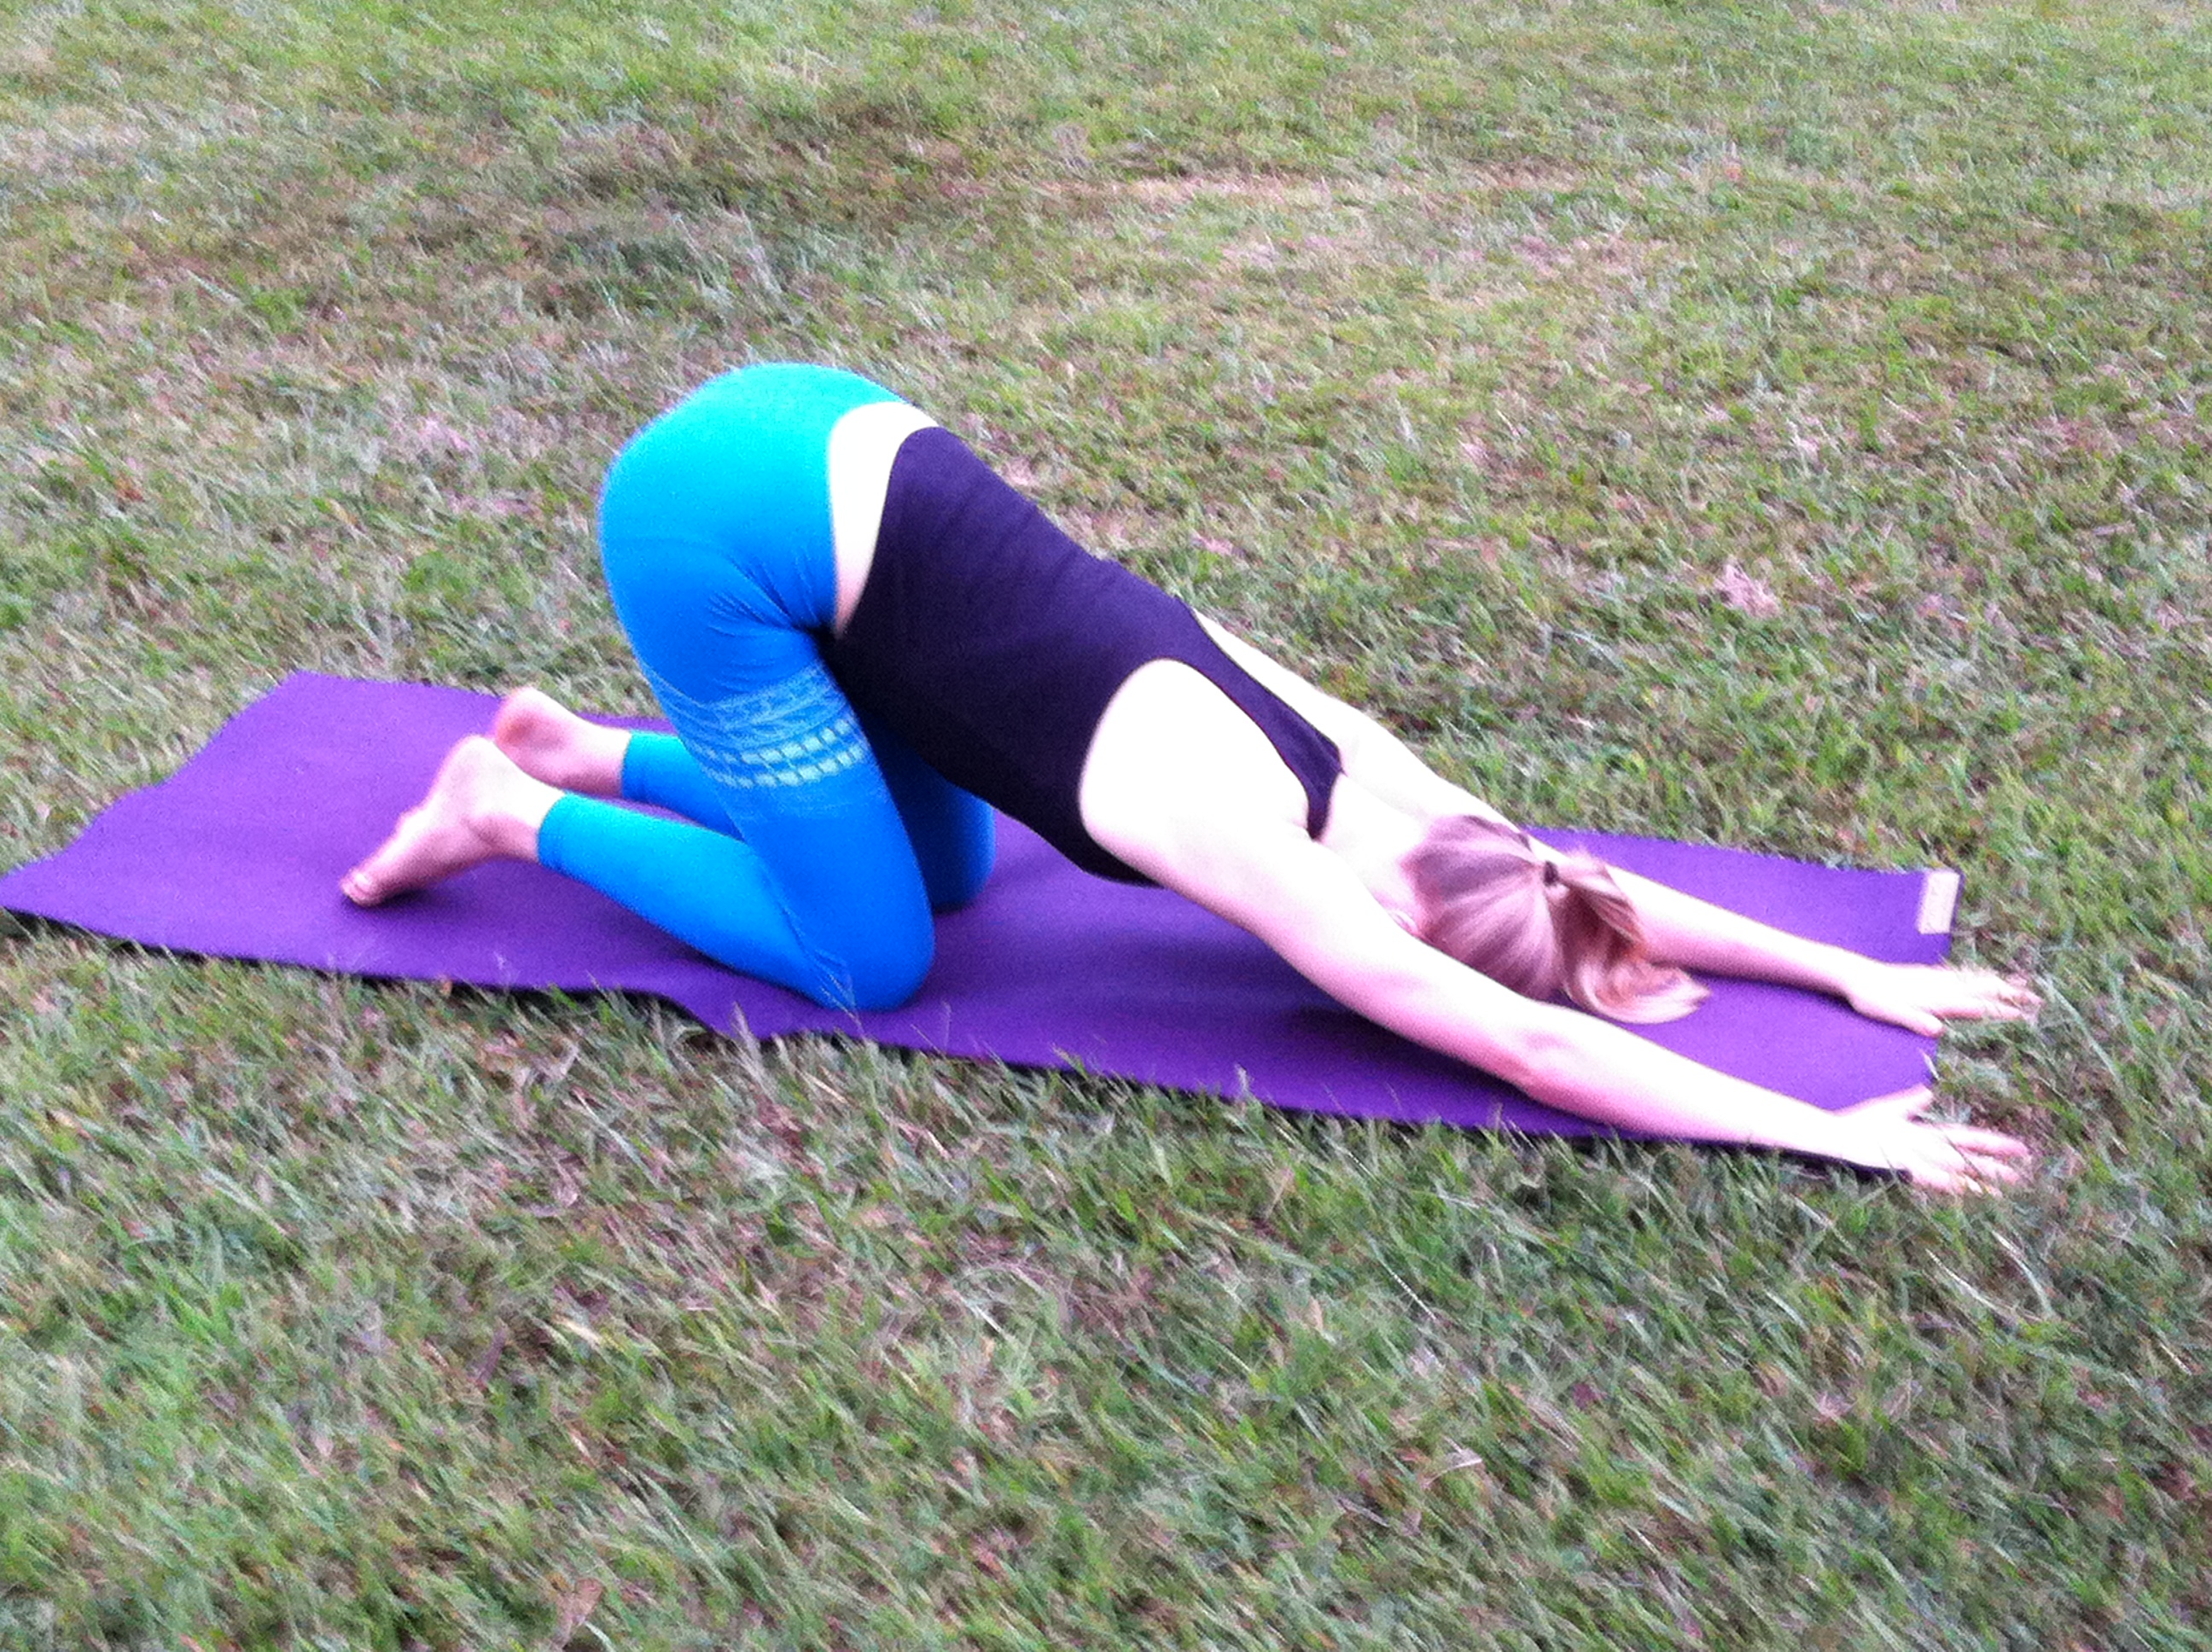
Child’s Pose
- From tabletop, touch your big toes together and sit on your heels, then separate your knees about as wide as your hips.
- Exhale and lay your torso down between your thighs. Lengthen your tailbone back and extend through the crown of the head. Rest the forehead on the mat.
- Reach your arms forward and place palms flat on the ground. Let the shoulder blades be wide on the back body.
- Breathe into the back waistline.
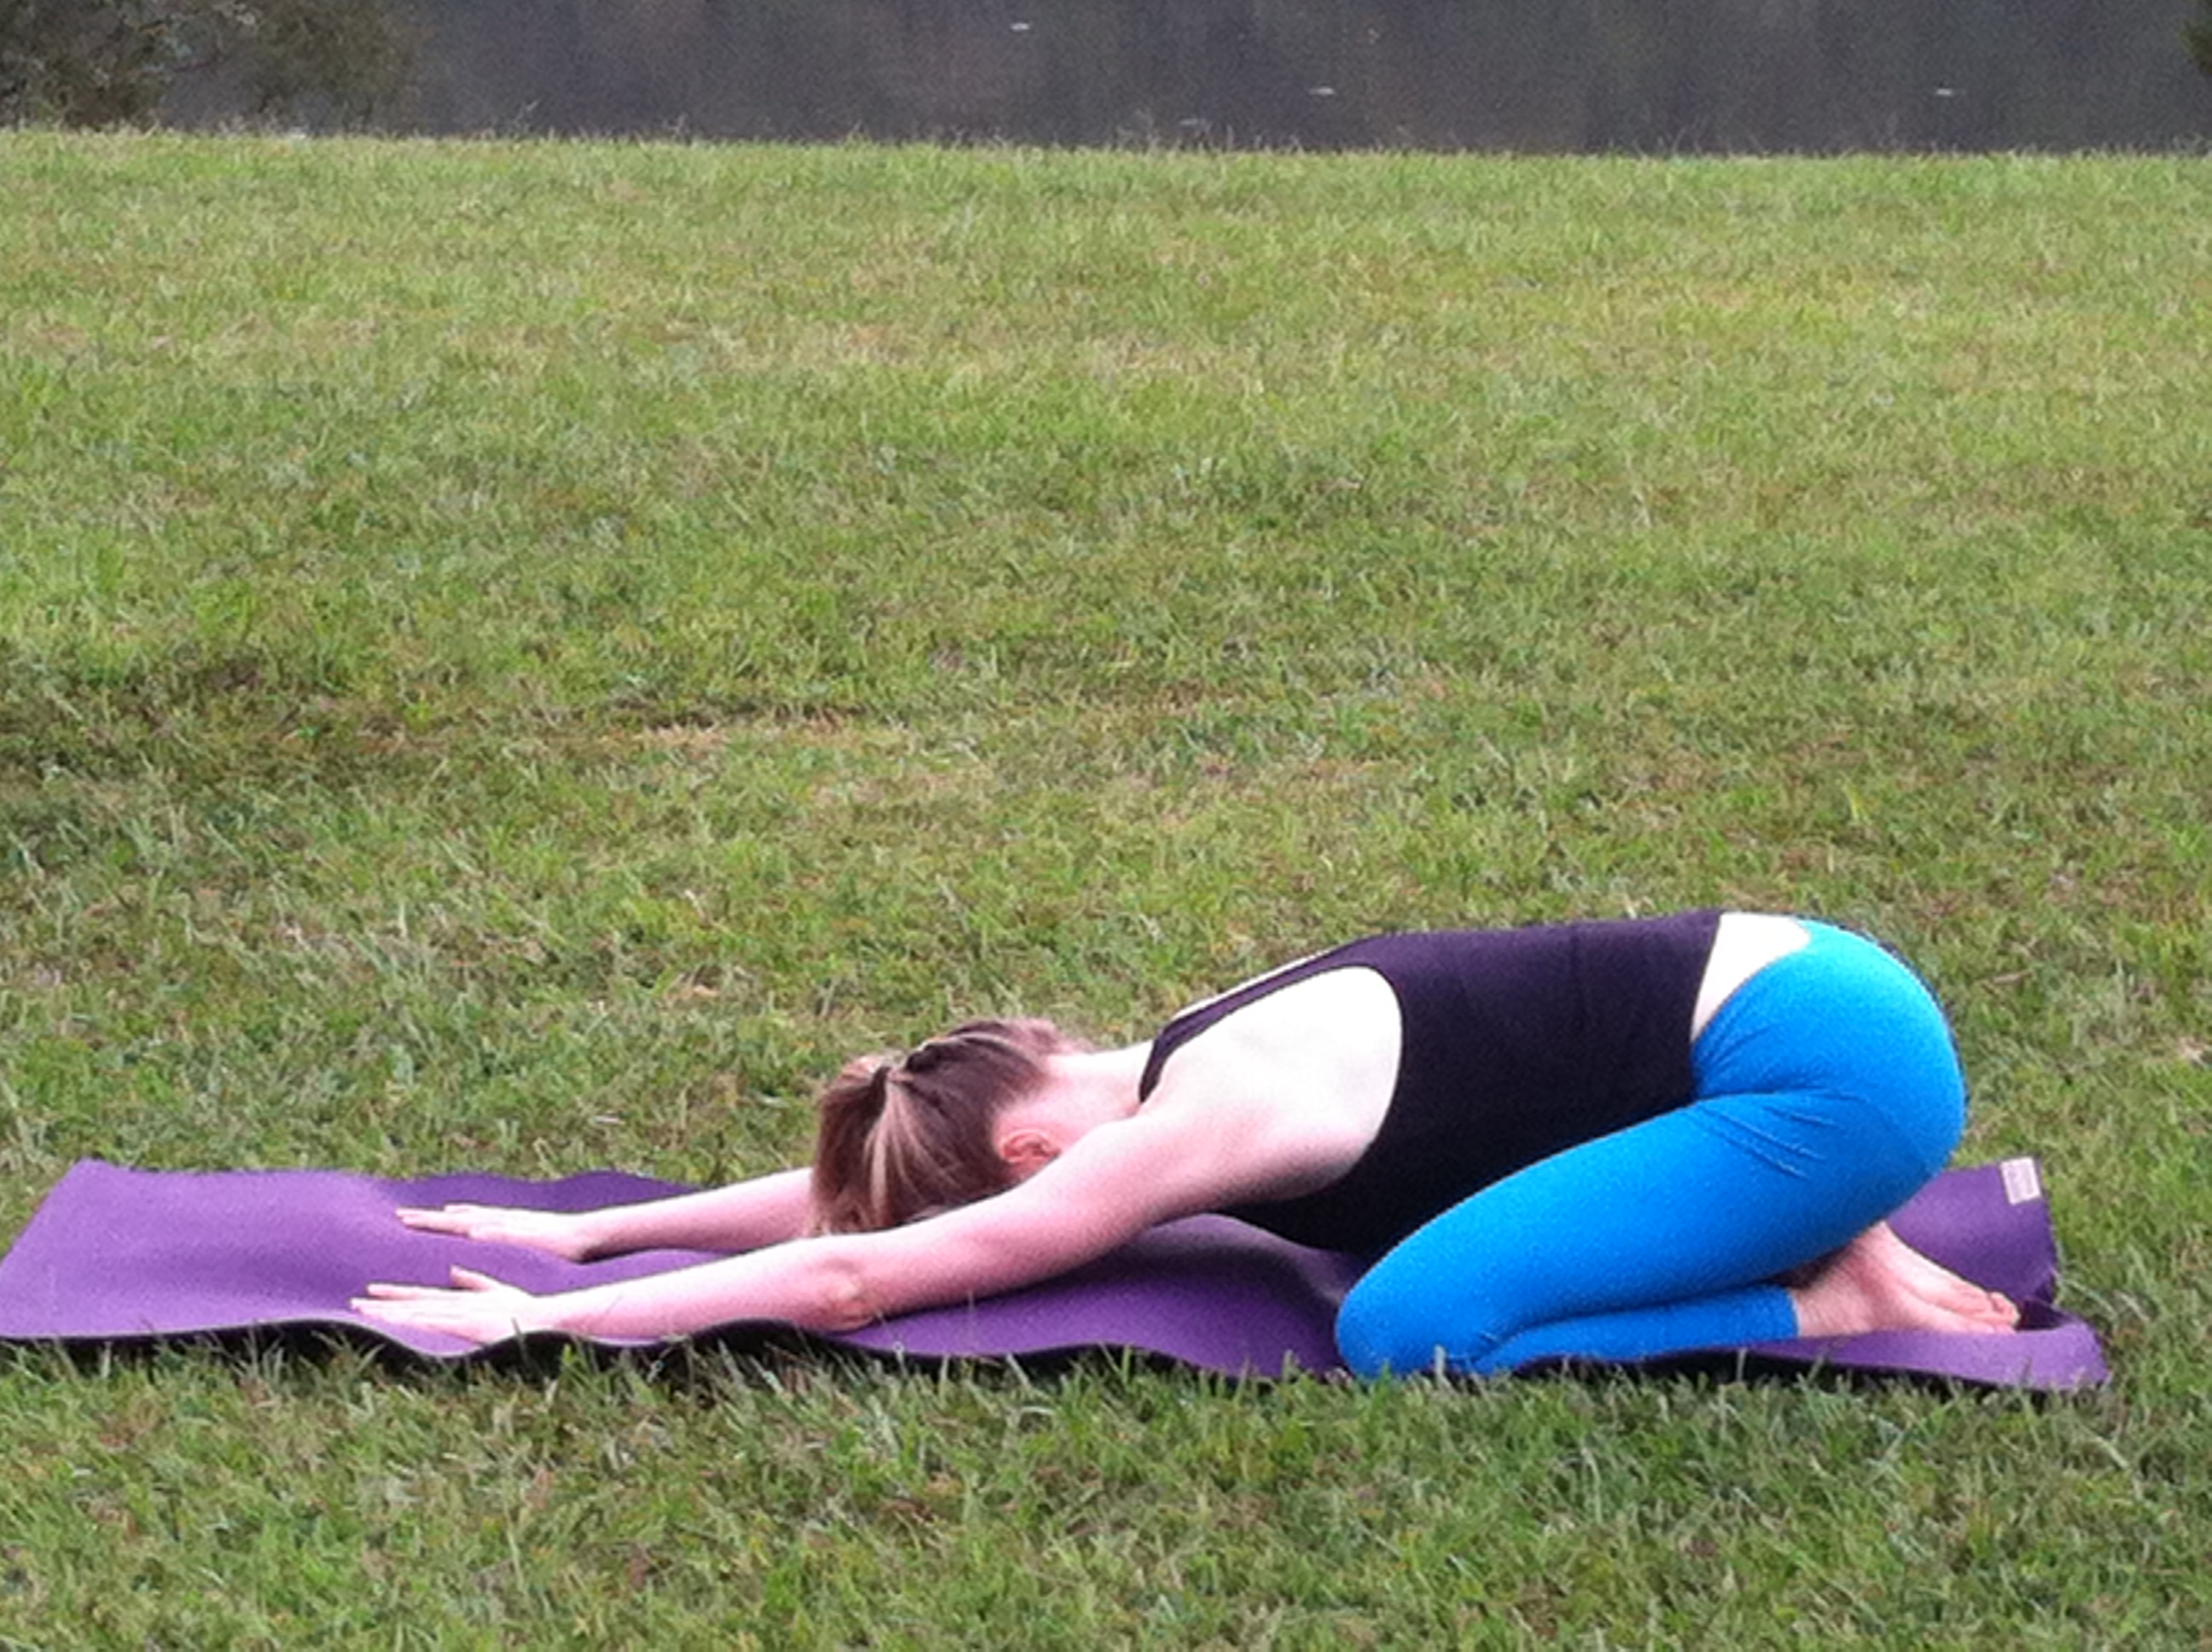
You can move between Cow and Child’s pose for a dynamic warm up of hips, shoulders, and spine.
Sun Salutation
Purpose: As part of a warm up or full practice, this series of poses lengthens and strengthens major muscle groups while building energy for the rest of your practice. There are many variations of the Sun Salutations; the lunges included in this series warm up the hip flexors, an important area of focus for hurdlers.
Mountain
- Stand with feet hip width apart. Firm your thigh muscles and lift the knee caps, without hardening your lower belly. Lift the inner ankles to strengthen the inner arches, then imagine a line of energy all the way up along your inner thighs to your groins, and from there through the core of your torso, neck, and head, and out through the crown of your head. Turn the upper thighs slightly inward. Lengthen your tailbone toward the floor and lift the pubis toward the navel. Widen shoulder blades down and together on the back body. Balance the crown of your head directly over the center of your pelvis, with the underside of your chin parallel to the floor, throat soft, and the tongue wide and flat on the floor of your mouth.
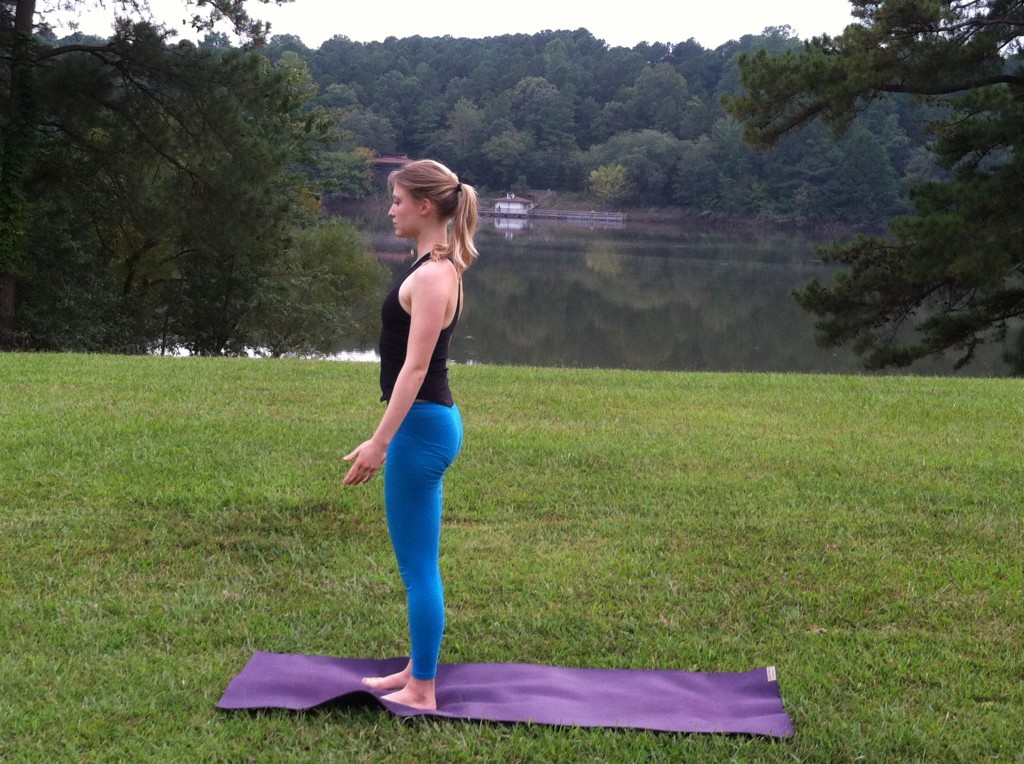
2. Inhale to reach arms overhead

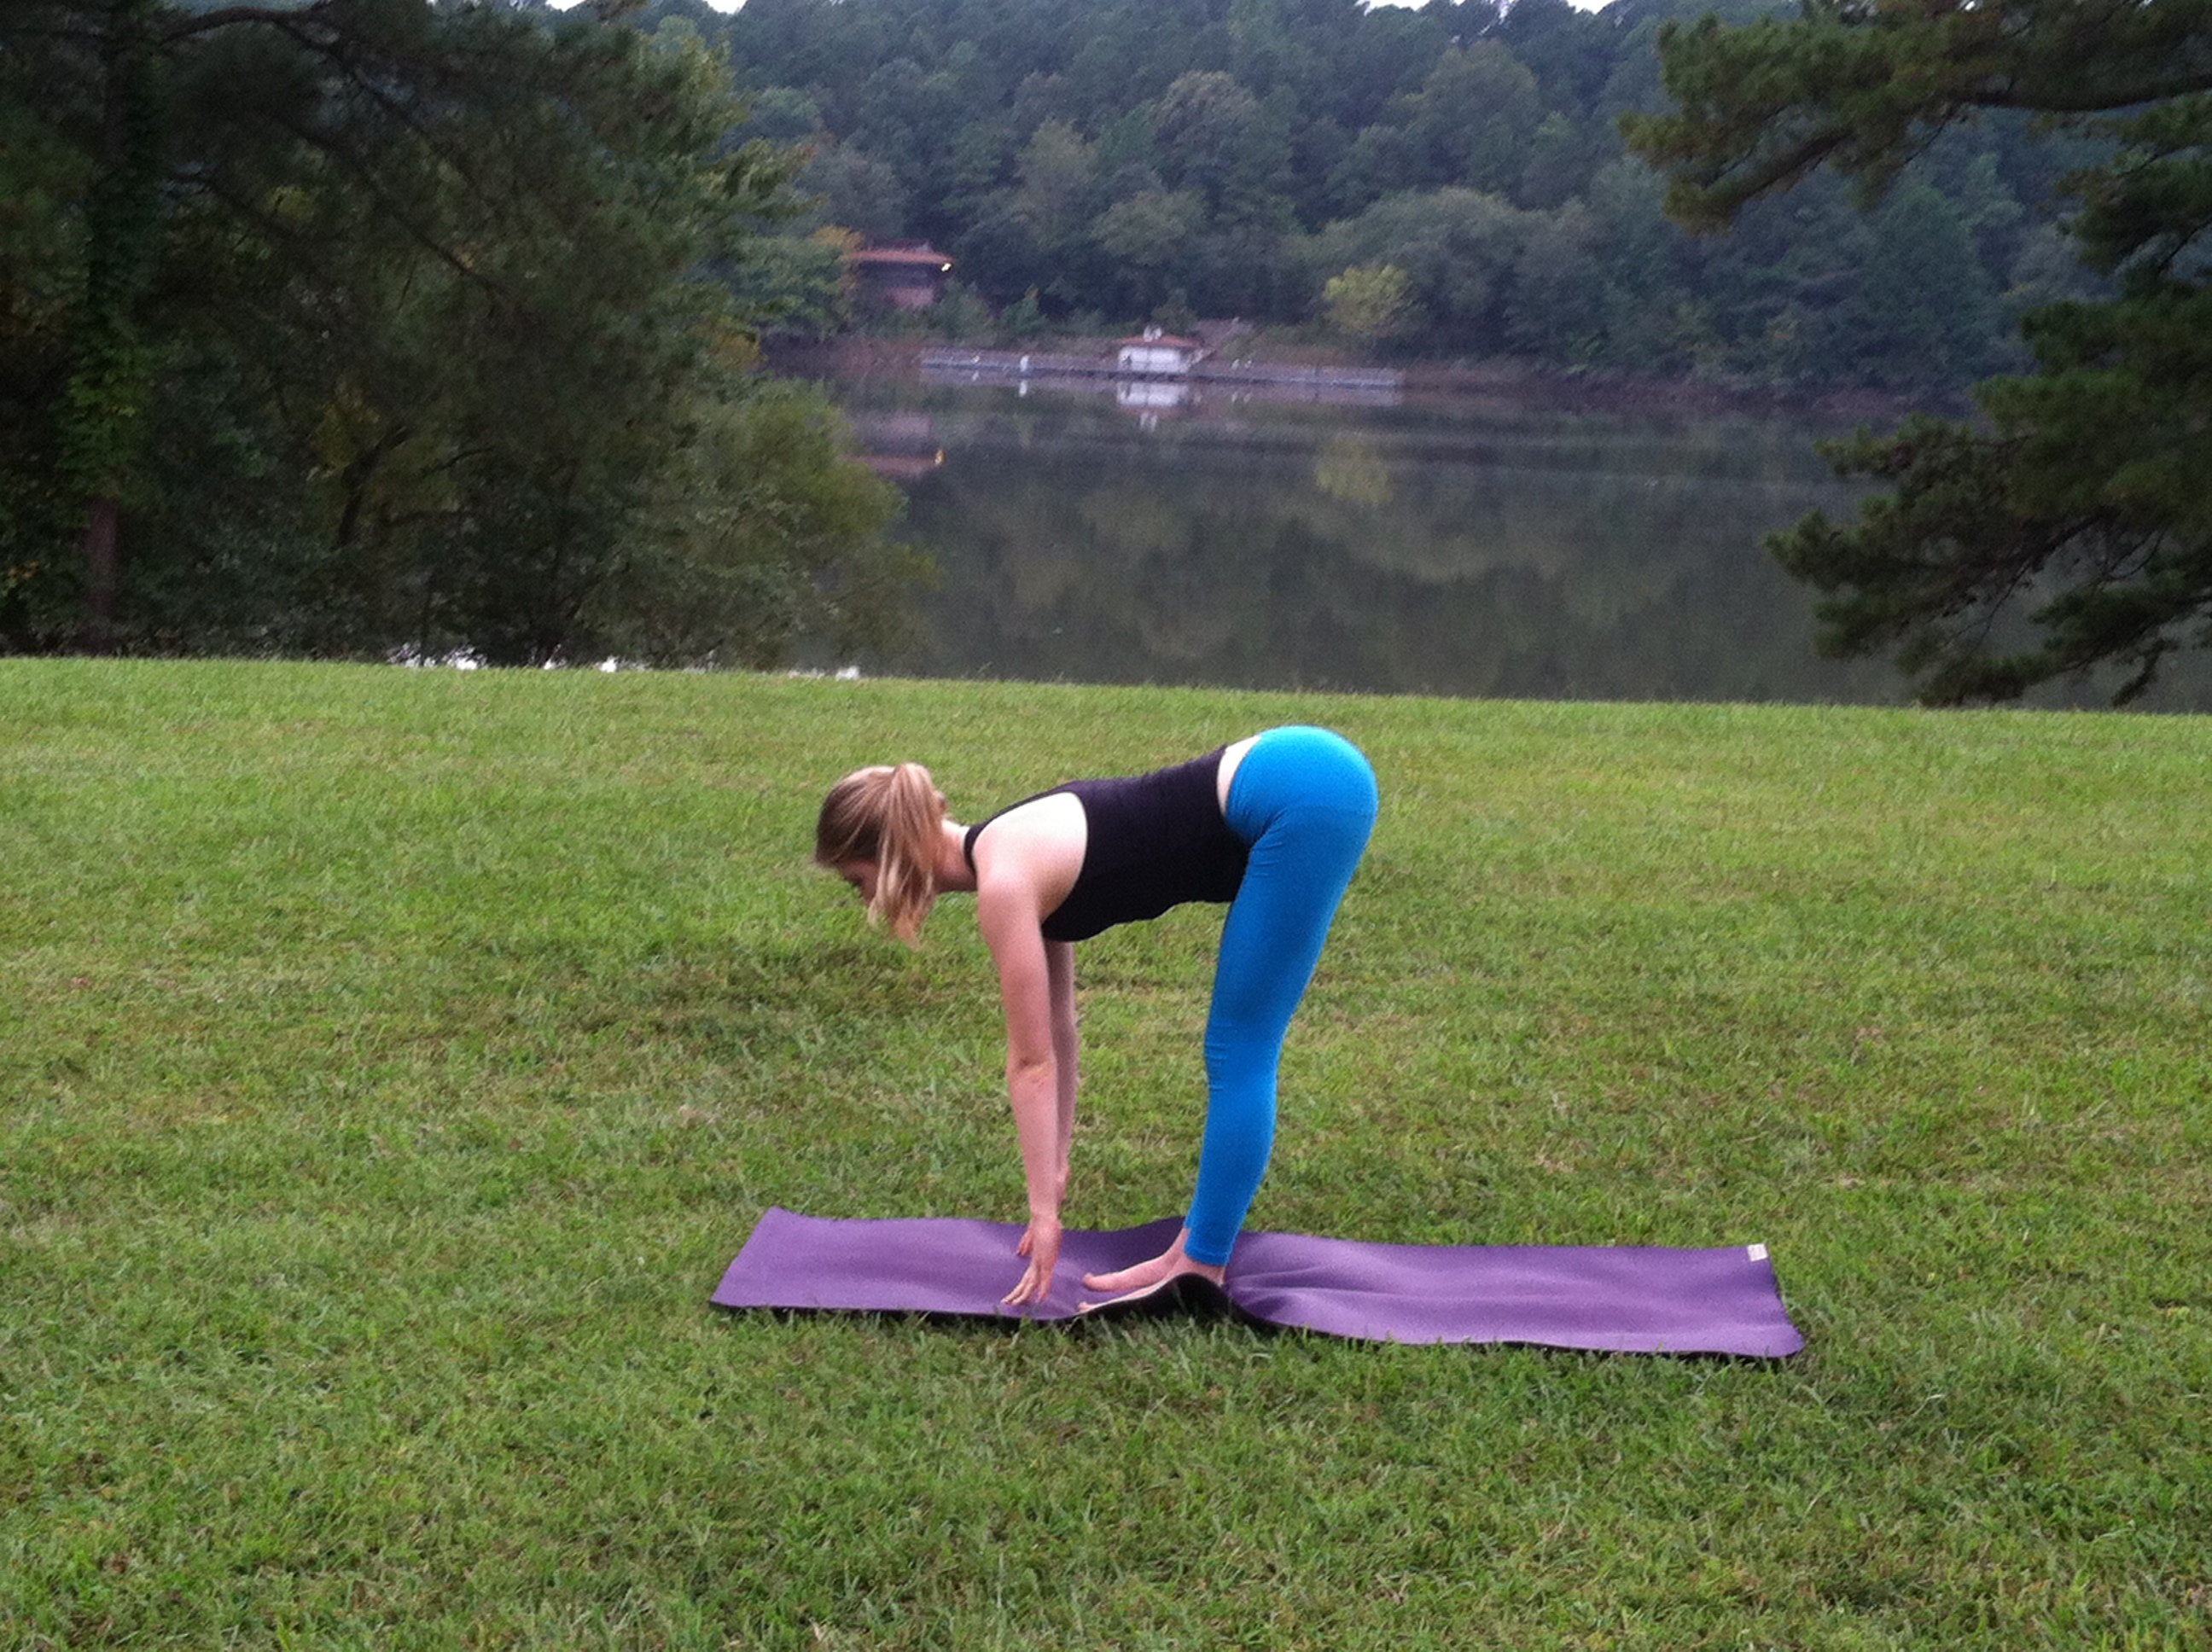
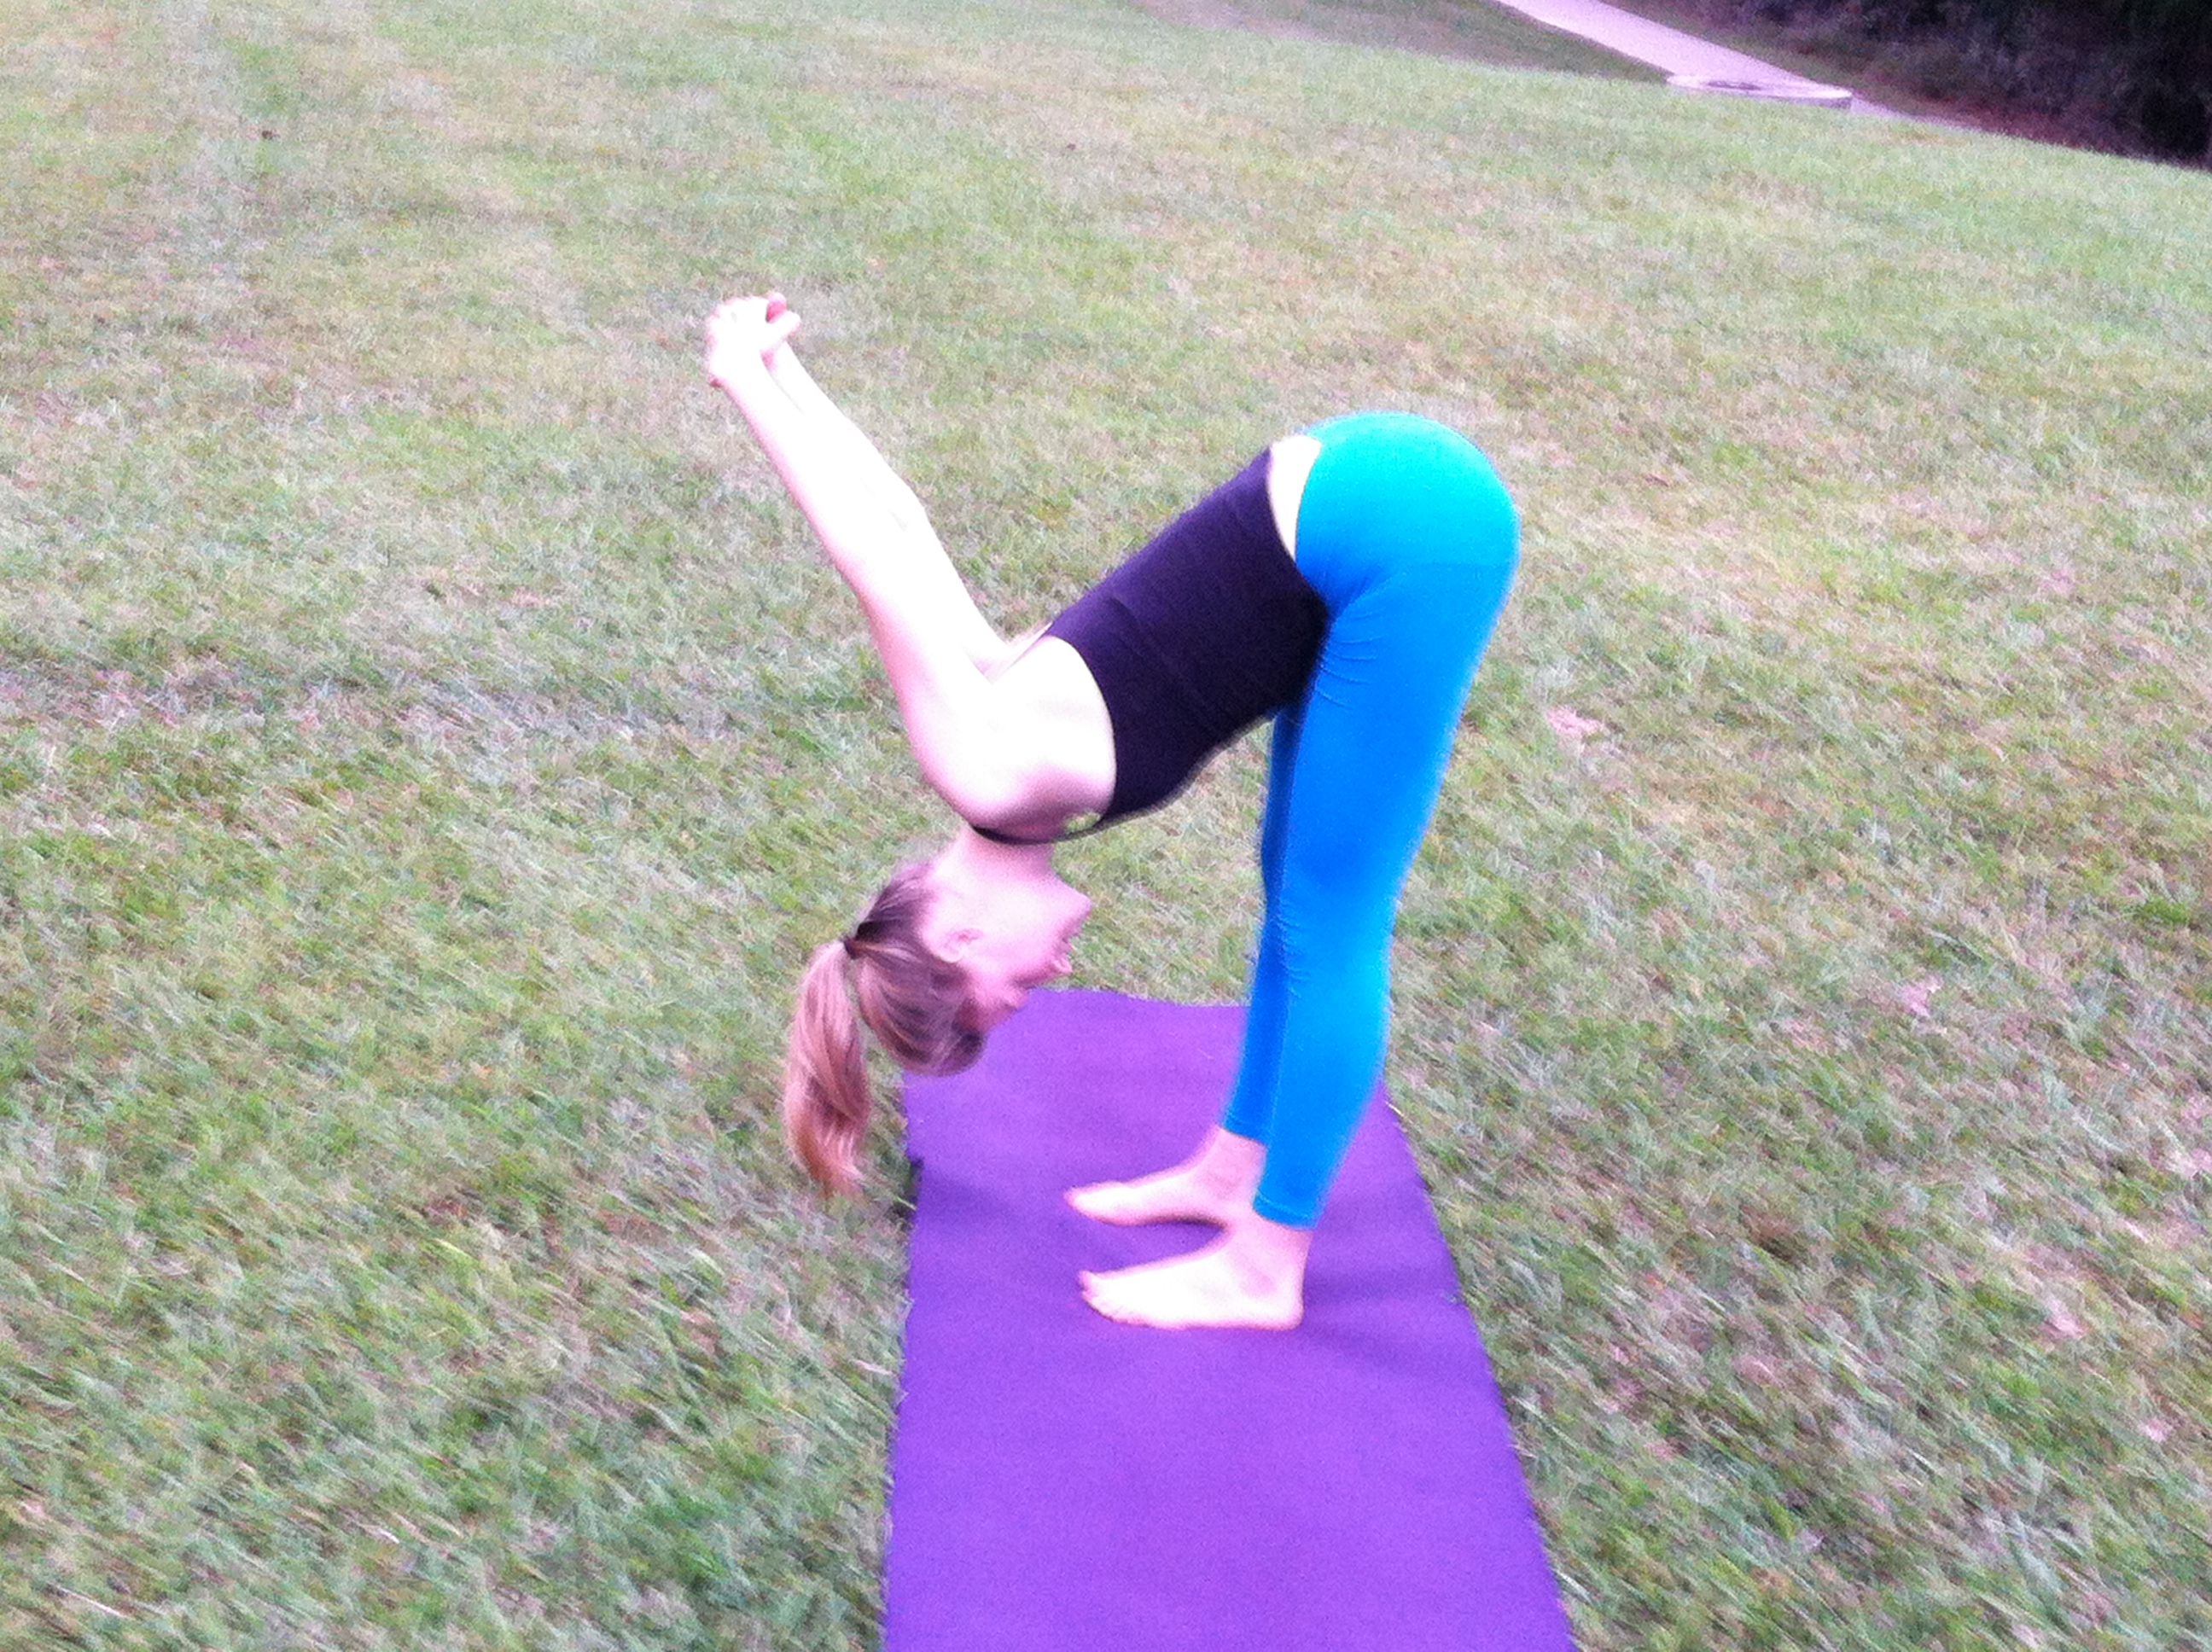
Standing Forward fold
- Exhale and fold forward, hinging at the hips and lengthening torso toward thighs.
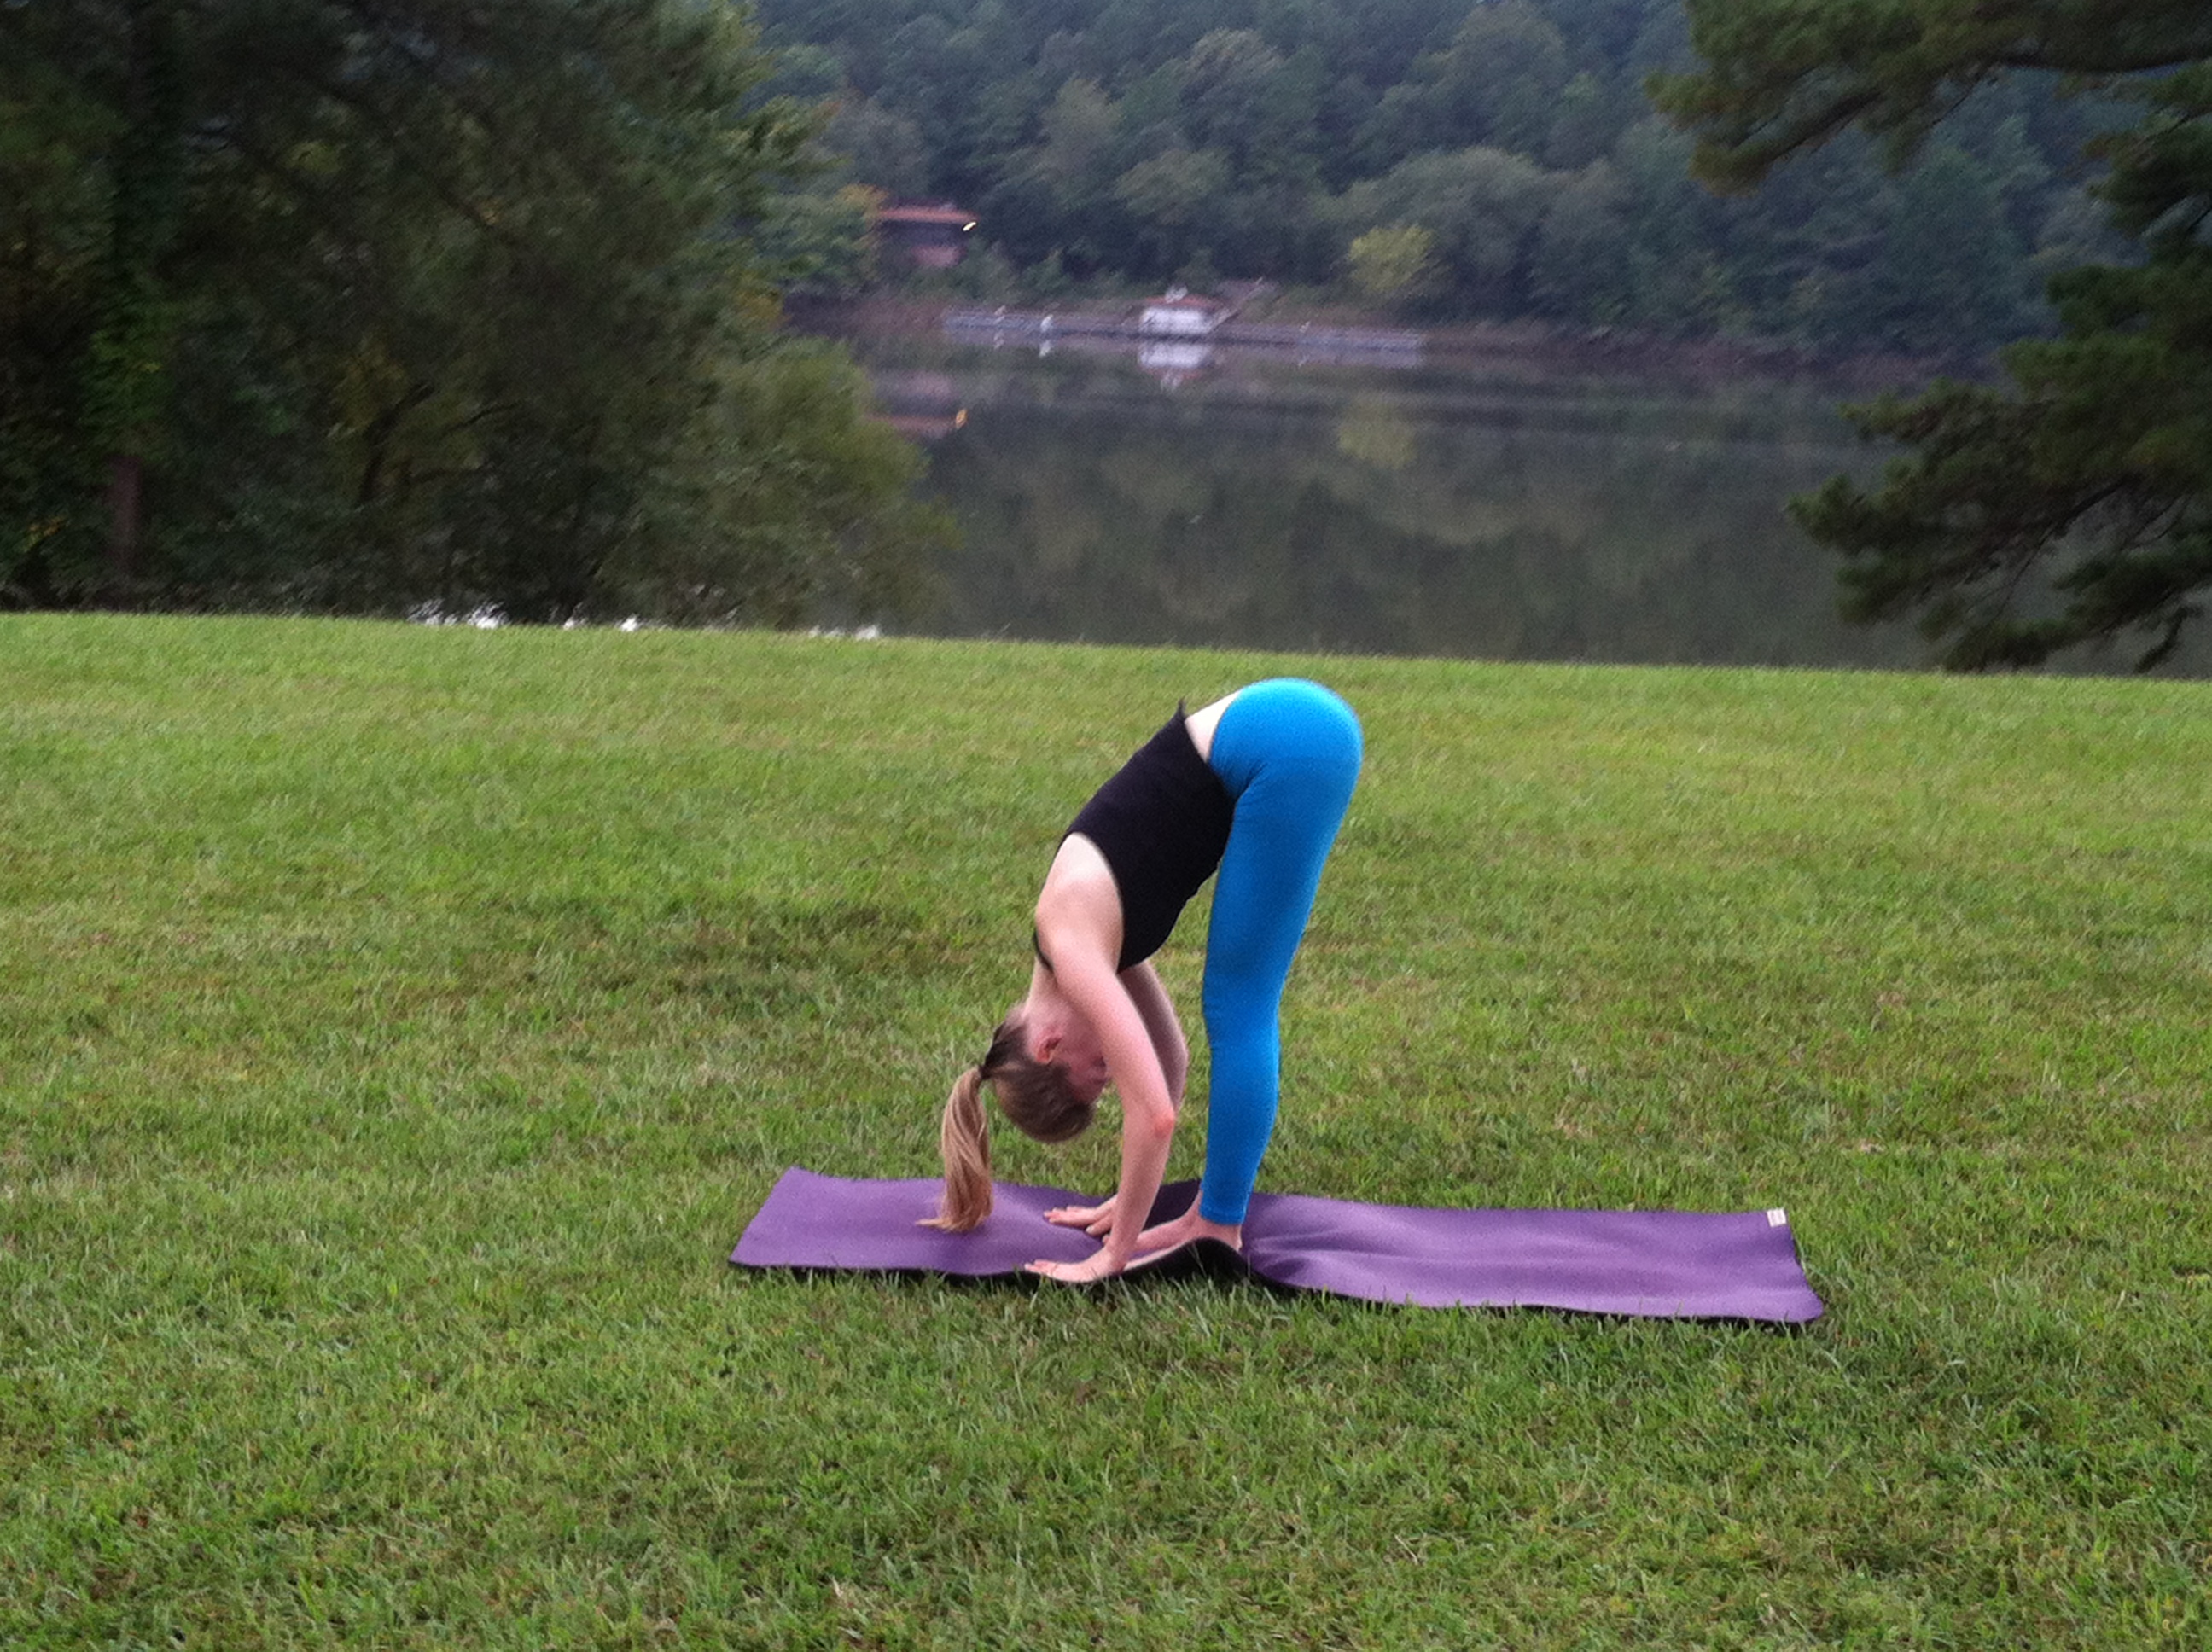
Extended forward fold
- Inhale to extend the spine, reaching the chest forward to make a flat back. Head lifts.
- Press thigh bones back, but keep knees soft.
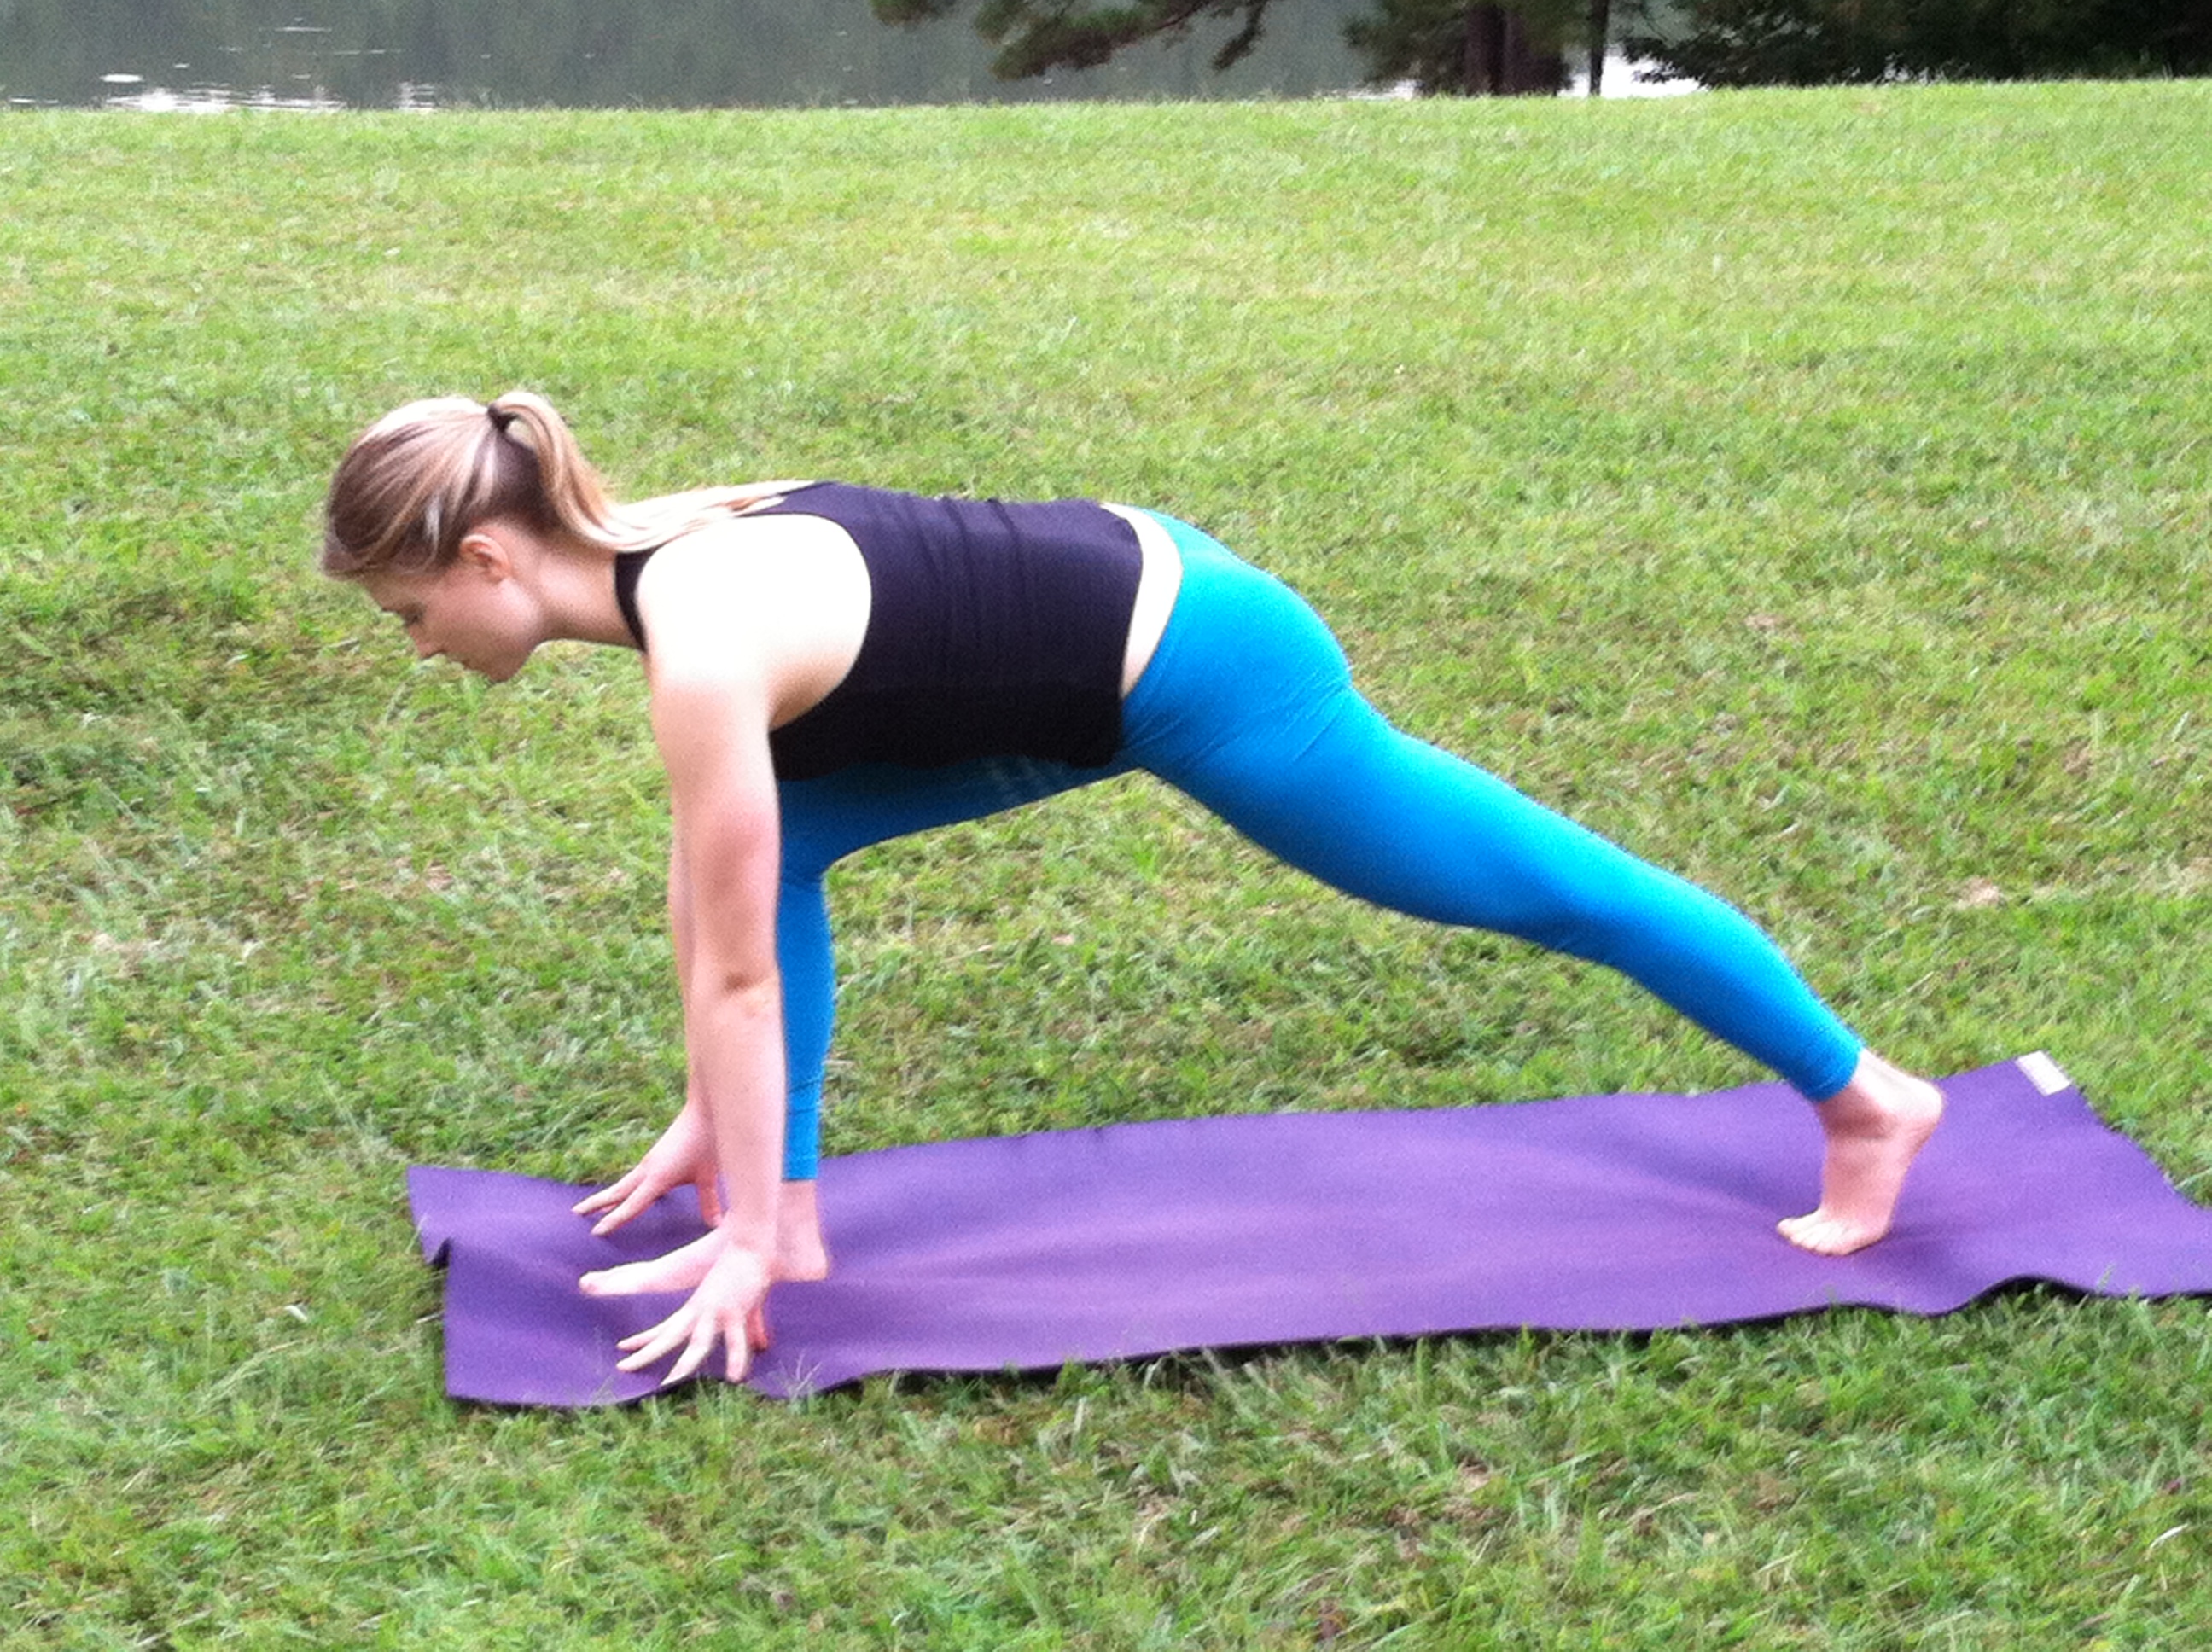
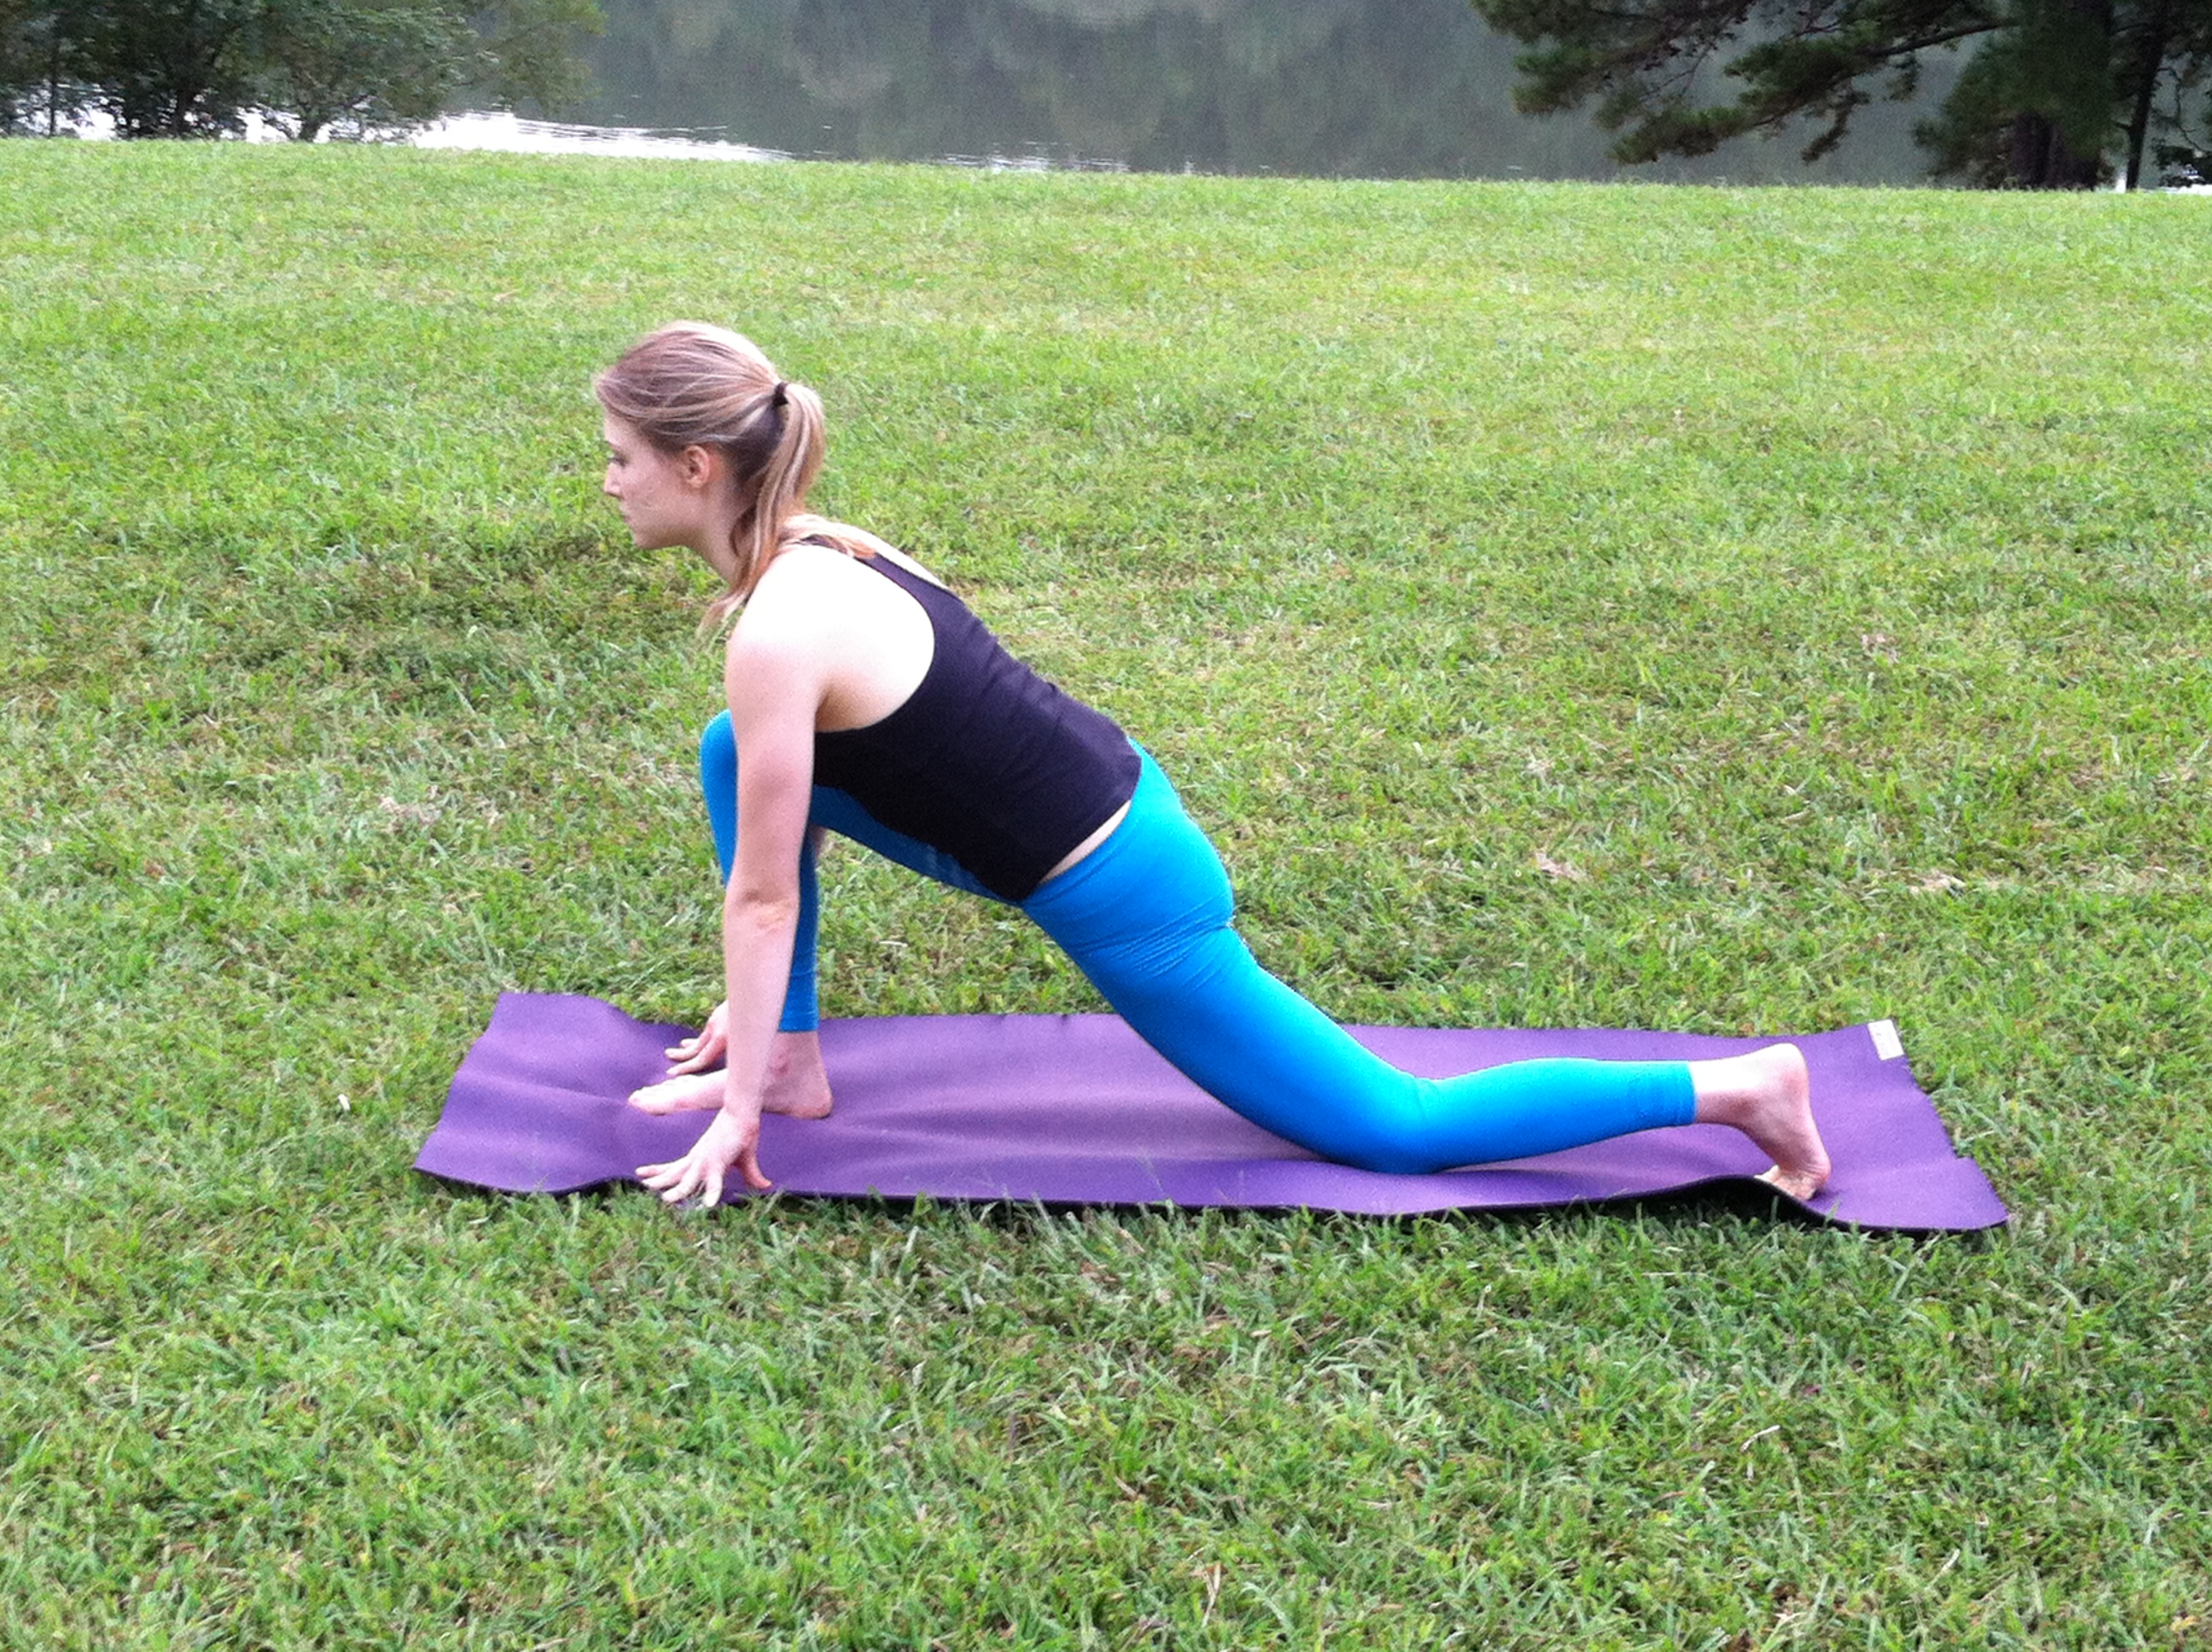
Lunge
- Step right foot back into lunge.
- Come up onto your fingertips and lift the chest forward while reaching through right heel.
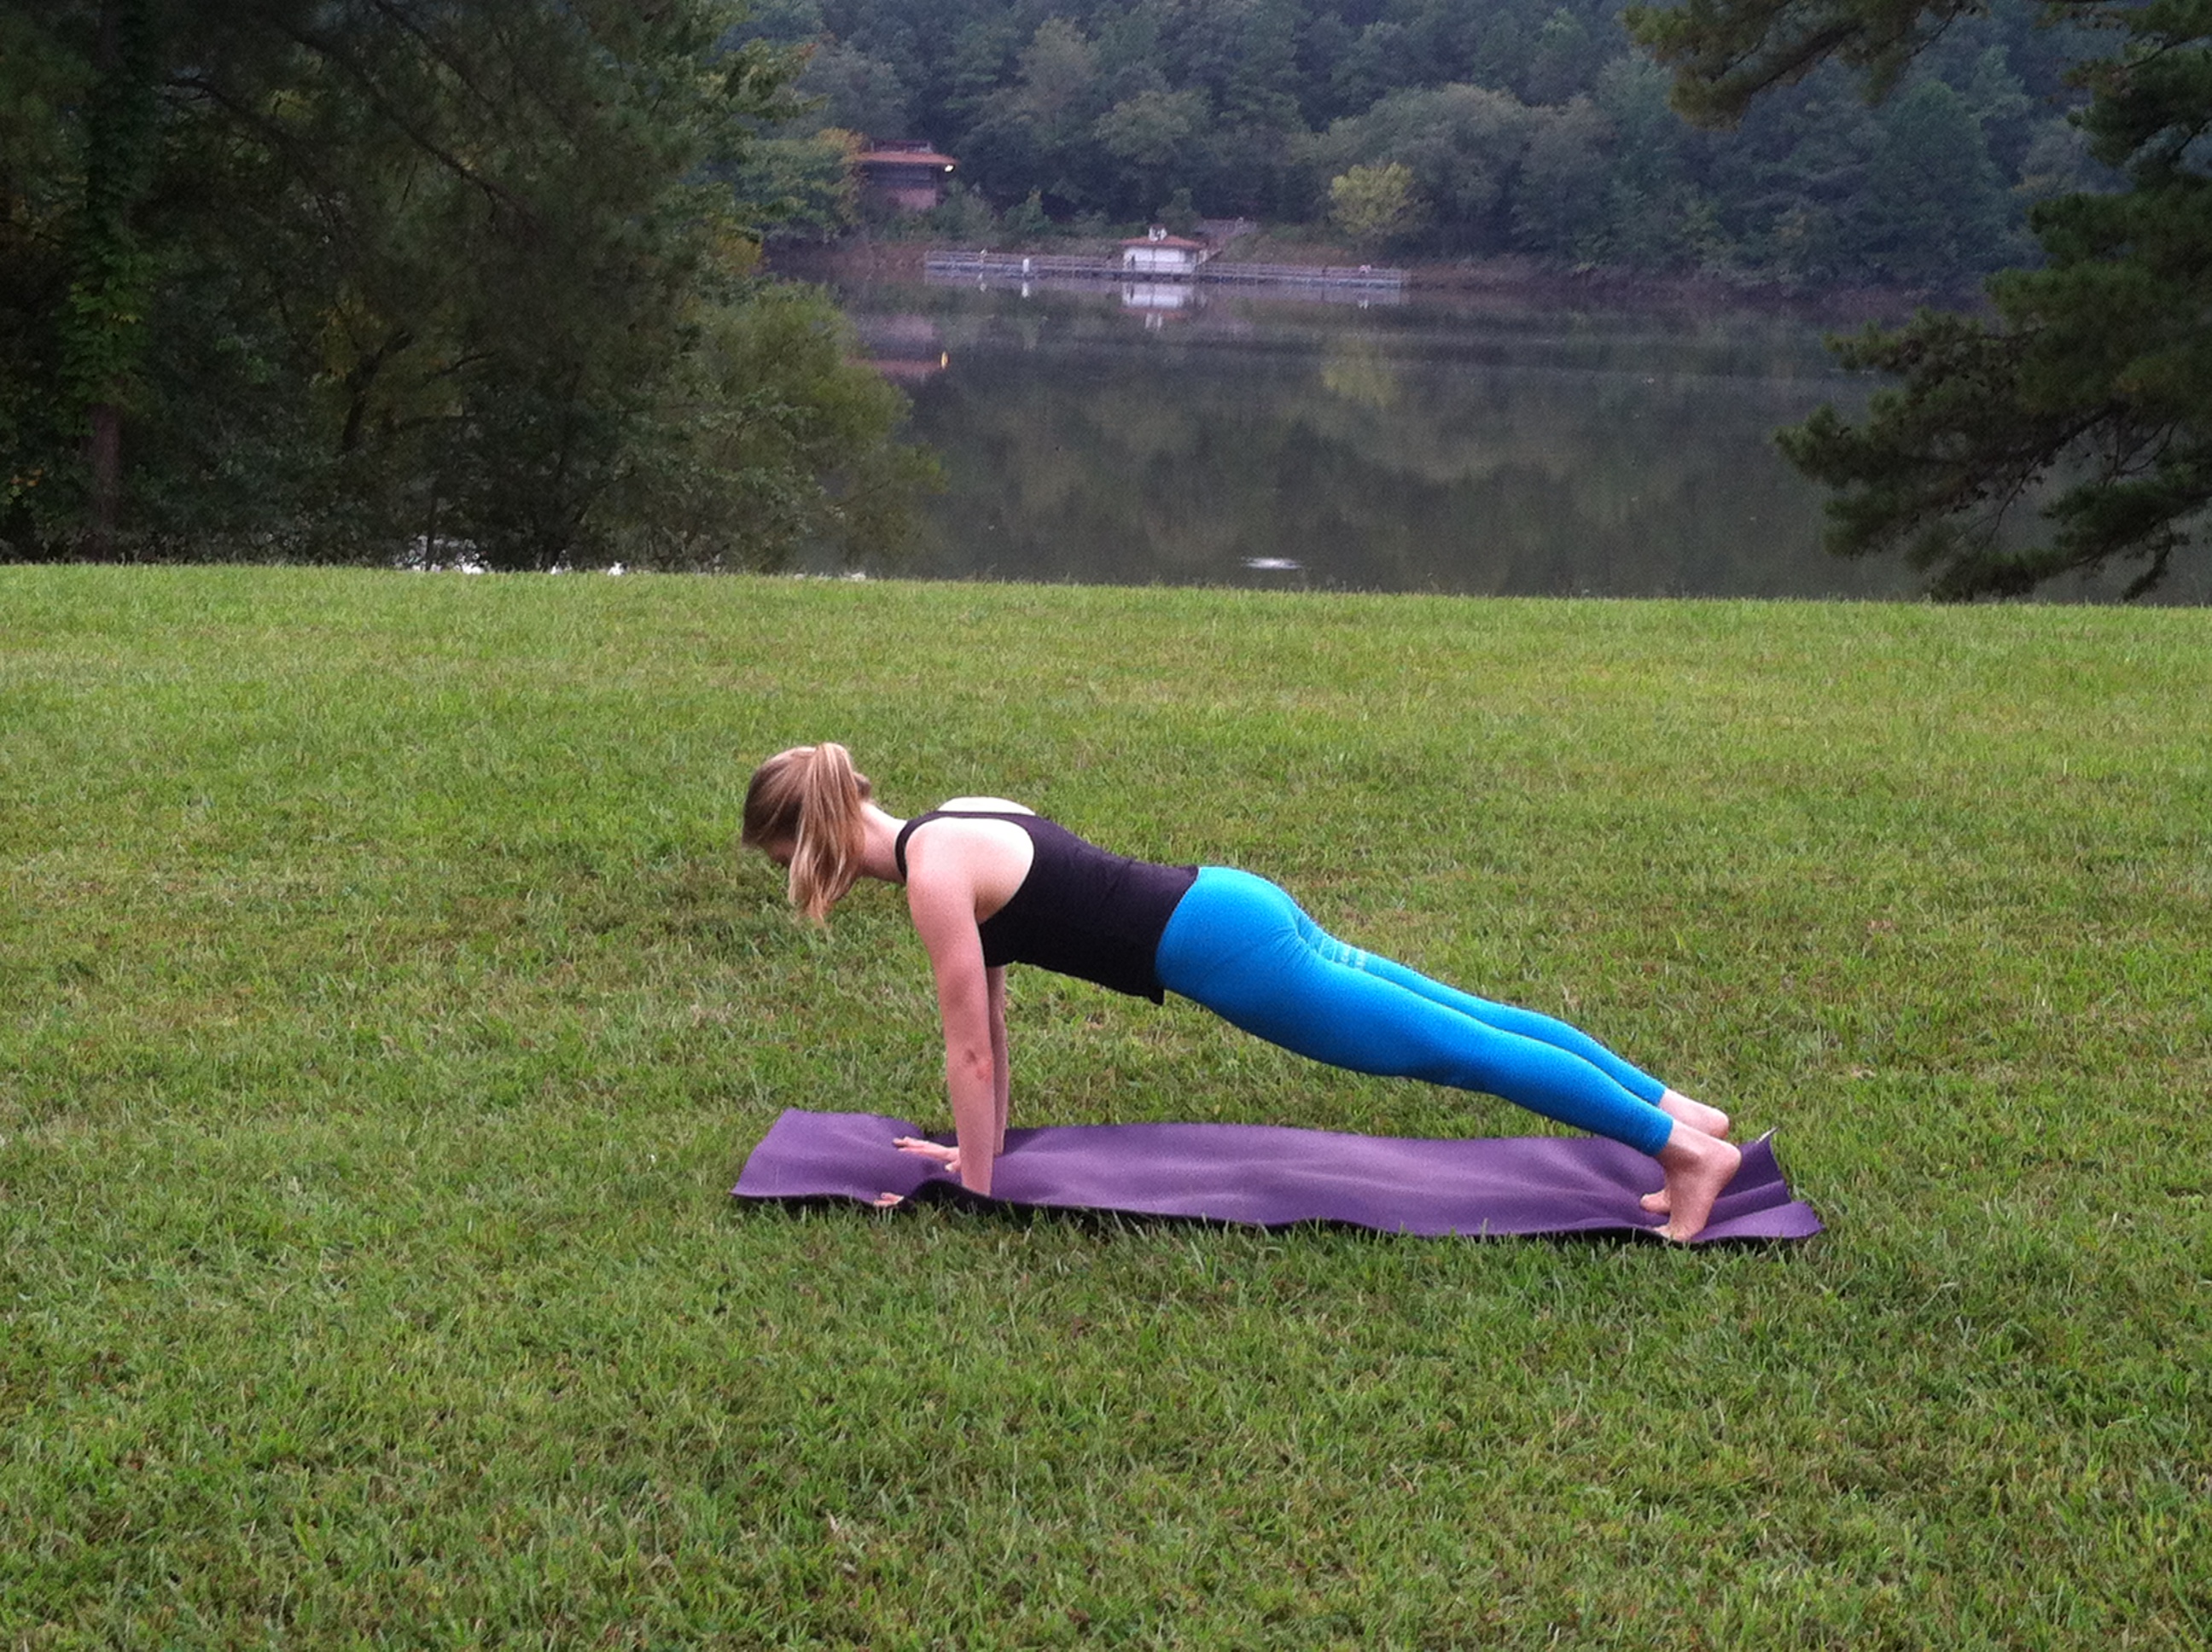
Plank
- Press hands evenly into the mat, shoulder width apart, and step into plank pose. Imagine there is a string connected to your center, extending the length of your body and out in either direction.
- Breathe into the waistline, press back through the heels and extend energy through the crown of the head.
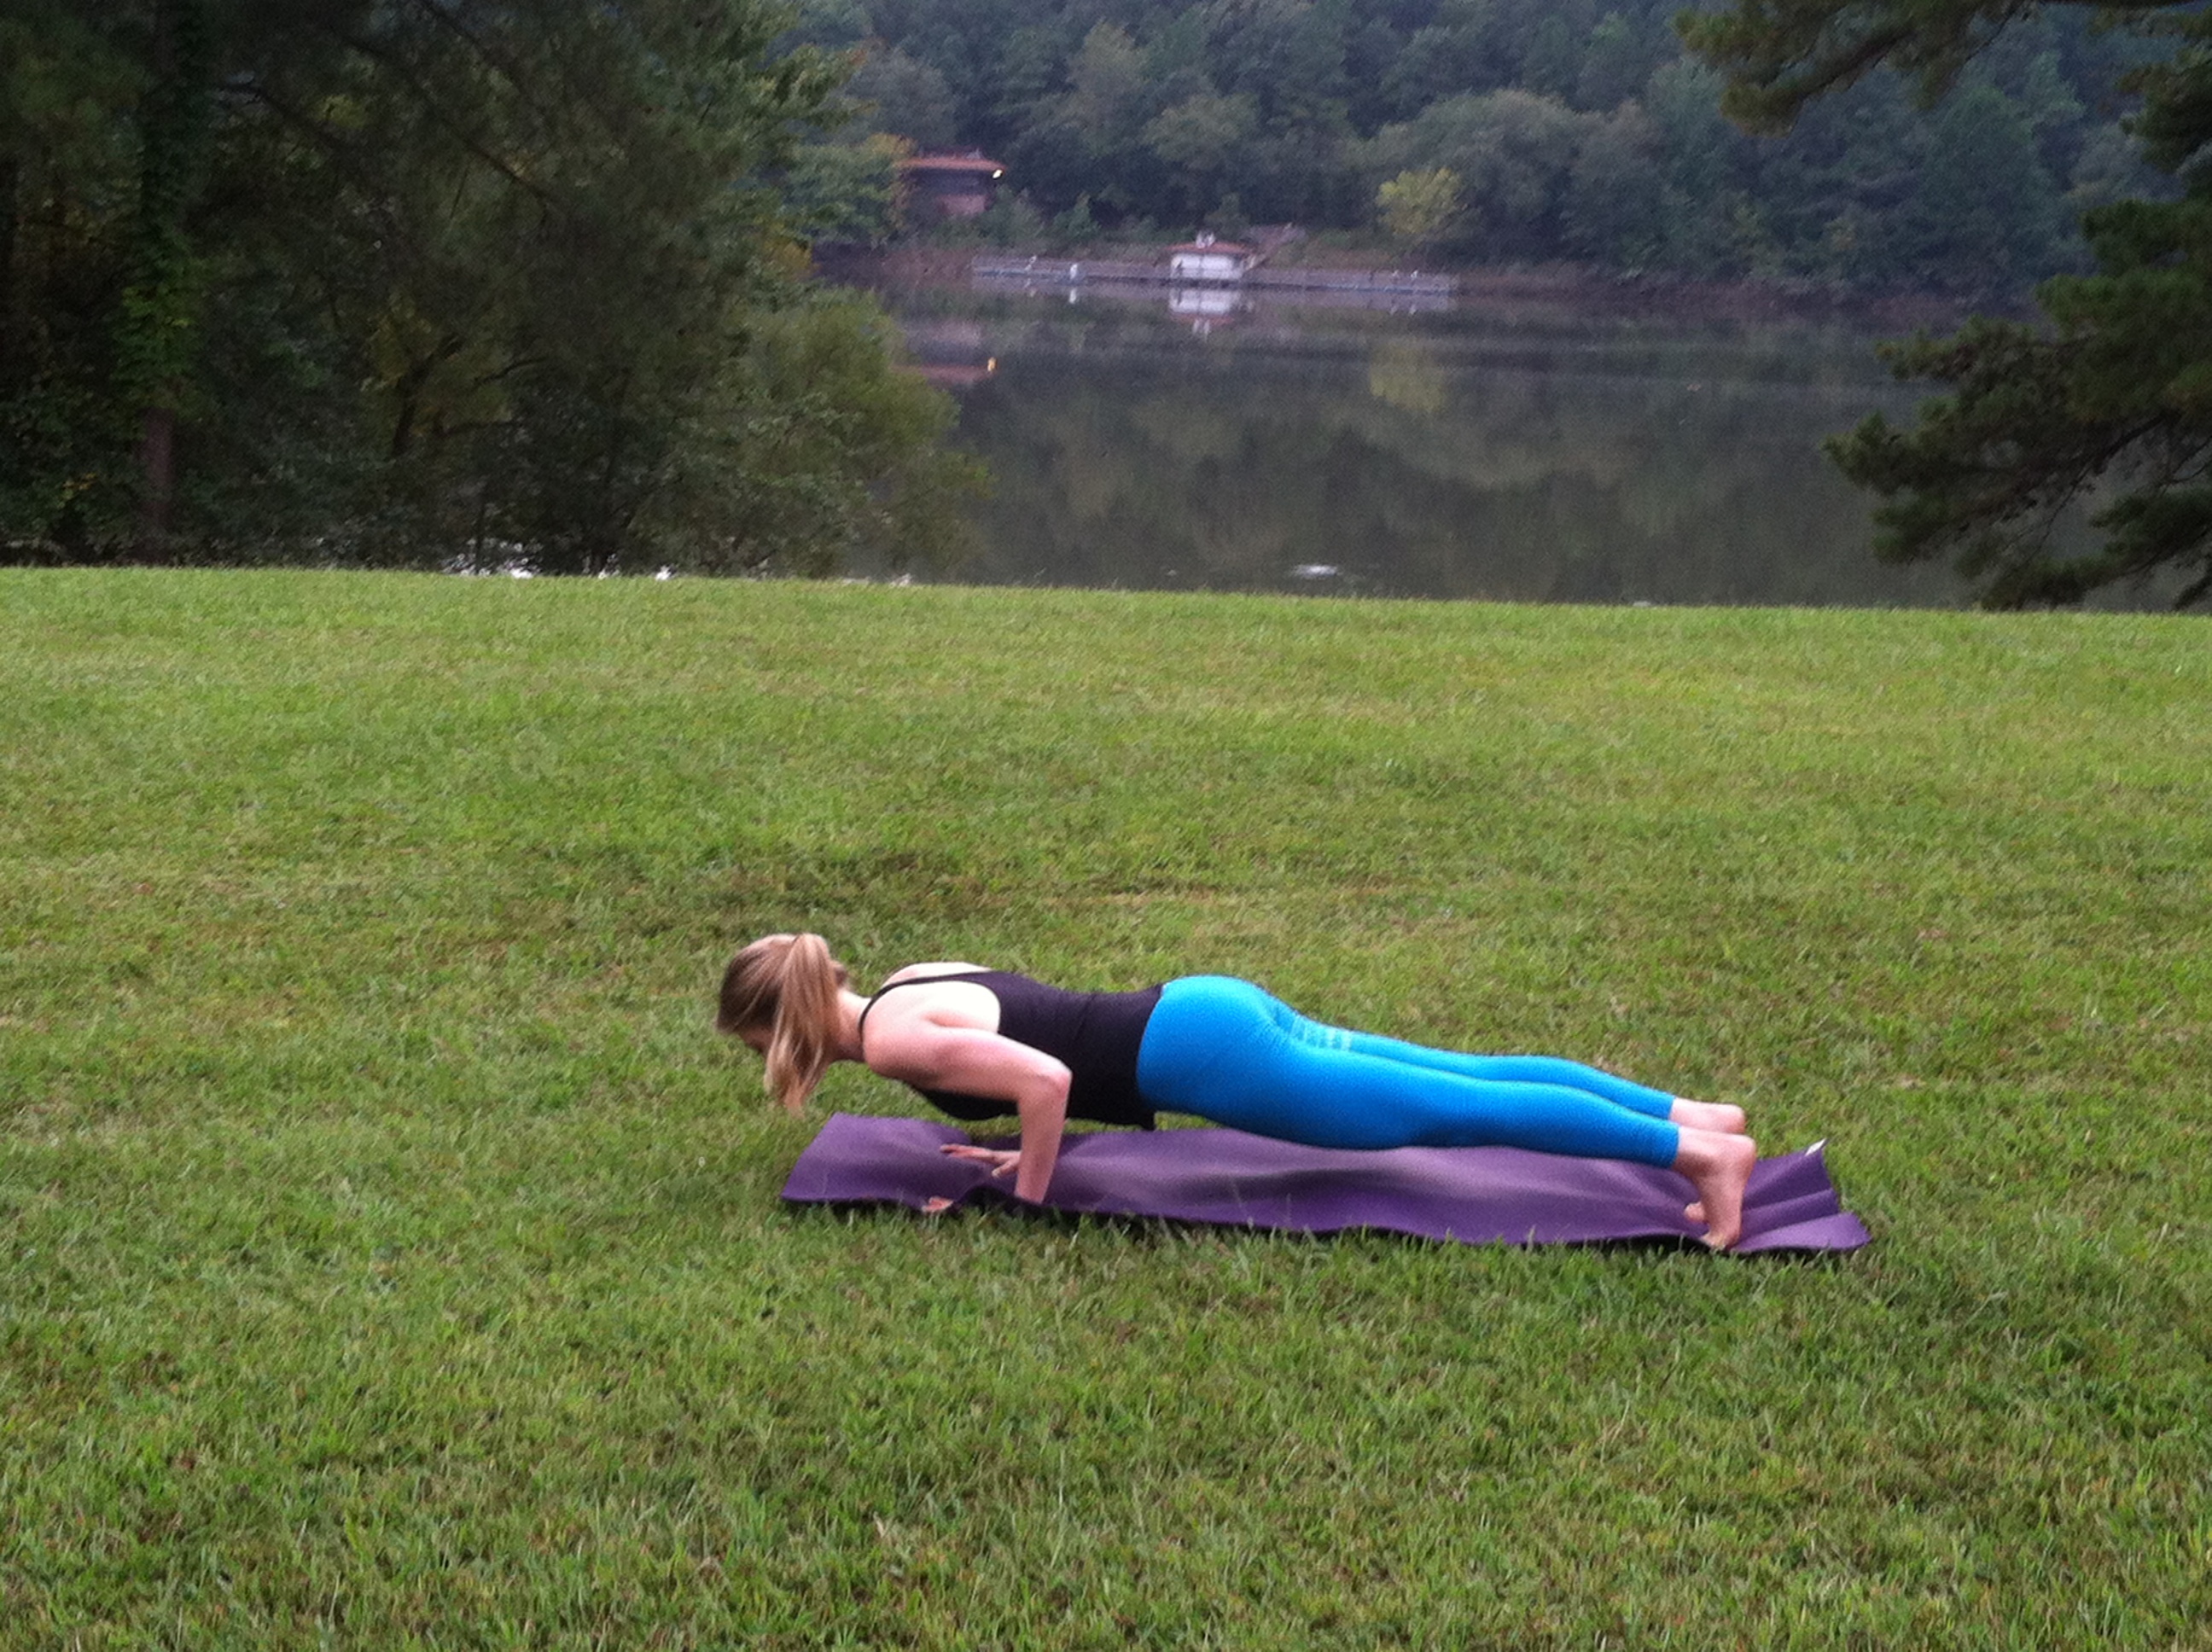
Chaturanga Dandasana
- With an exhalation, slowly lower your torso and legs to a few inches above and parallel to the floor. There’s a tendency in this pose for the lower back to sway toward the floor and the tailbone to poke up toward the ceiling.
- Throughout your stay in this position, keep the tailbone firmly in place and the legs very active and turned slightly inward. Squeeze elbows toward the ribs and lift belly button toward spine. You may hold or flow gently to your belly on the floor.
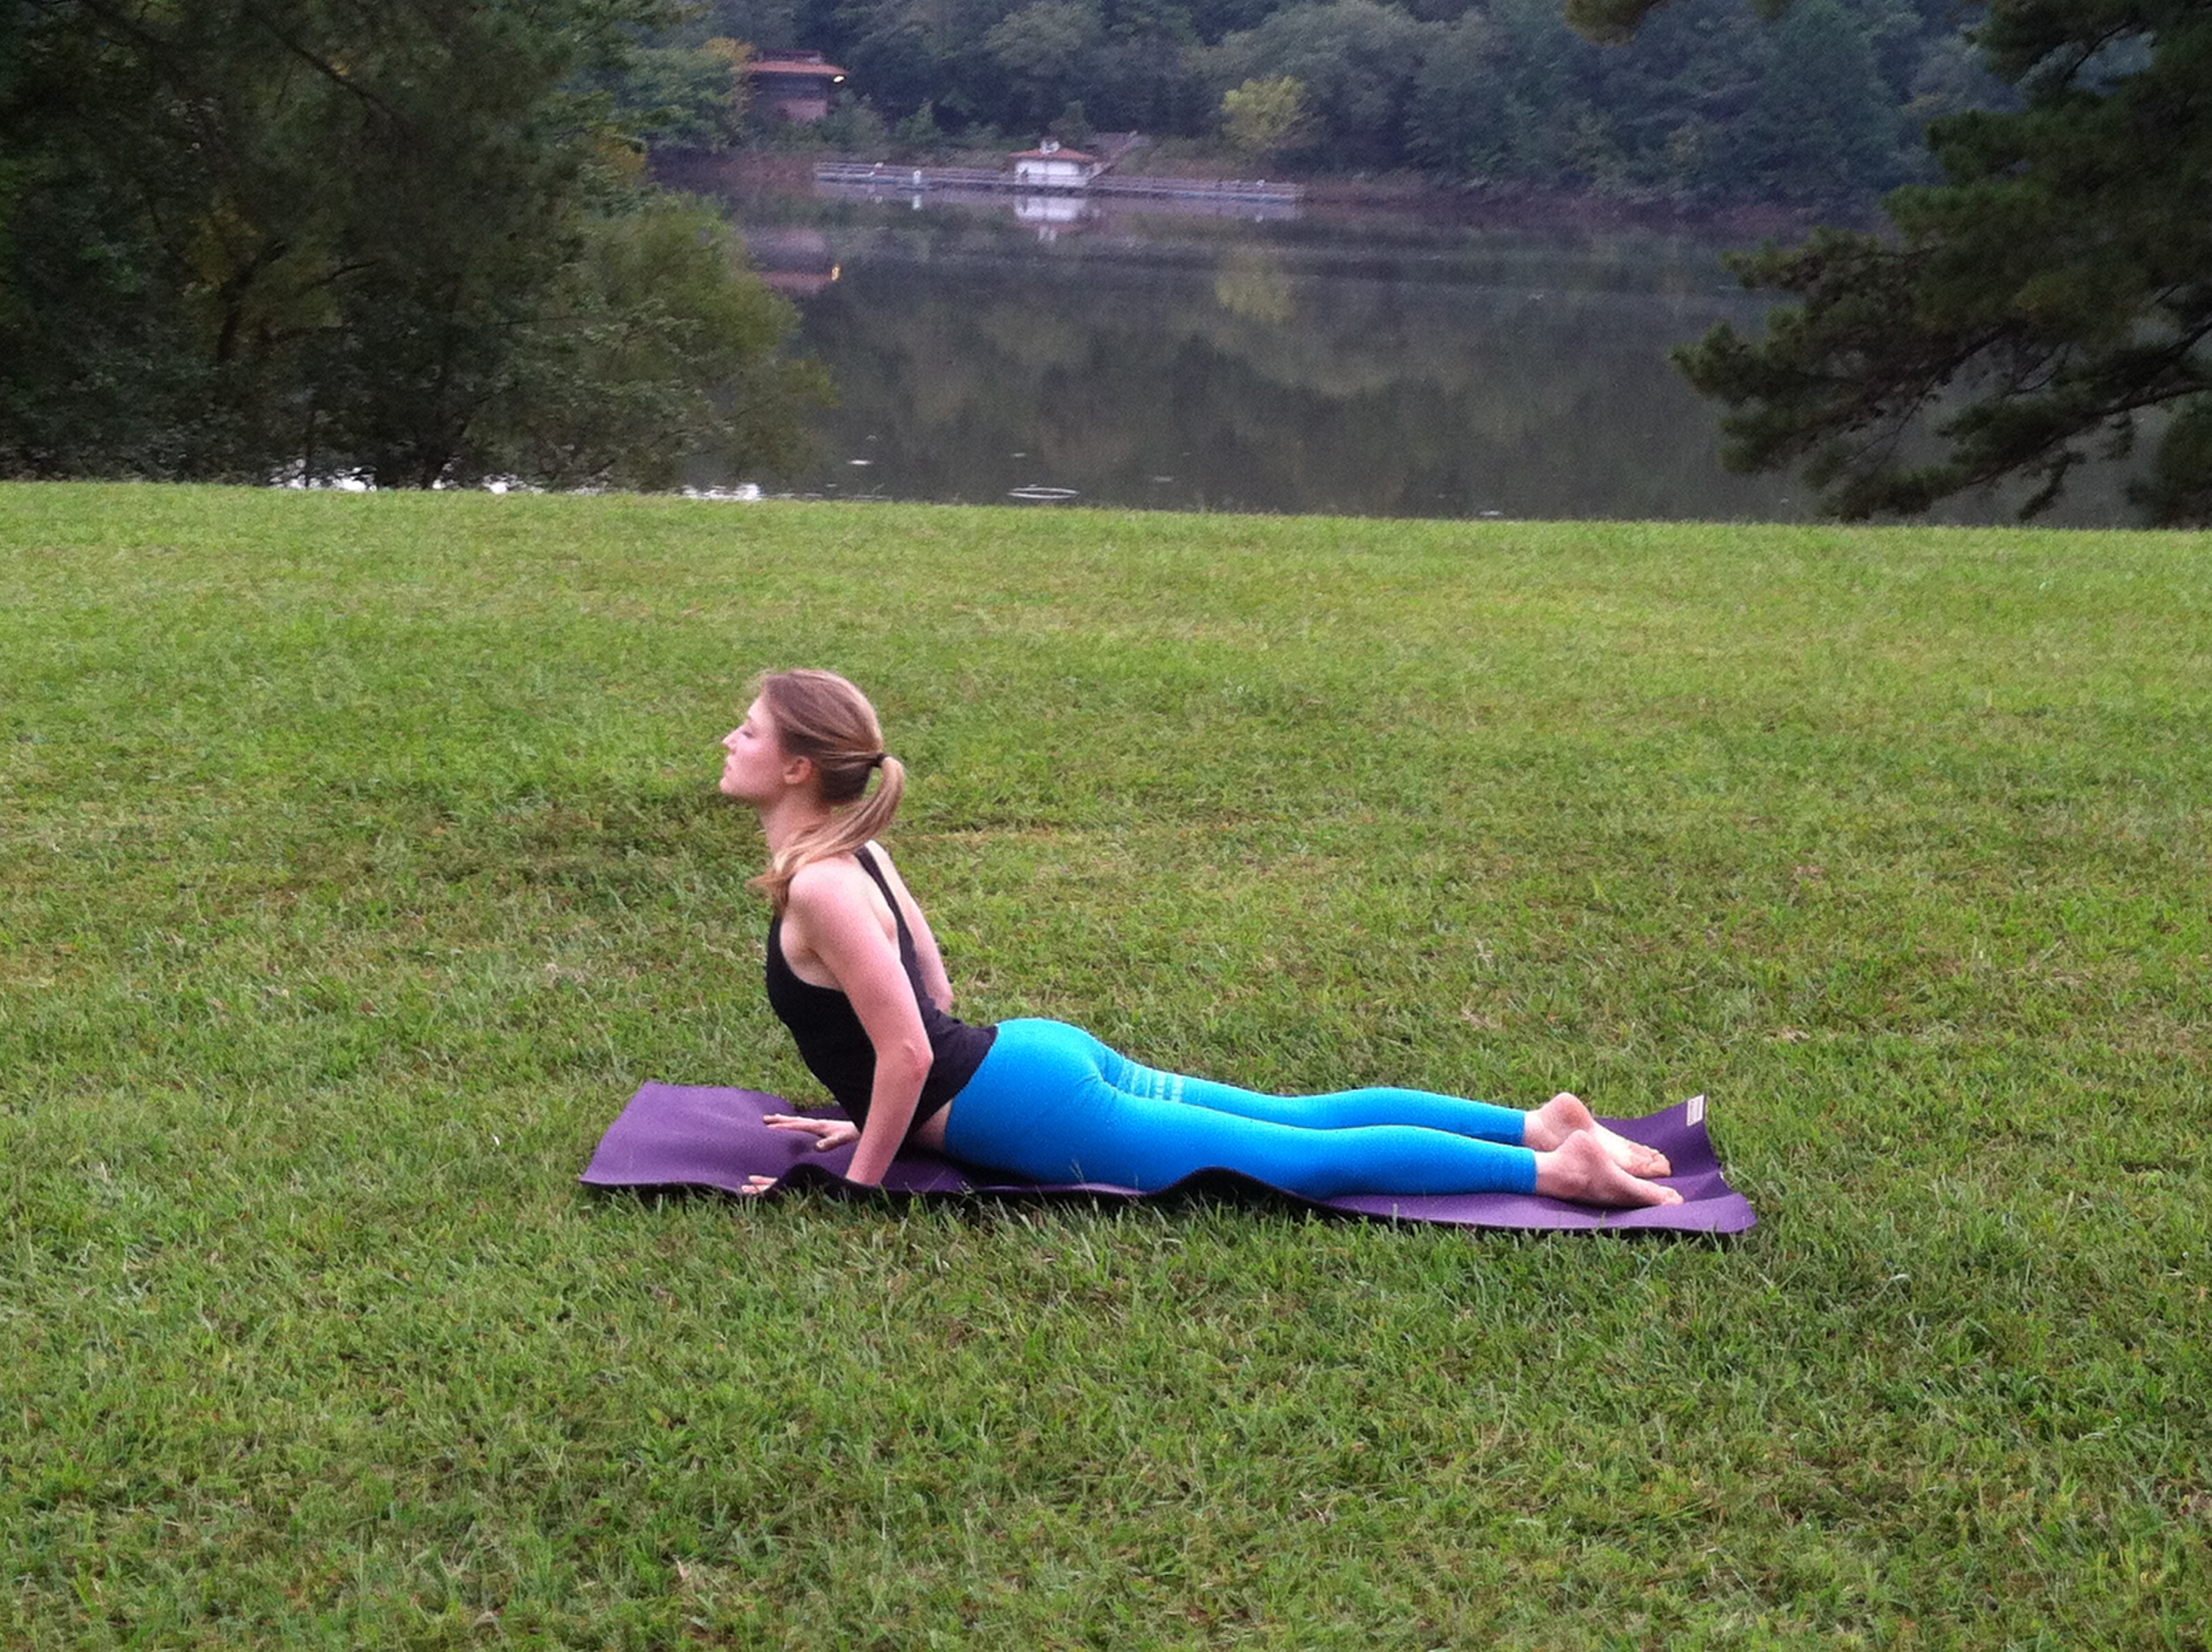
Cobra
- Stretch your legs back, tops of the feet and toenails on the floor. Spread your hands on the floor under your shoulders. Hug the elbows back into your body. Press the tops of the feet and thighs and the pubis firmly into the floor.
- On an inhalation, begin to straighten the arms to lift the chest off the floor, going only to the height at which you can maintain a connection through your pubis to your legs. Firm but don’t harden the buttocks, and distribute the backbend evenly throughout the spine.
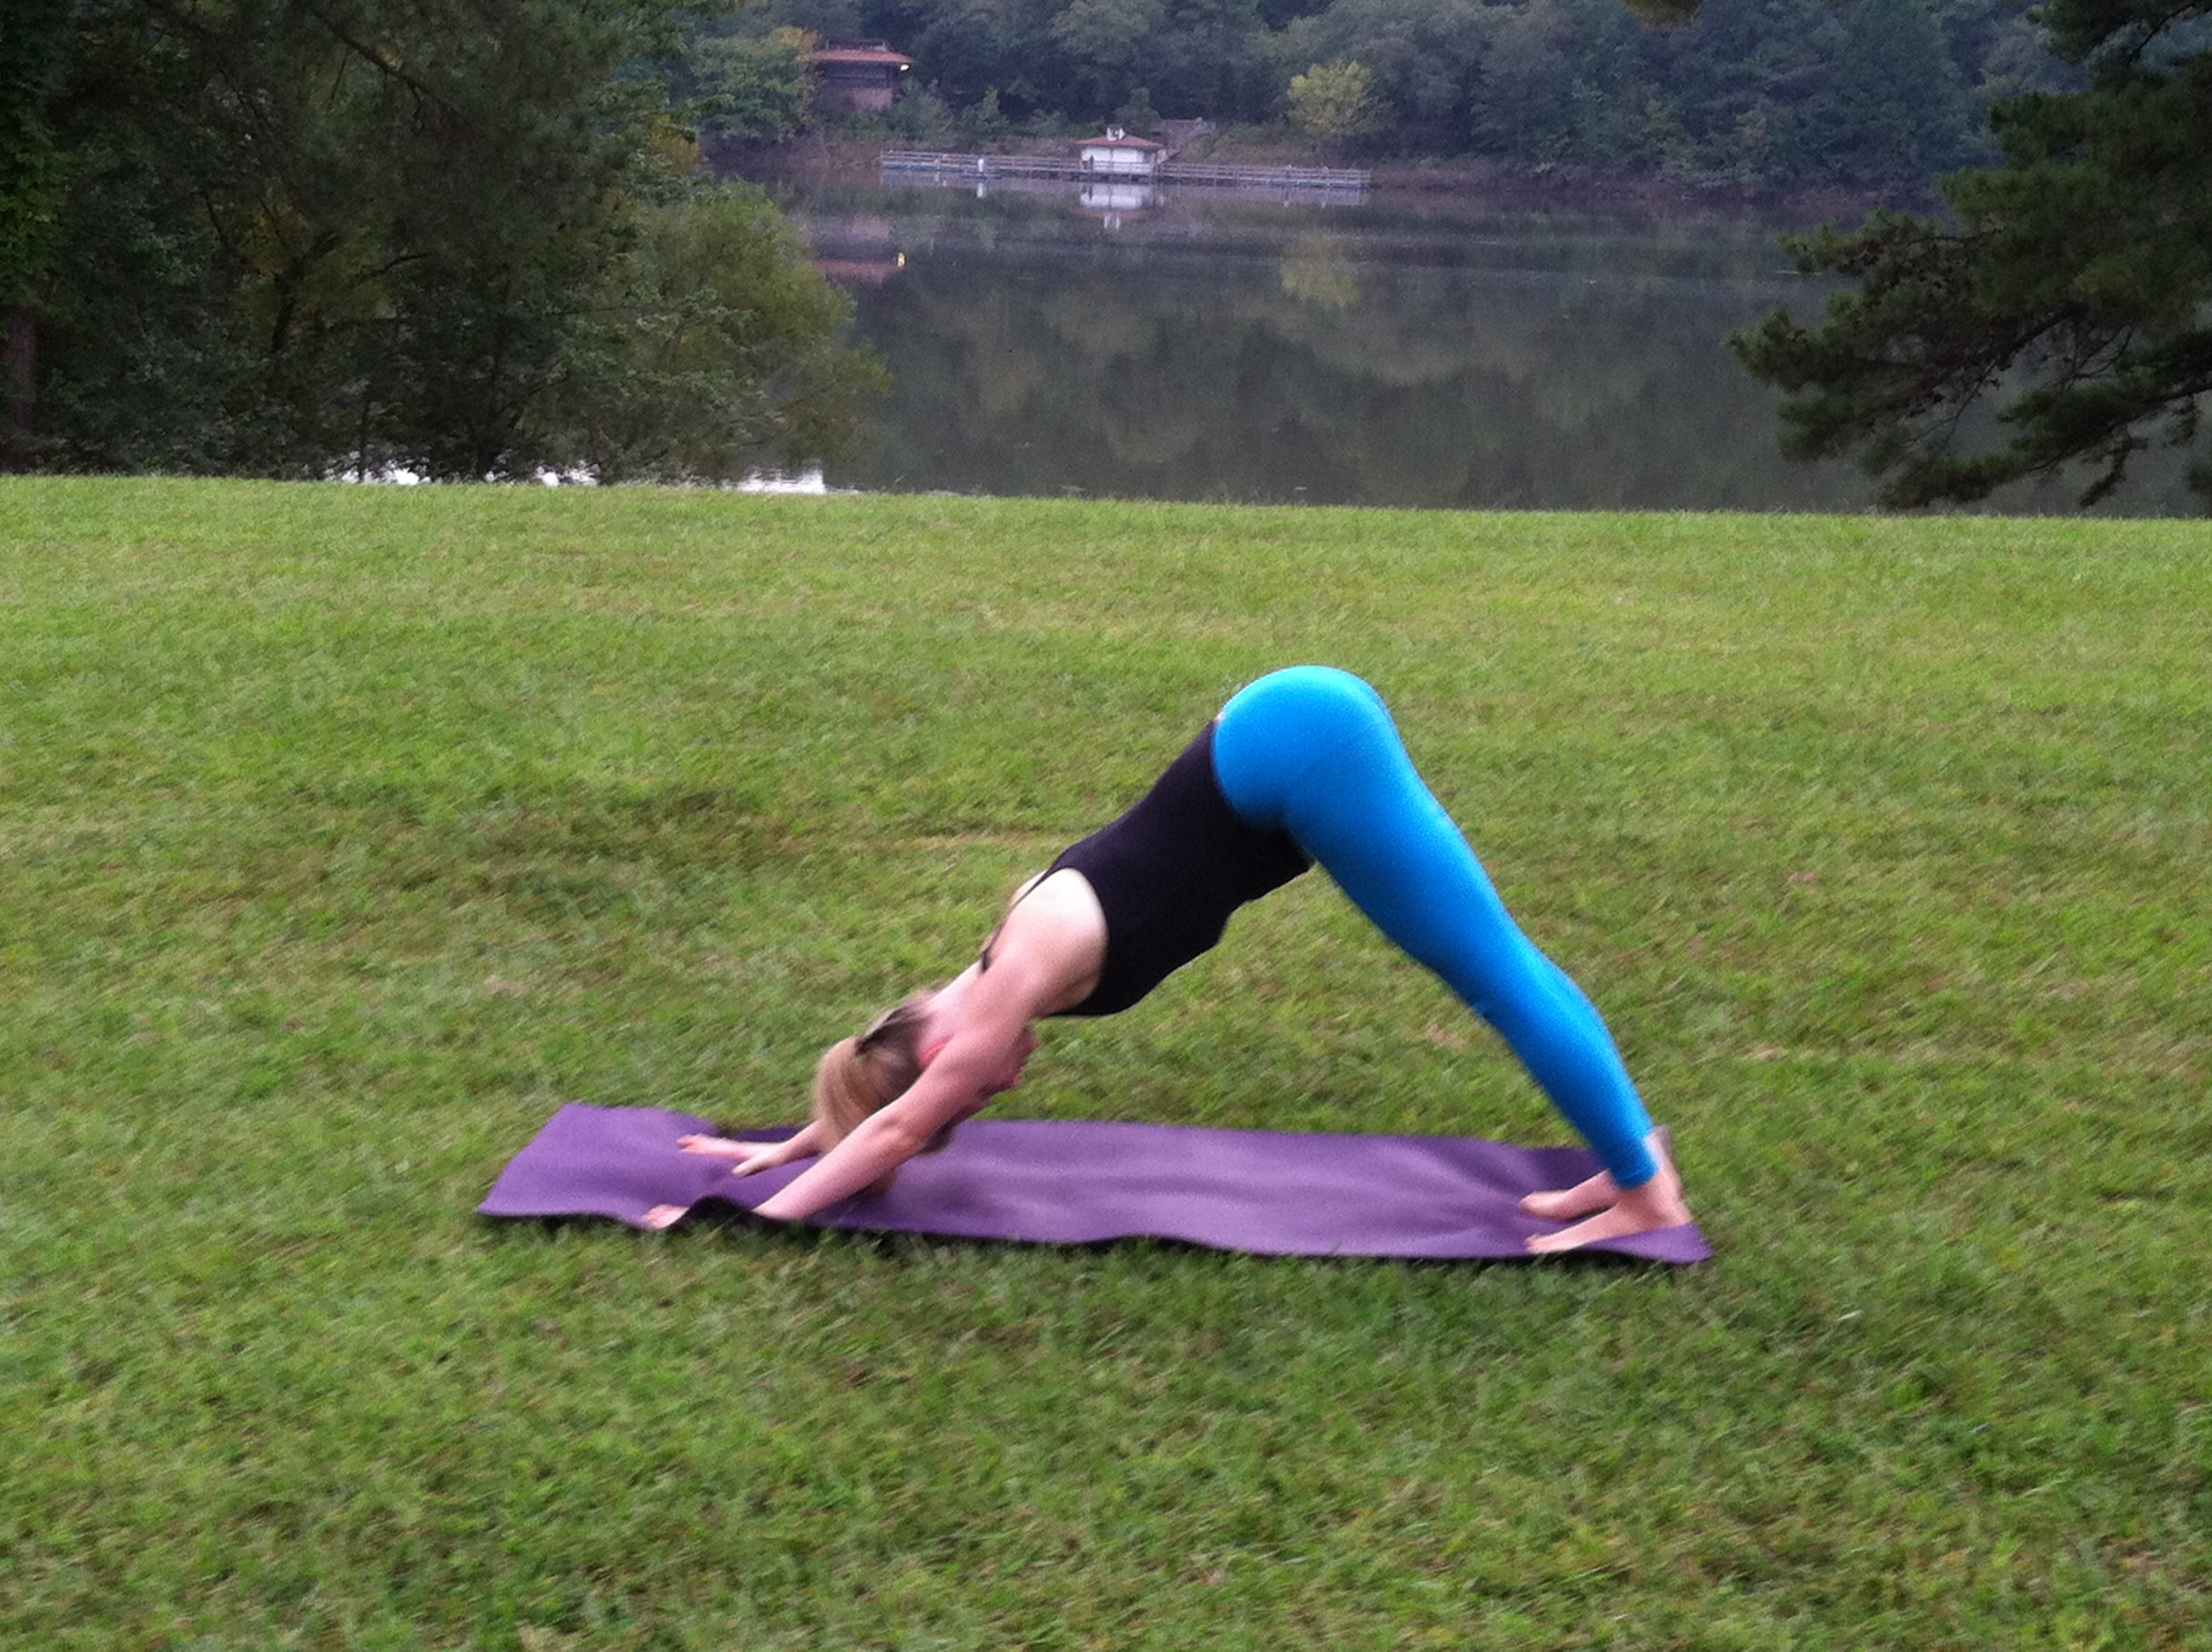
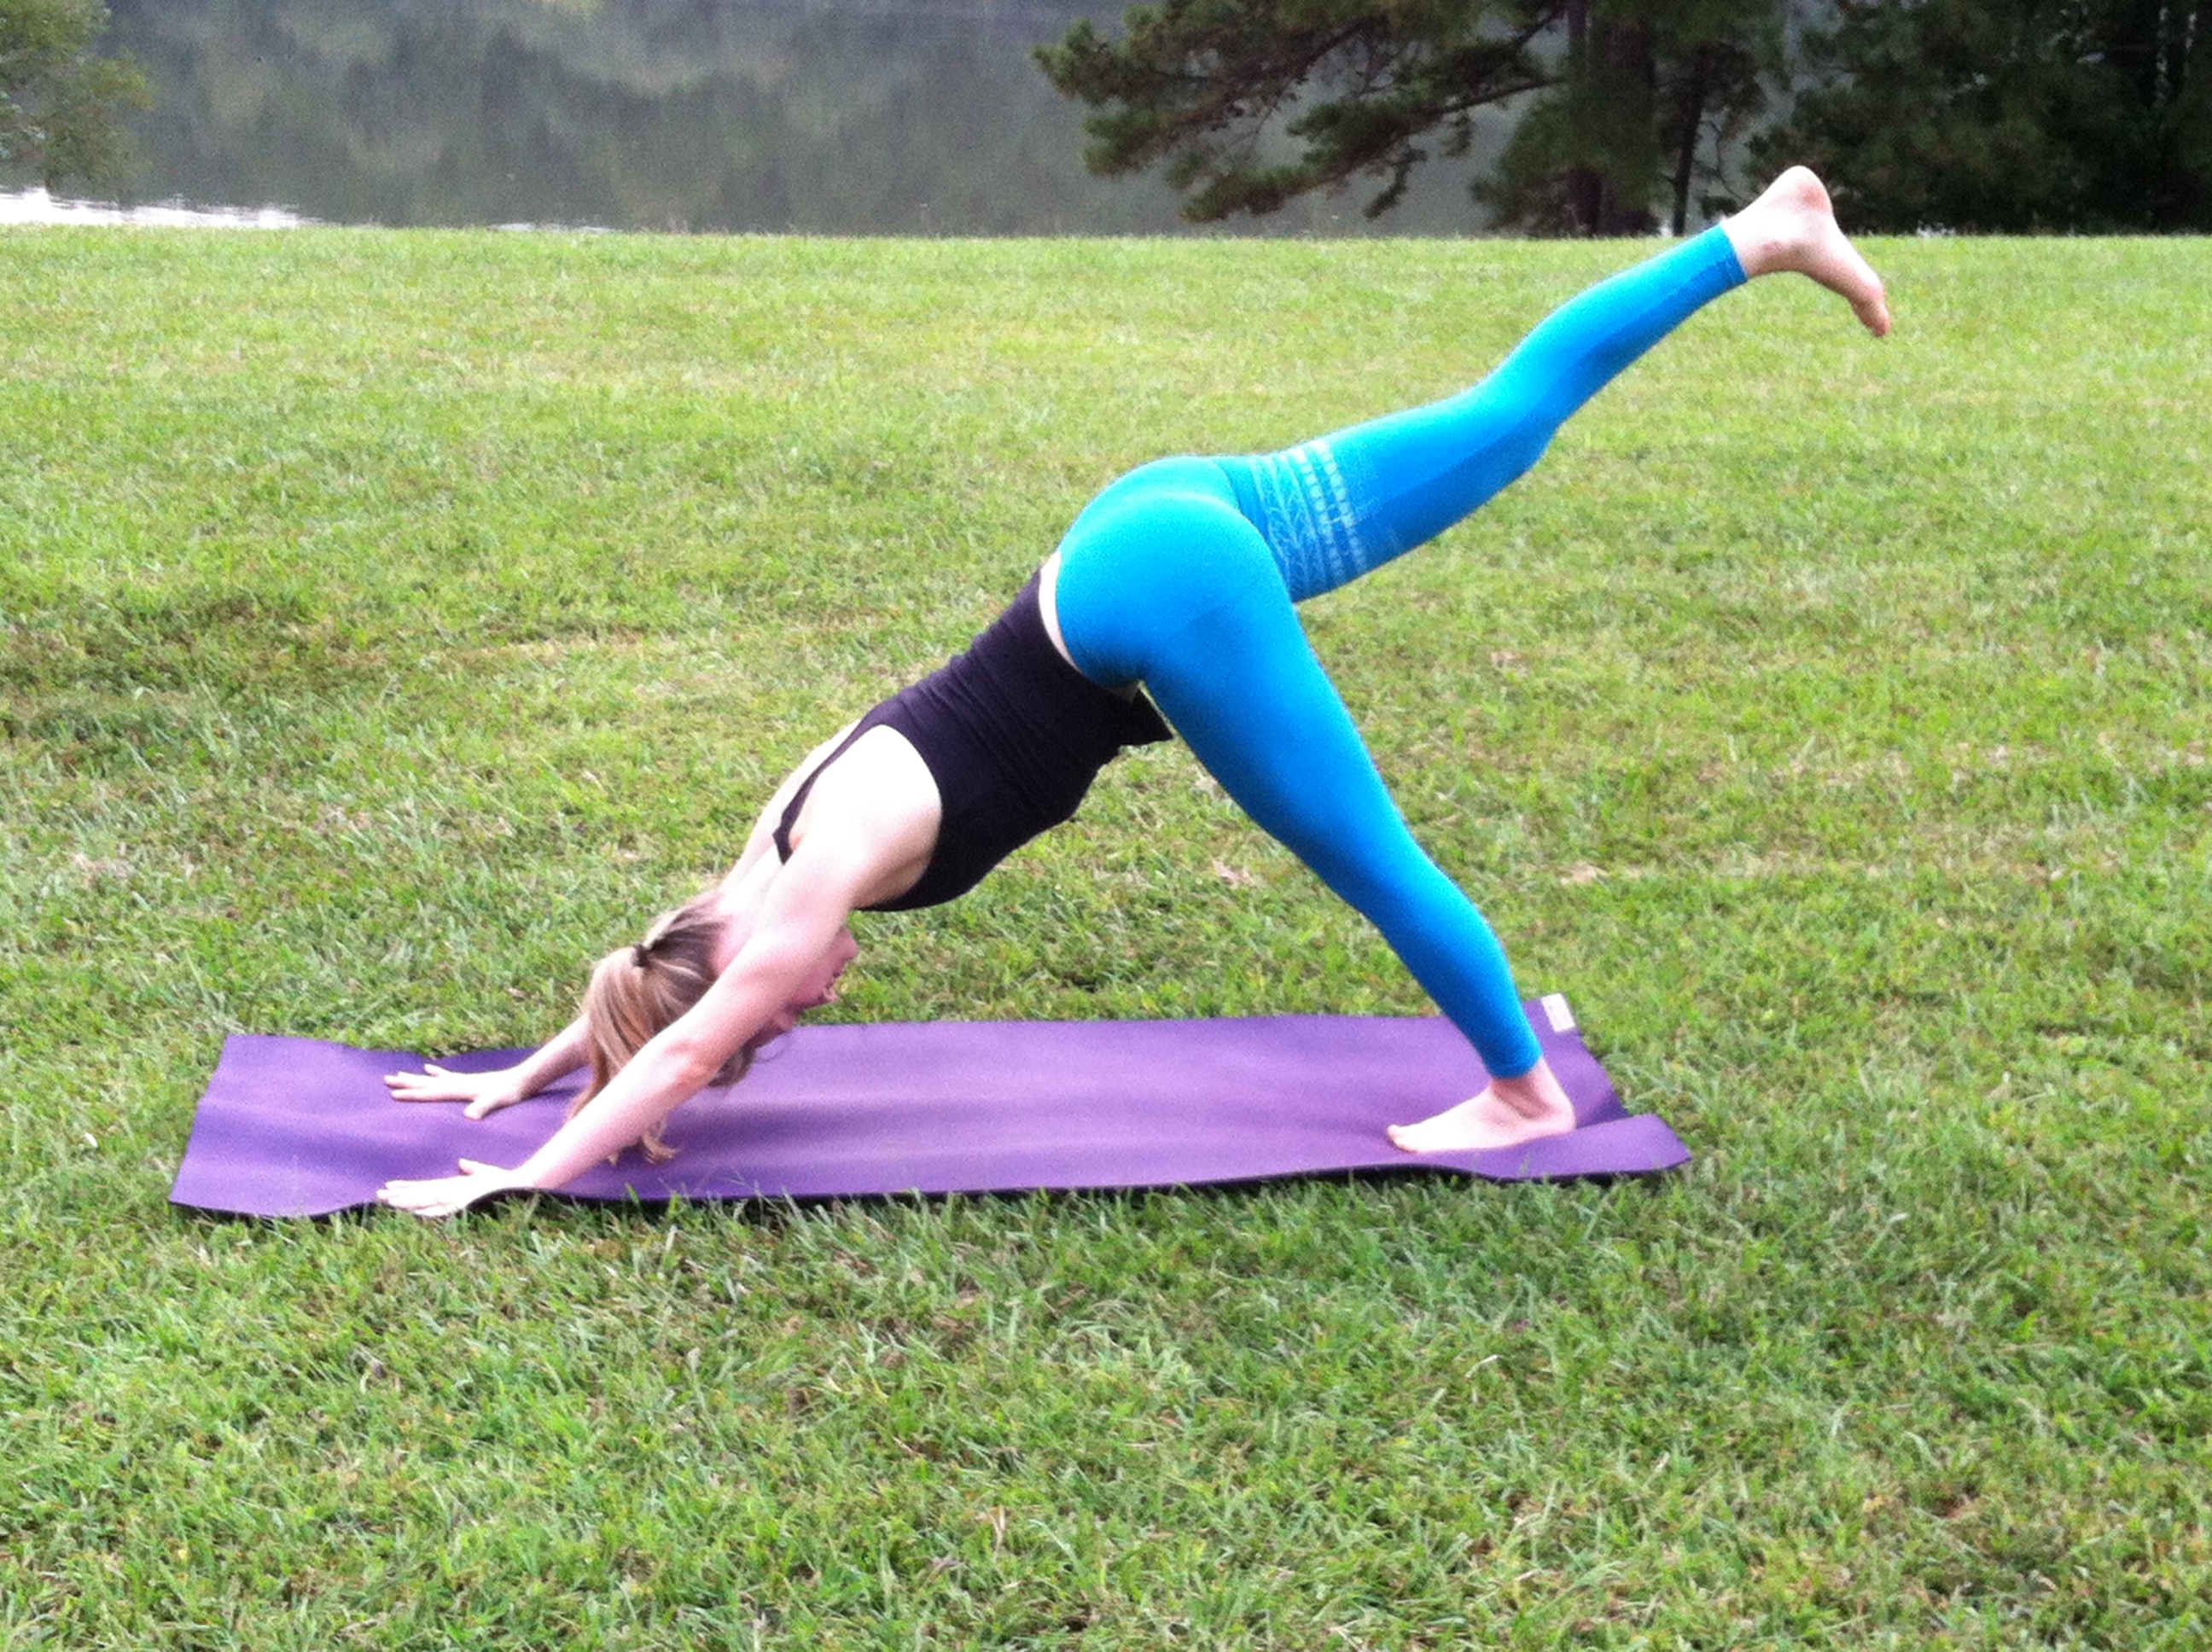
Downward-Facing Dog
- Exhale, tuck the toes under, bend the knees, and lift the hips up, pressing back through the inner heels.
- Begin to straighten the knees as you stretch back through the hamstrings, but do not lock the knees. Press the bases of your index fingers actively into the mat. Firm your shoulder blades down and back. Neck soft. Hold for 5-8 breaths.
3. At the end of your last exhale, come into Lunge with right foot forward. Lift onto fingertips, reaching chest up with spine long.
4. At the end of an exhale, step your feet in between your hands at the top of the mat. Inhale and lengthen the spine into extended forward fold, exhale into a standing forward fold, and then on an inhalation, press firmly into the feet, and lift up, circling the arms wide and reaching toward the sky. Exhale to bring hands back to center in prayer position at the heart.
Repeat entire dynamic series 3-5 times to warm up the body for the rest of your practice. Sun Salutations with the breath can also be done to warm up for training and competition, as the series loosens joints, increases strength and muscle flexibility, and calms and focuses the mind.
COOL DOWN
Purpose: Bring the body back into balance and integrate all the work you have done.
Lie on your back and hug your knees into your chest. Breathe deeply and rock back and forth on your back if it feels good to you.
Revolved Abdomen Pose
- Bend your knees and bring your shins up so that they are parallel to the floor.
- Stretch your arms out on either side.
- Exhale. Let the knees fall to one side.
- Look the other way if you choose.
- Switch
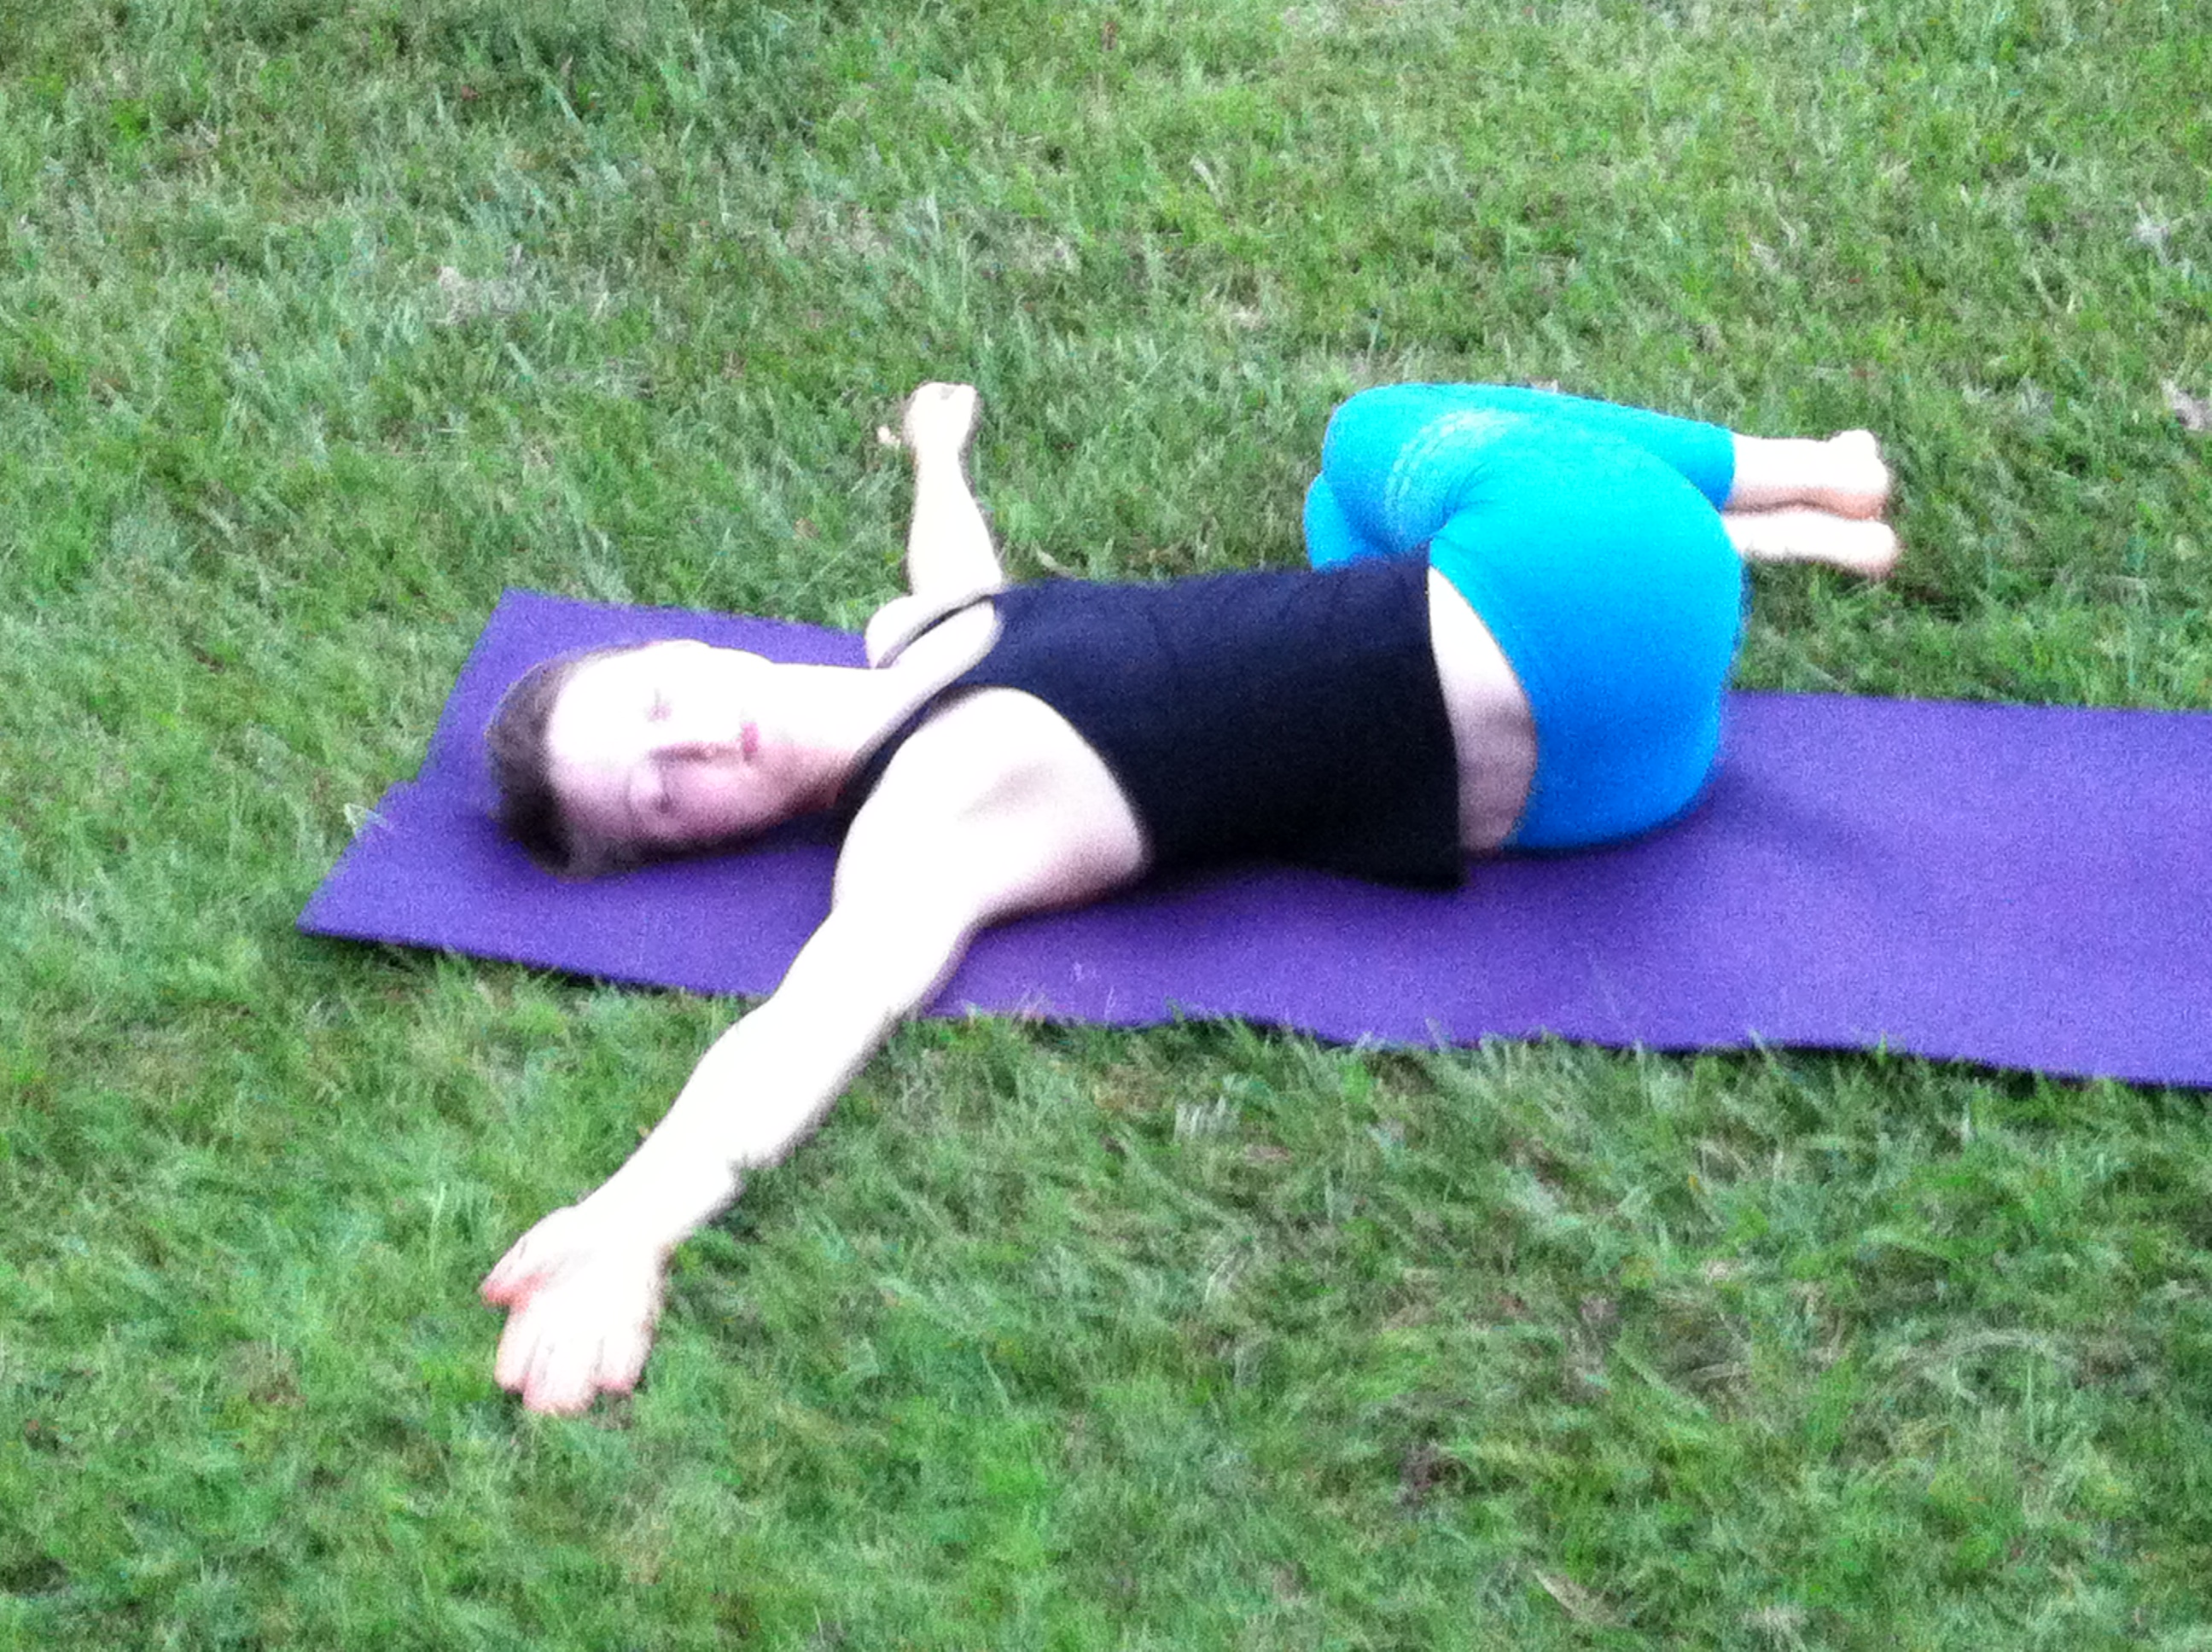
Dead Bug
- Lift heels toward the sky.
- Lift fingertips toward the sky.
- Maintain just enough energy in the limbs to keep them lifted. Otherwise, relax and let the blood easily flow to the center of the body.
- You may roll wrists and ankles.
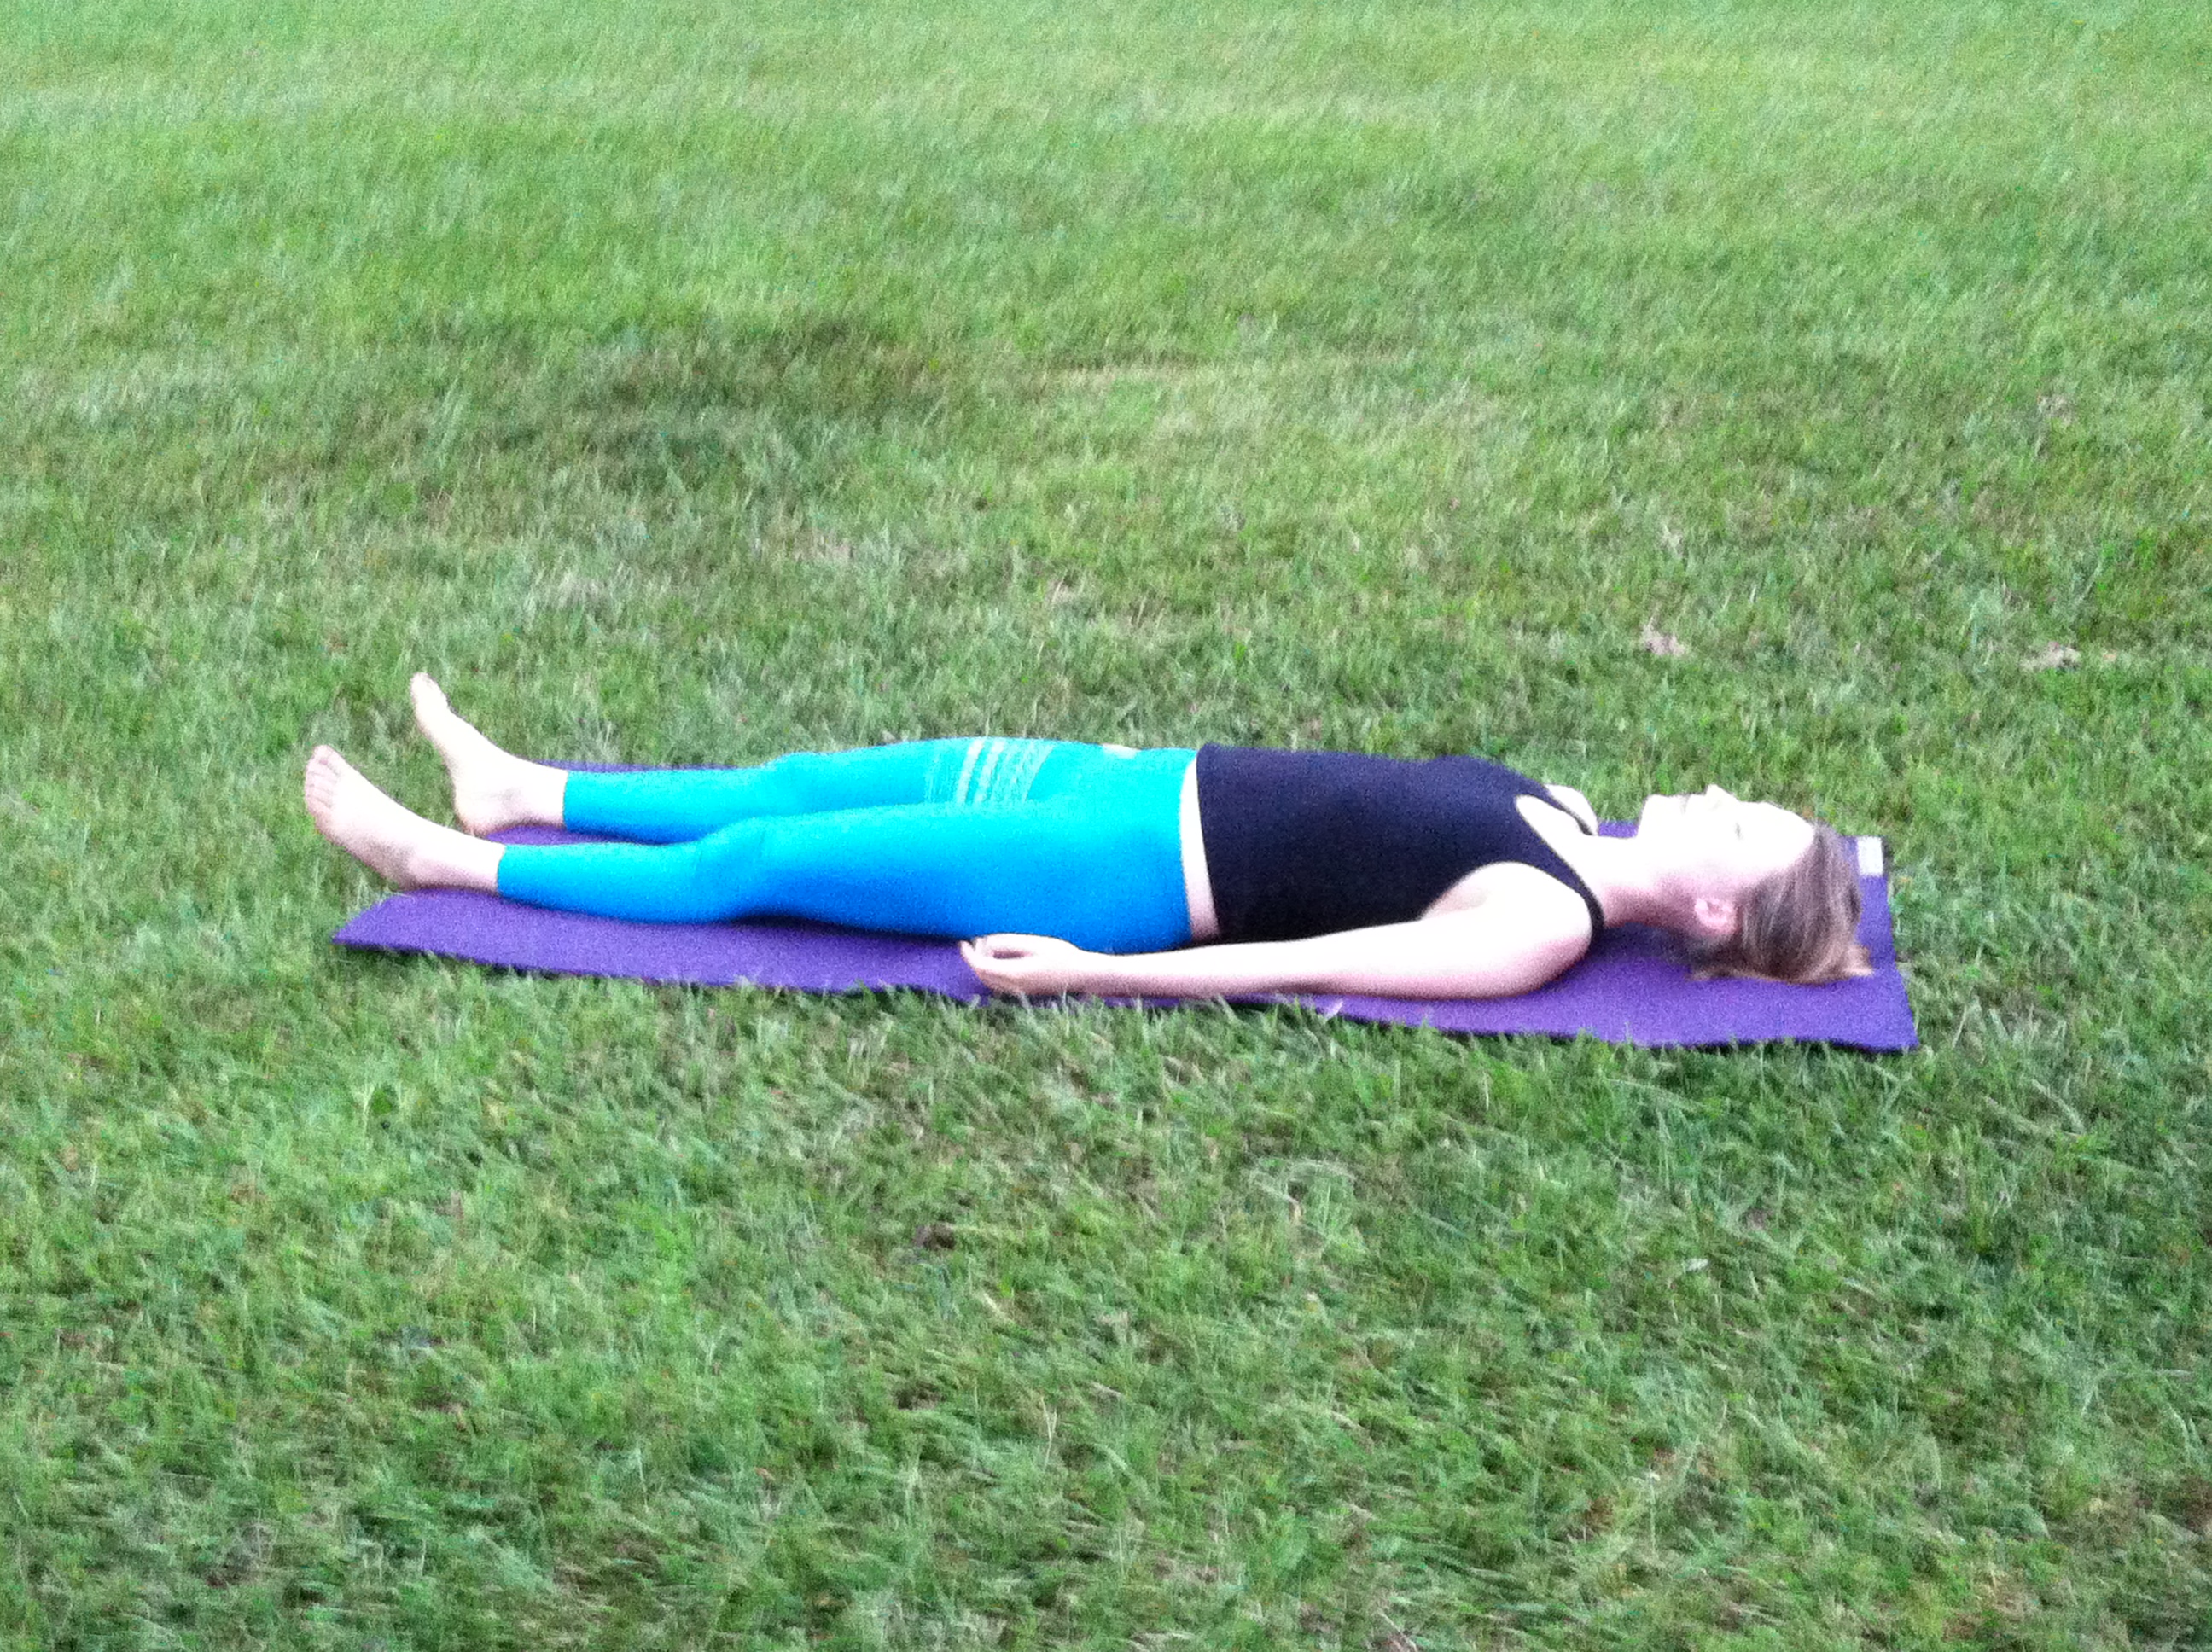
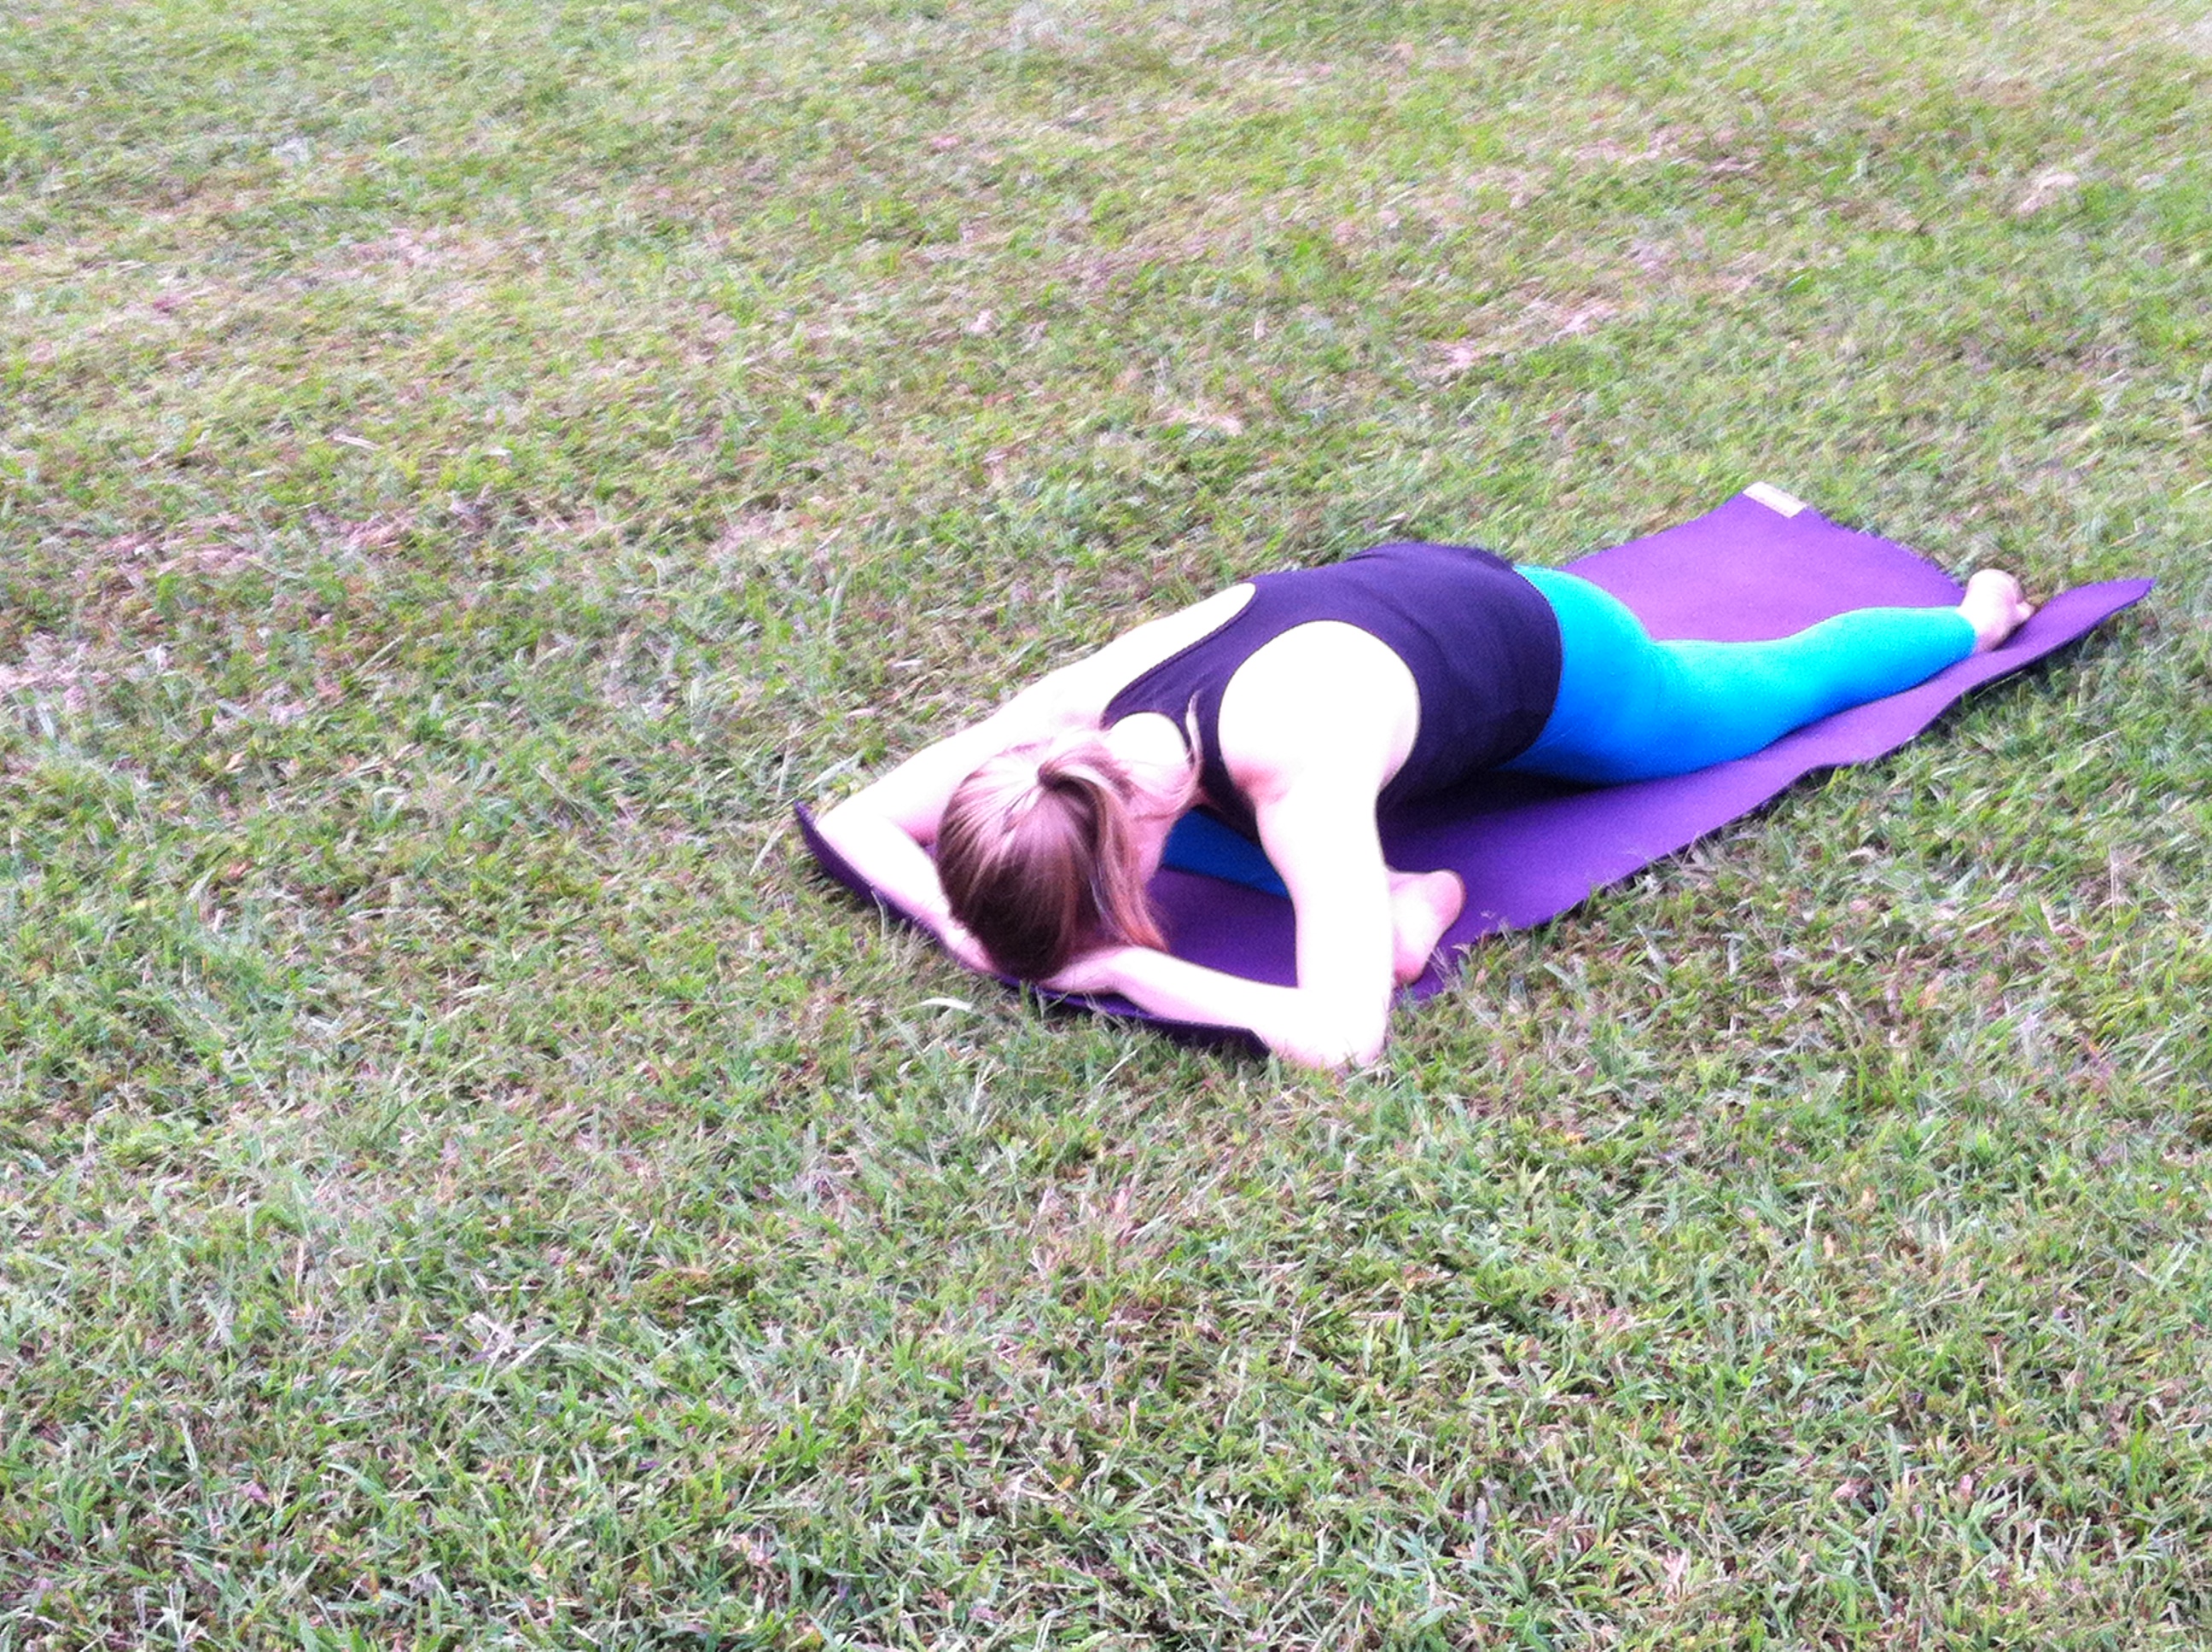
Savasana (Corpse Pose)
In Savasana it’s essential that the body be placed in a neutral position.
- Lie on your back with palms facing up. Shoulder blades gently together on the back body. Let the hips open so the toes fall out to either side.
- Deepen the breath. Focus on the quality of each inhale and exhale without judgement.
- In addition to quieting the physical body in Savasana, it’s also necessary to pacify the sense organs. Soften the root of the tongue, the wings of the nose, the channels of the inner ears, and the skin of the forehead, especially around the bridge of the nose between the eyebrows. Let the eyes sink to the back of the head, then turn them downward to gaze at the heart. Release your brain to the back of the head.
CORE FOCUS
Purpose: Strengthens and brings awareness to abdominals and spine. Stretches surrounding muscles. Helps cultivate balance.
Mountain

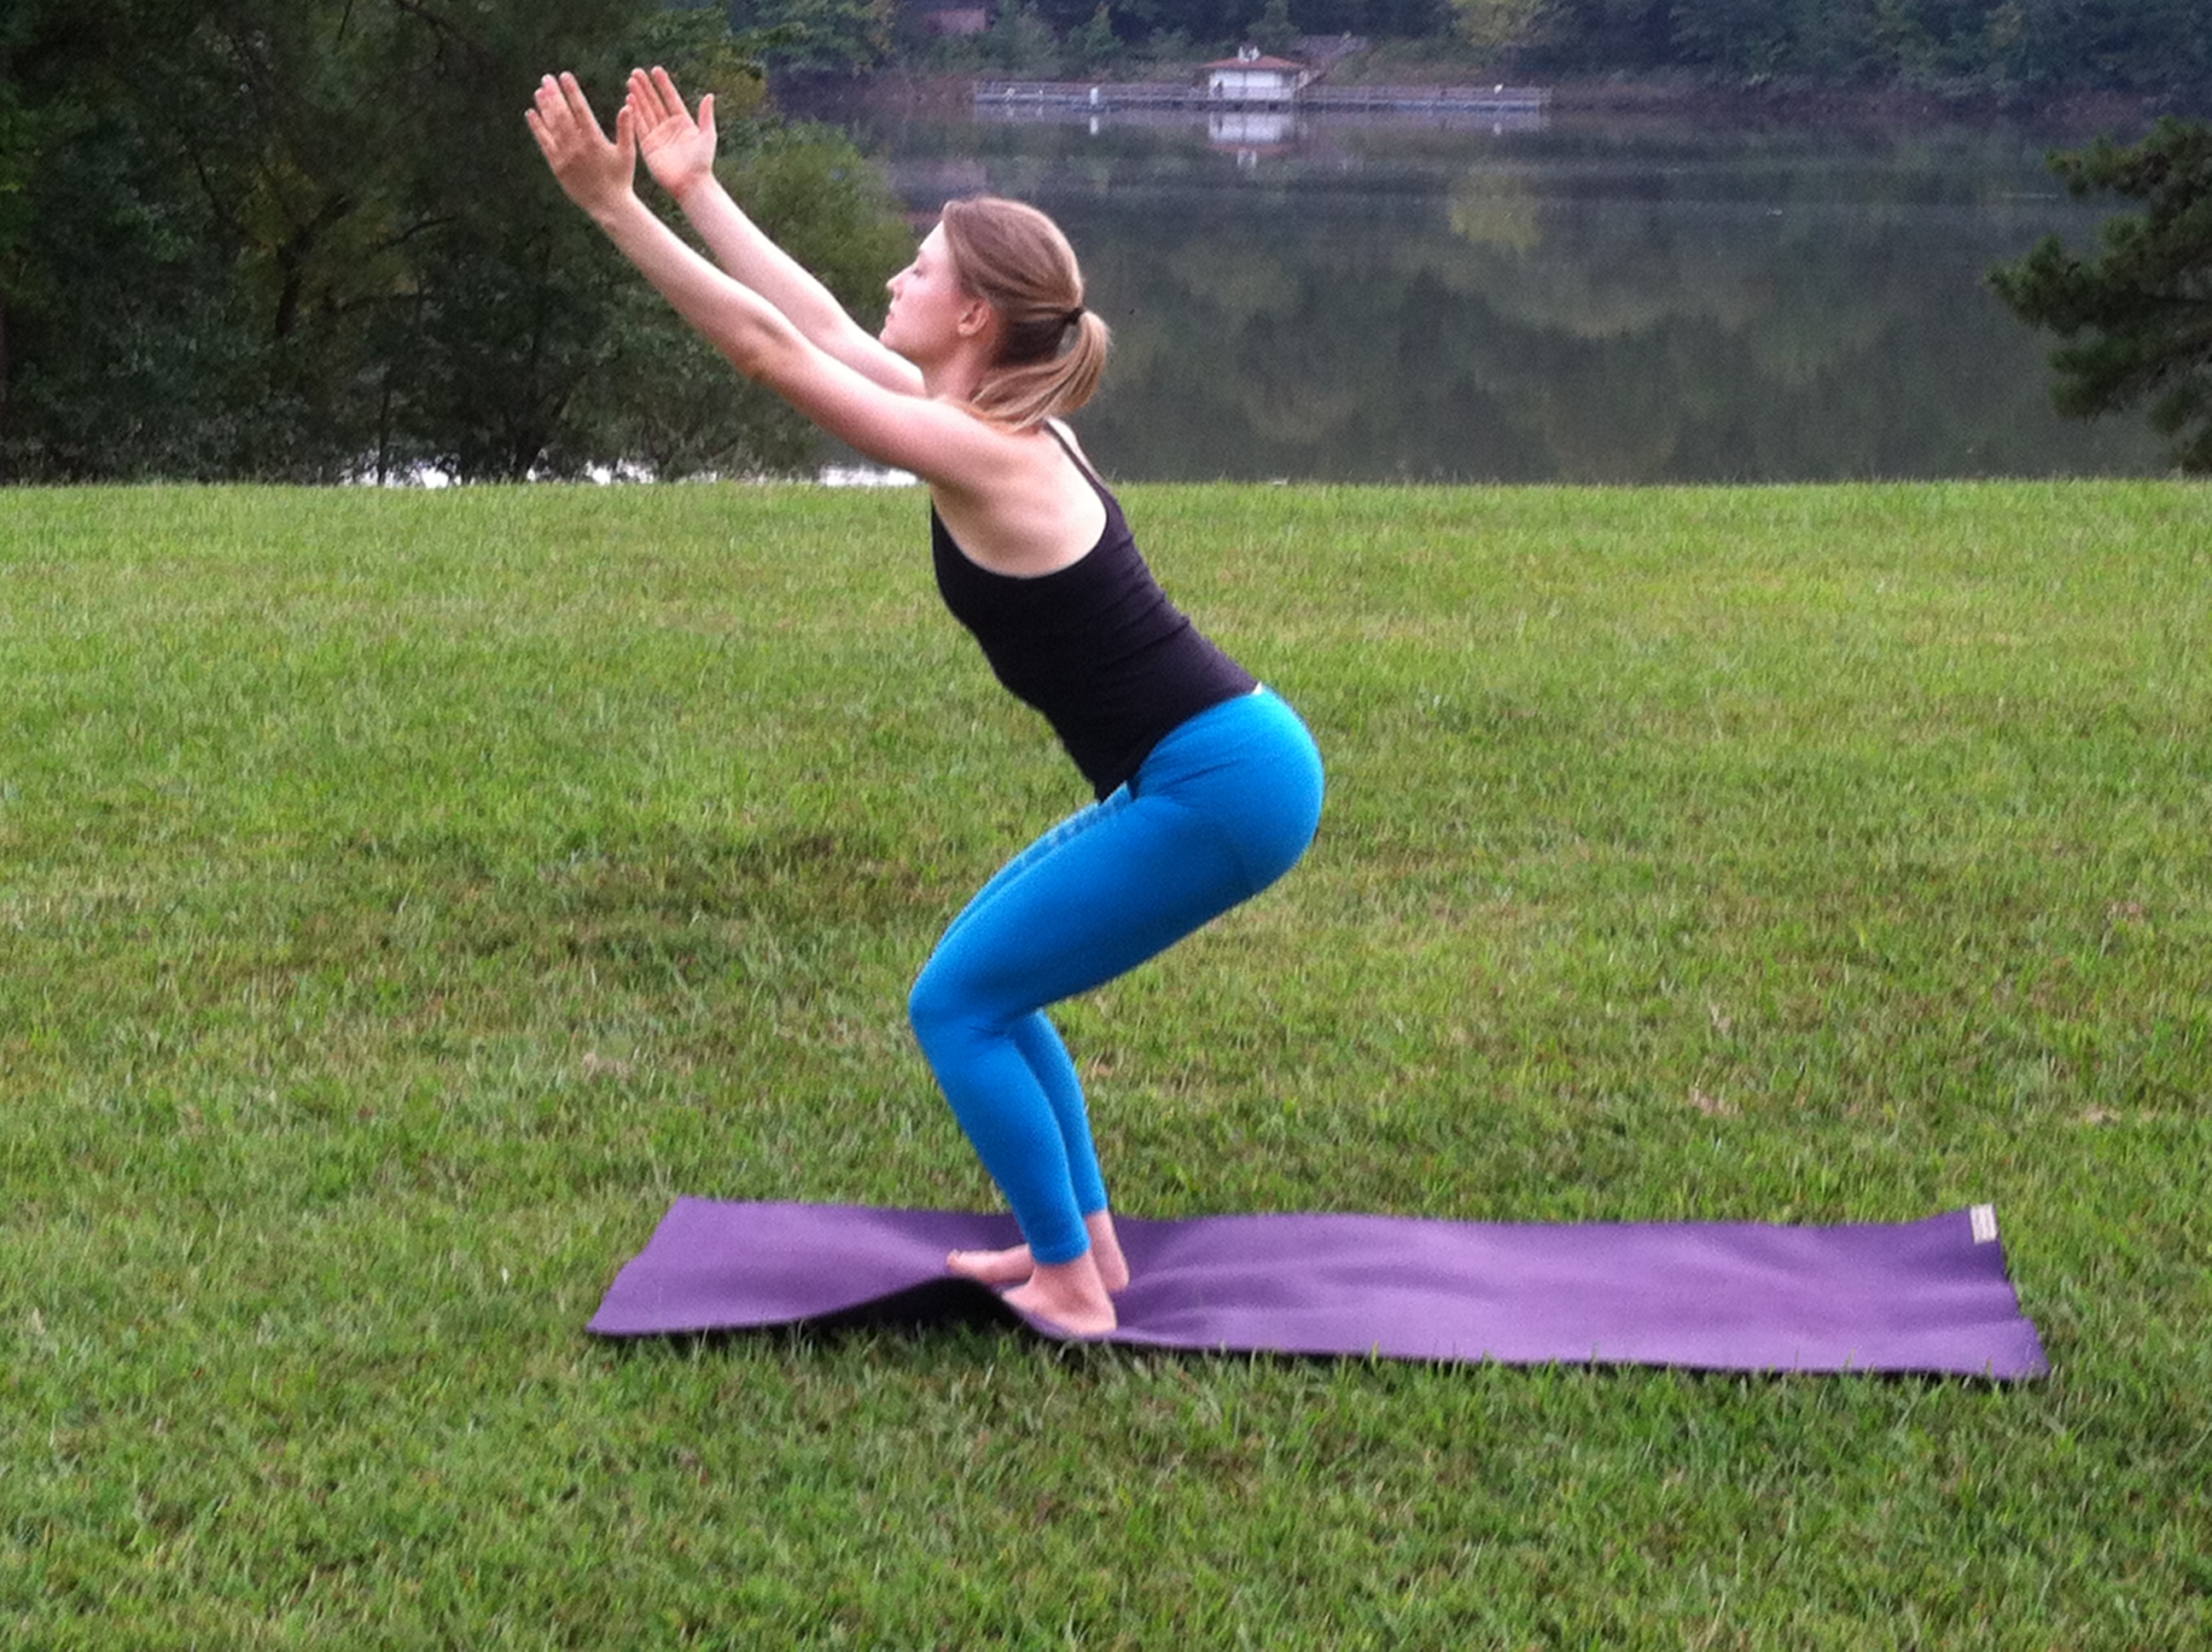
Chair pose
- Inhale and raise your arms perpendicular to the floor. Keep the arms parallel, palms facing inward.
- Exhale and bend your knees, trying to take the thighs as nearly parallel to the floor as possible. The torso will lean slightly forward over the thighs. Shoulders down away from the ears. Ground your tailbone down toward the floor.
Chair Twist
- Fold your palms together in front of your heart in Prayer Position.
- As you exhale, twist to the right, placing your left elbow or shoulder on the outside of your right knee. Look at your knees to make sure they’re in line with each other.
- Slowly rotate your face up to the ceiling and bring right shoulder blade back to open the chest up toward the sky. Center.
- Inhale to lengthen the spine and exhale to twist to the other side.
Vinyasa
Locust
- Lie on your belly with arms by your sides. Inwardly rotate thighs and tuck tailbone toward the floor. Interlace fingers behind the back. Shoulder blades move down and together.
- On an inhale, peel your head, upper torso, arms, and legs away from the floor. You’ll be resting on your lower ribs, belly, and front pelvis. Firm your buttocks and reach strongly through your legs. Keep the big toes turned toward each other. Let head and neck stay level.
- Exhale to release.
Bow
- Lie on your belly with your hands alongside your torso, palms up. Exhale and bend your knees, bringing your heels as close as you can to your buttocks. Reach back with your hands and take hold of your ankles (but not the tops of the feet). Make sure your knees aren’t wider than the width of your hips, and keep your knees hip width for the duration of the pose.
- Inhale and strongly lift your heels away from your buttocks and, at the same time, lift your thighs away from the floor. This will have the effect of pulling your upper torso and head off the floor. Burrow the tailbone down toward the floor, and keep your back muscles soft. As you continue lifting the heels and thighs higher, press your shoulder blades firmly against your back to open your heart. Draw the tops of the shoulders away from your ears. Gaze forward.
- Breathe into the back body.
- Exhale to release.

Downward-Facing Dog
Mountain
Standing Side Bend
- Bring feet together and palms together overhead and interlace fingers. Release pointer fingers and let shoulder blades slide down and together on the back body while keeping biceps squeezing toward the ears.
- Root tailbone down toward the heels and lift lower belly up.
- Inhale to extend the torso out of the hips and on an exhale, press the hips to the left while lifting torso up and over to the right. Maintain armpits and hips evenly facing forward. Lift chest gently toward the sky.
- Release on an inhale, pressing down through the feet to reach fingers up toward the sky.
- Exhale to the other side.

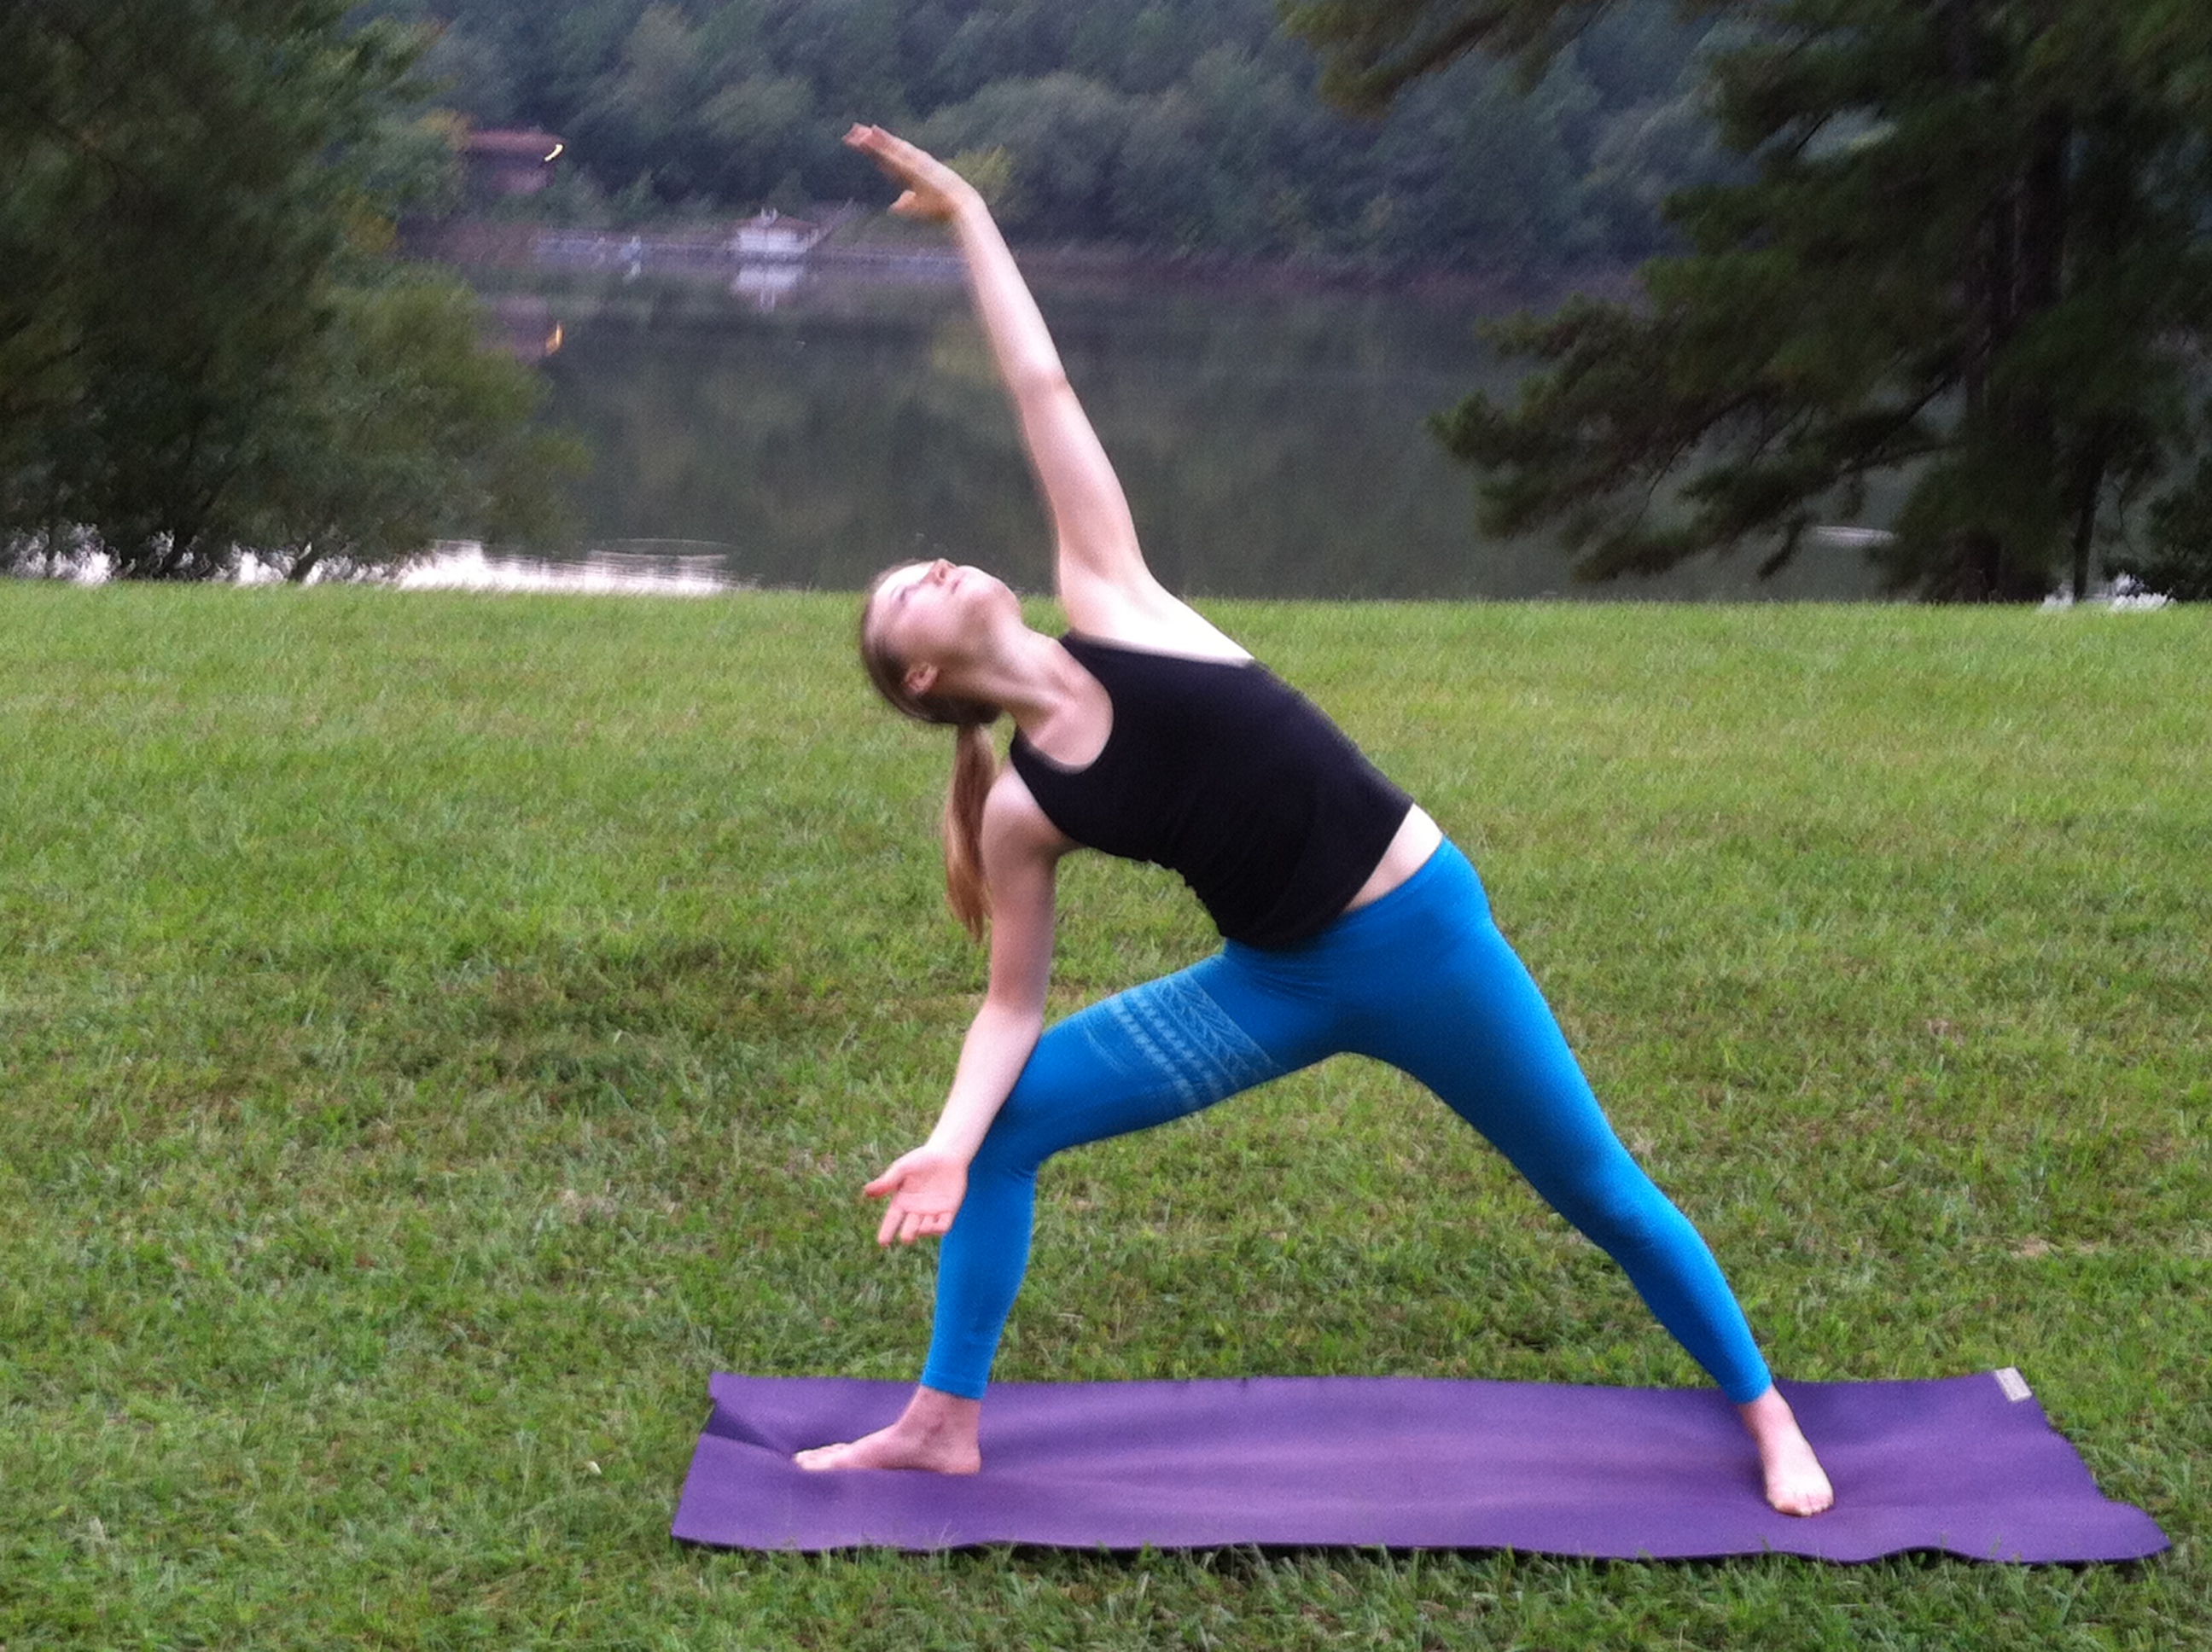
Standing back bend
- Place hands on low back, fingertips pointing down.
- Inhale, lift chest toward ceiling. Exhale, bend shoulders and upper back backward as if lying over a beach ball. Lift the heart toward the ceiling, and tuck your tailbone down, under your torso, as you bend.
- To release, inhale, and lead with the heart; the head is the last thing to come up.
- Return to starting position.

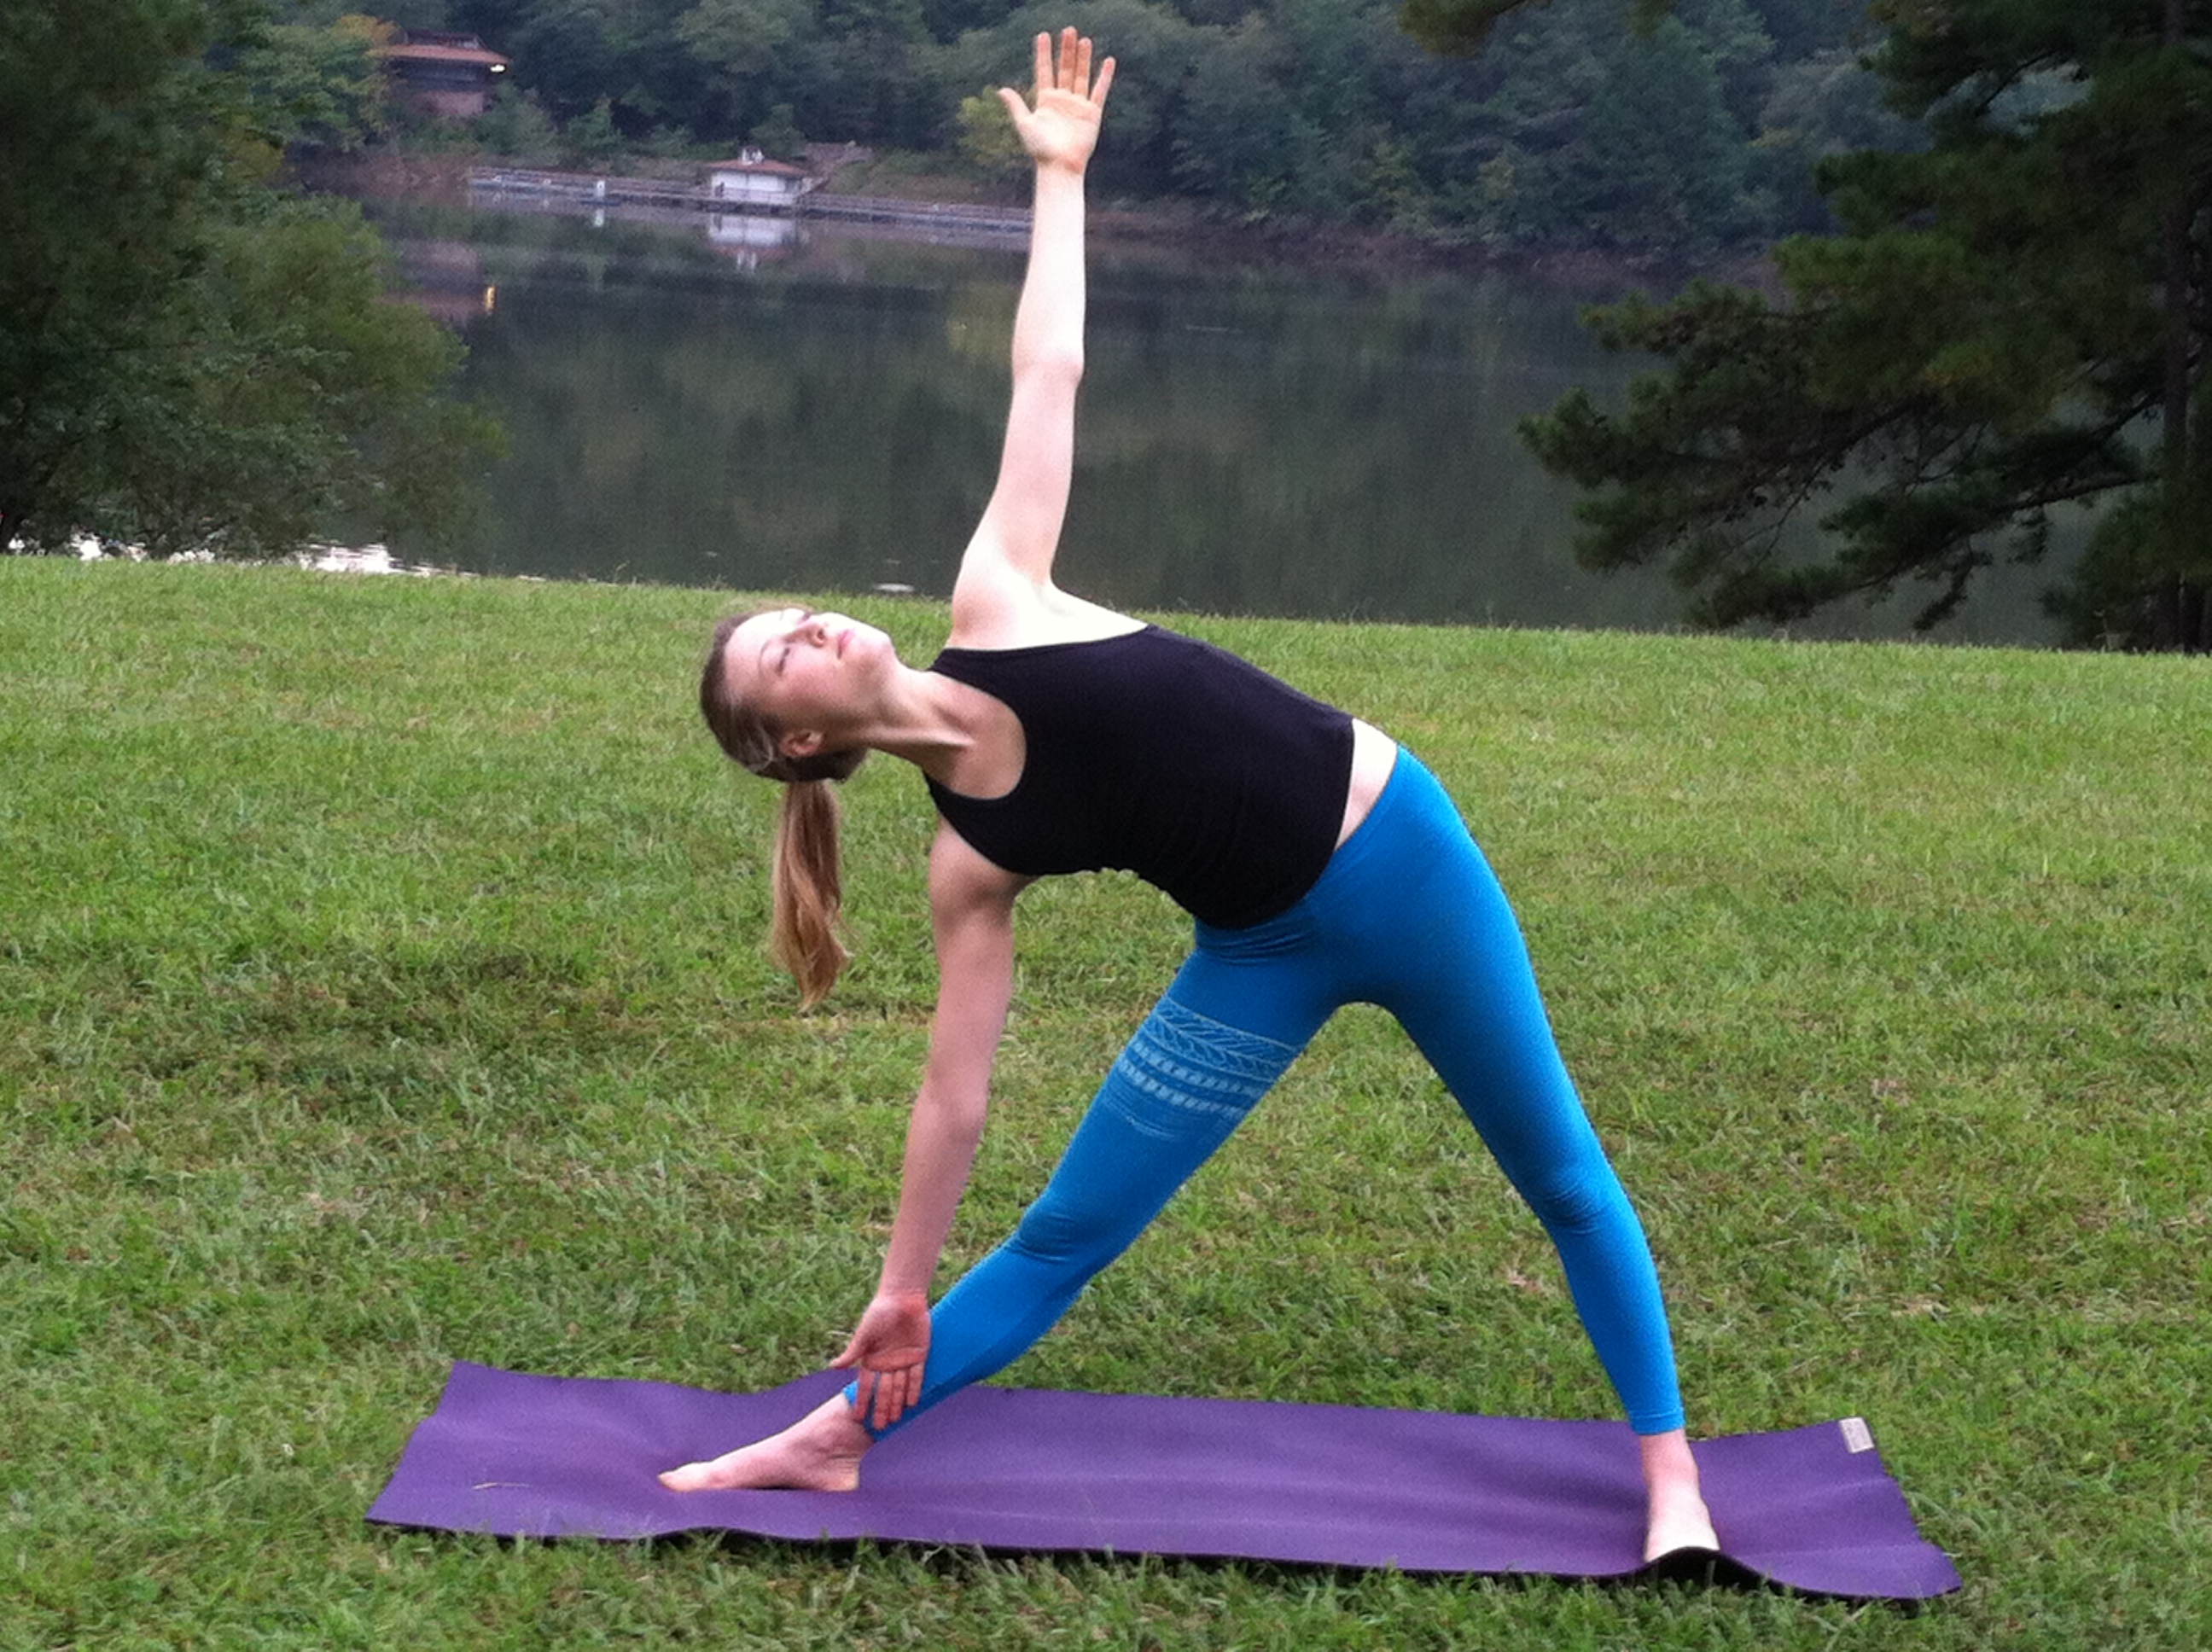
Triangle
- Step your feet wider than your hips. Turn your left foot in slightly to the right and your right foot out to the right 90 degrees. Align the right heel with the left heel. Firm your thighs and turn your right thigh outward, so that the center of the right knee cap is in line with the center of the right ankle.
- Extend the arms actively out to the sides. Exhale and extend your torso to the right directly over the plane of the right leg, bending from the hip joint, not the waist. Anchor this movement by strengthening the left leg and pressing the outer heel firmly to the floor. Rotate the torso to the left, keeping the two sides equally long.
- Rest your right hand on your shin, ankle, or the floor outside your right foot, whatever is possible without distorting the sides of the torso. Stretch your left arm toward the ceiling, in line with the tops of your shoulders. Keep your head in a neutral position or turn it to the left, eyes gazing softly at the left thumb.
- To release, squeeze legs in toward each other, and on an inhale lift the torso back to center. Switch the placement of the feet and repeat on the opposite side.
Pyramid
- Step legs a few feet apart with right foot in front. Align your heels and turn the left toes out 45-60 degrees. Bring your hands to your hips and square the pelvis forward.
- Exhale and fold over the right leg at the hip. If you can, bring your hands to either side of the front foot. If not, use blocks to support the hands.
- On your inhales, think about extending the spine, and exhale to fold deeper into the pose.
Standing Split
- From Pyramid, activate your fingertips onto the mat on either side of the front foot. Bring more weight onto the fingertips and the right foot.
- Lift the left leg off the mat, reaching through the heel, and keeping the hips level. Use your abs to support the leg up.
- Keep the head and neck level with the spine. Reach through the heels and energy out the crown of the head. Firm your lower belly to maintain for a few breaths.
- Eventually, see if you can begin to bring more weight into the standing leg, and less into the hands, until you can grasp the standing ankle with one or both hands.
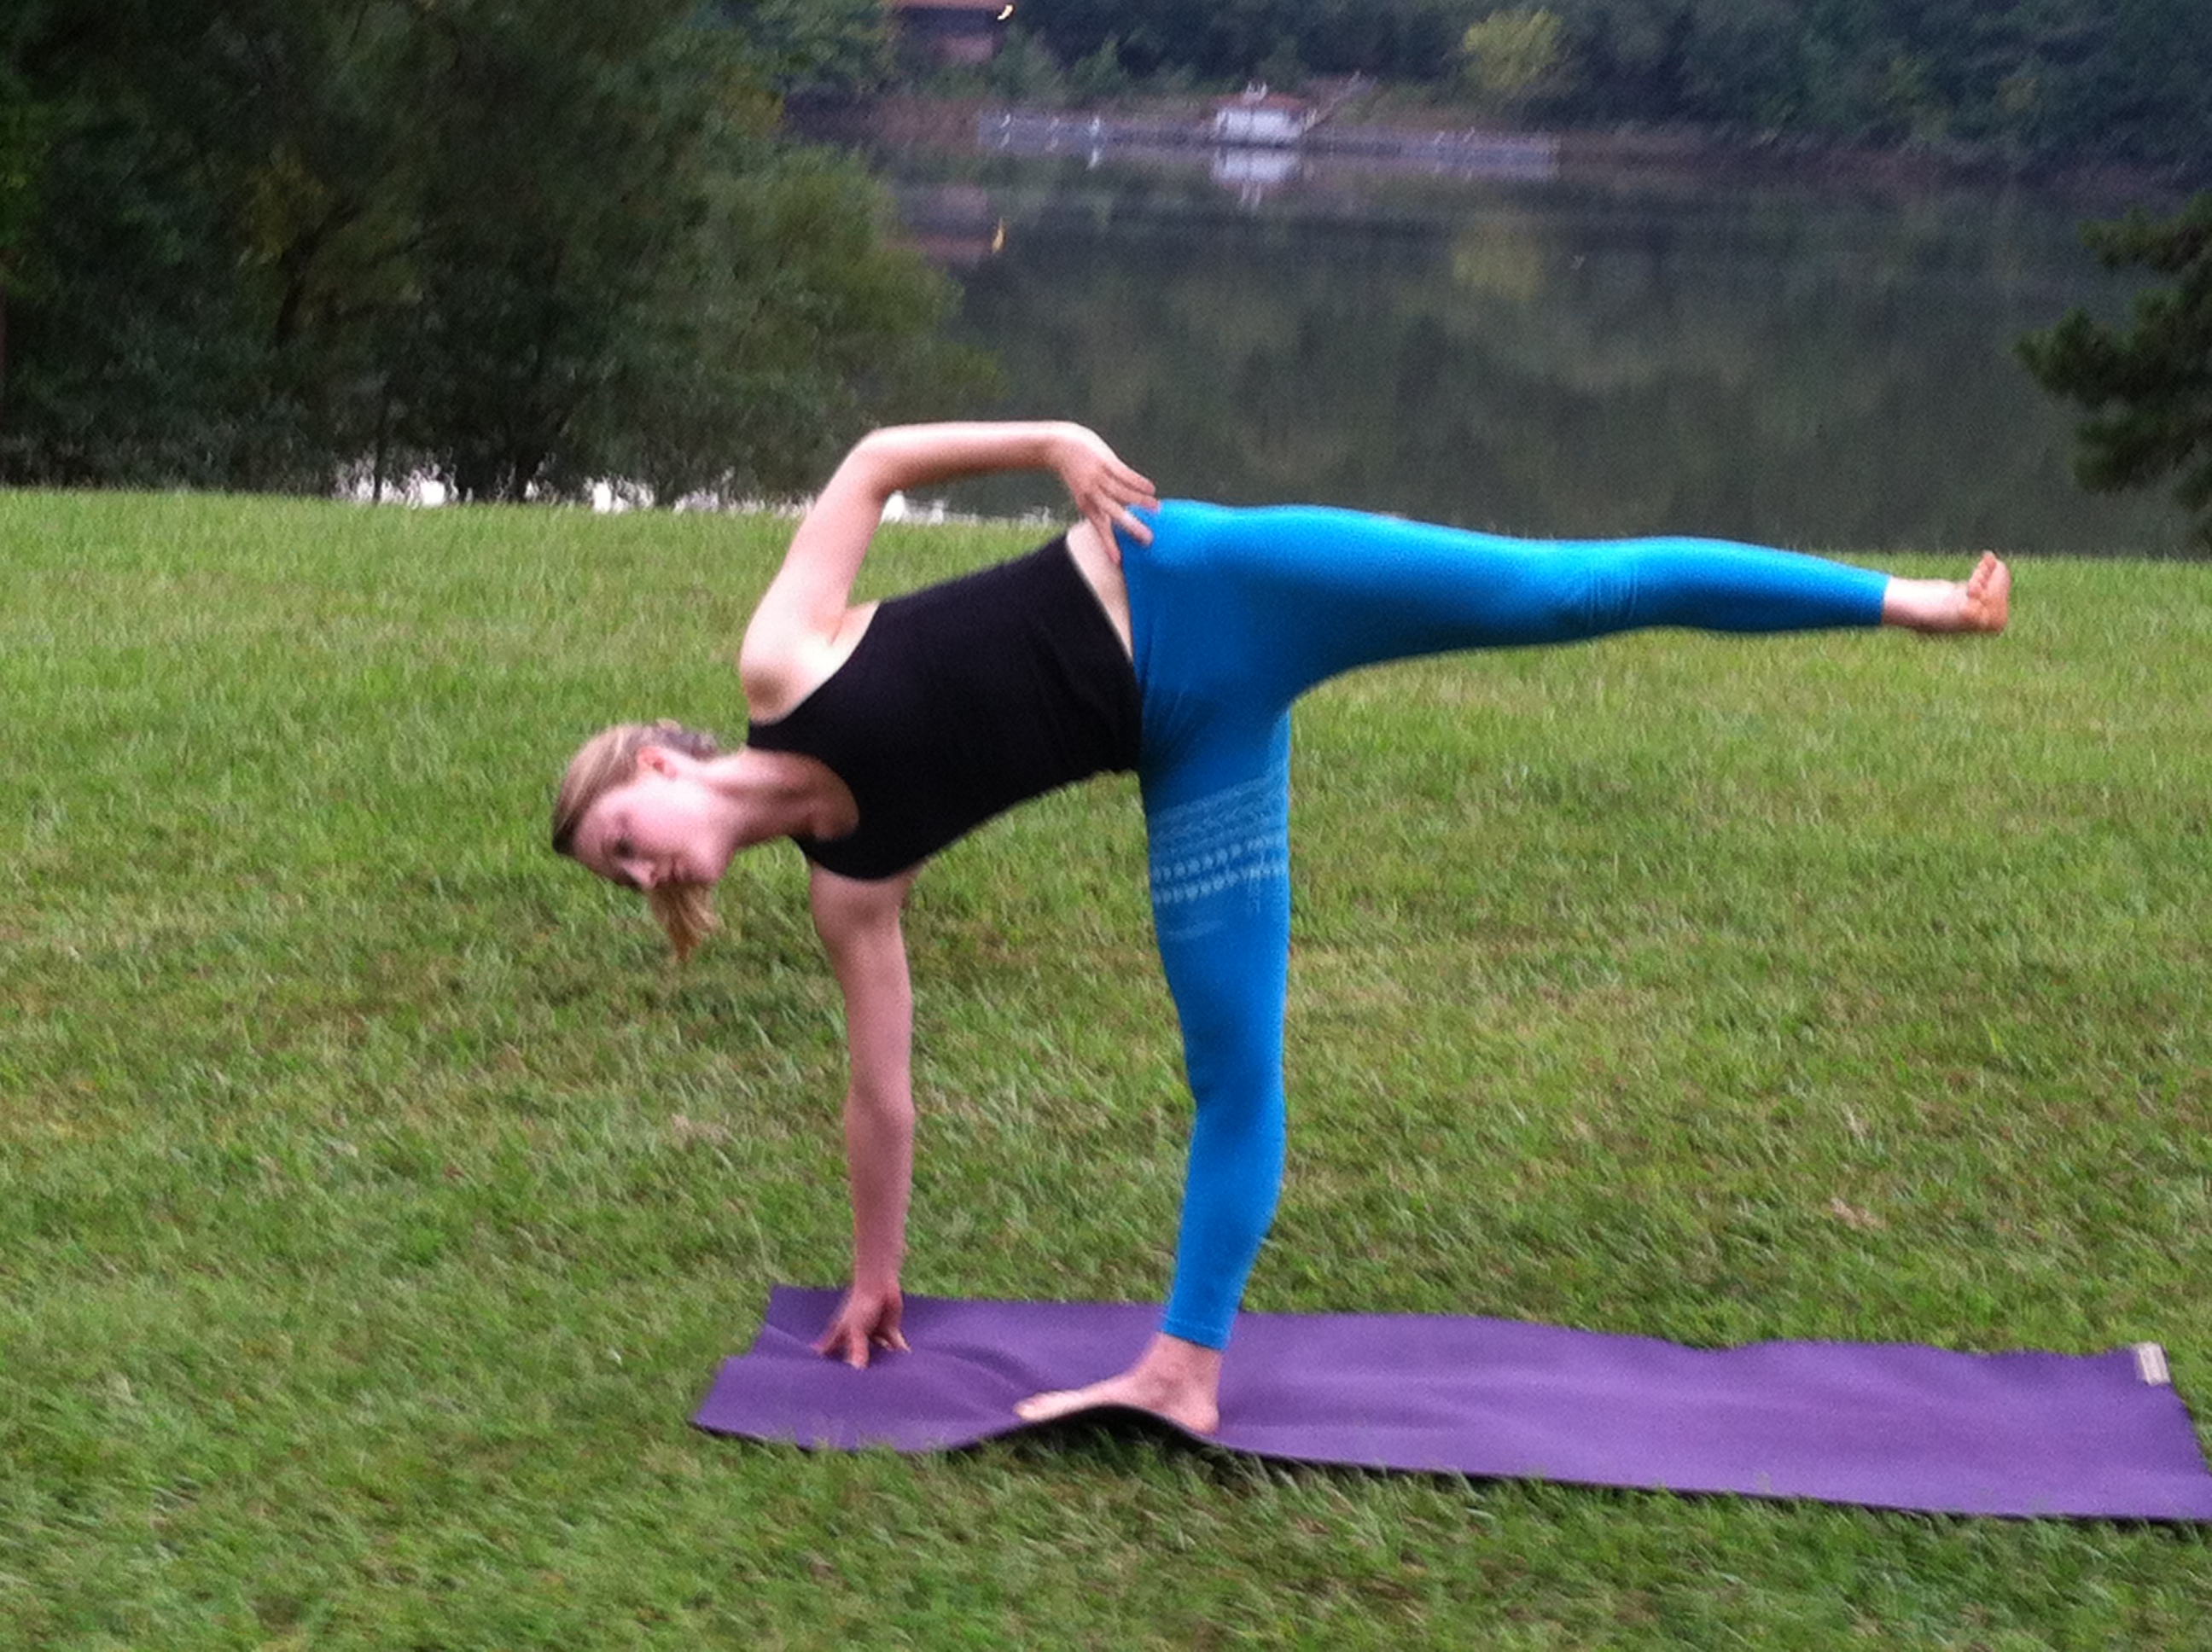
Half Moon Pose
- From Standing Split, bring your left hand to left hip, and open the hips up to the left, while keeping legs straight. Keep your right fingertips on the mat or on a block.
- Rotate your upper torso to the left and press hips slightly forward.
- Either leave your left hand on hip, or extend your hand straight up toward the sky. Reach through the fingertips.
- Try to keep most weight in the standing leg with quadricep lifted and knee straight but soft. Lift through the arch of the standing foot.
- Exhale, bend the left knee, and step the left foot back to meet the right.
You can move directly into this series of poses on the other side, or perform a vinyasa.
Perform a vinyasa after completing both sides.
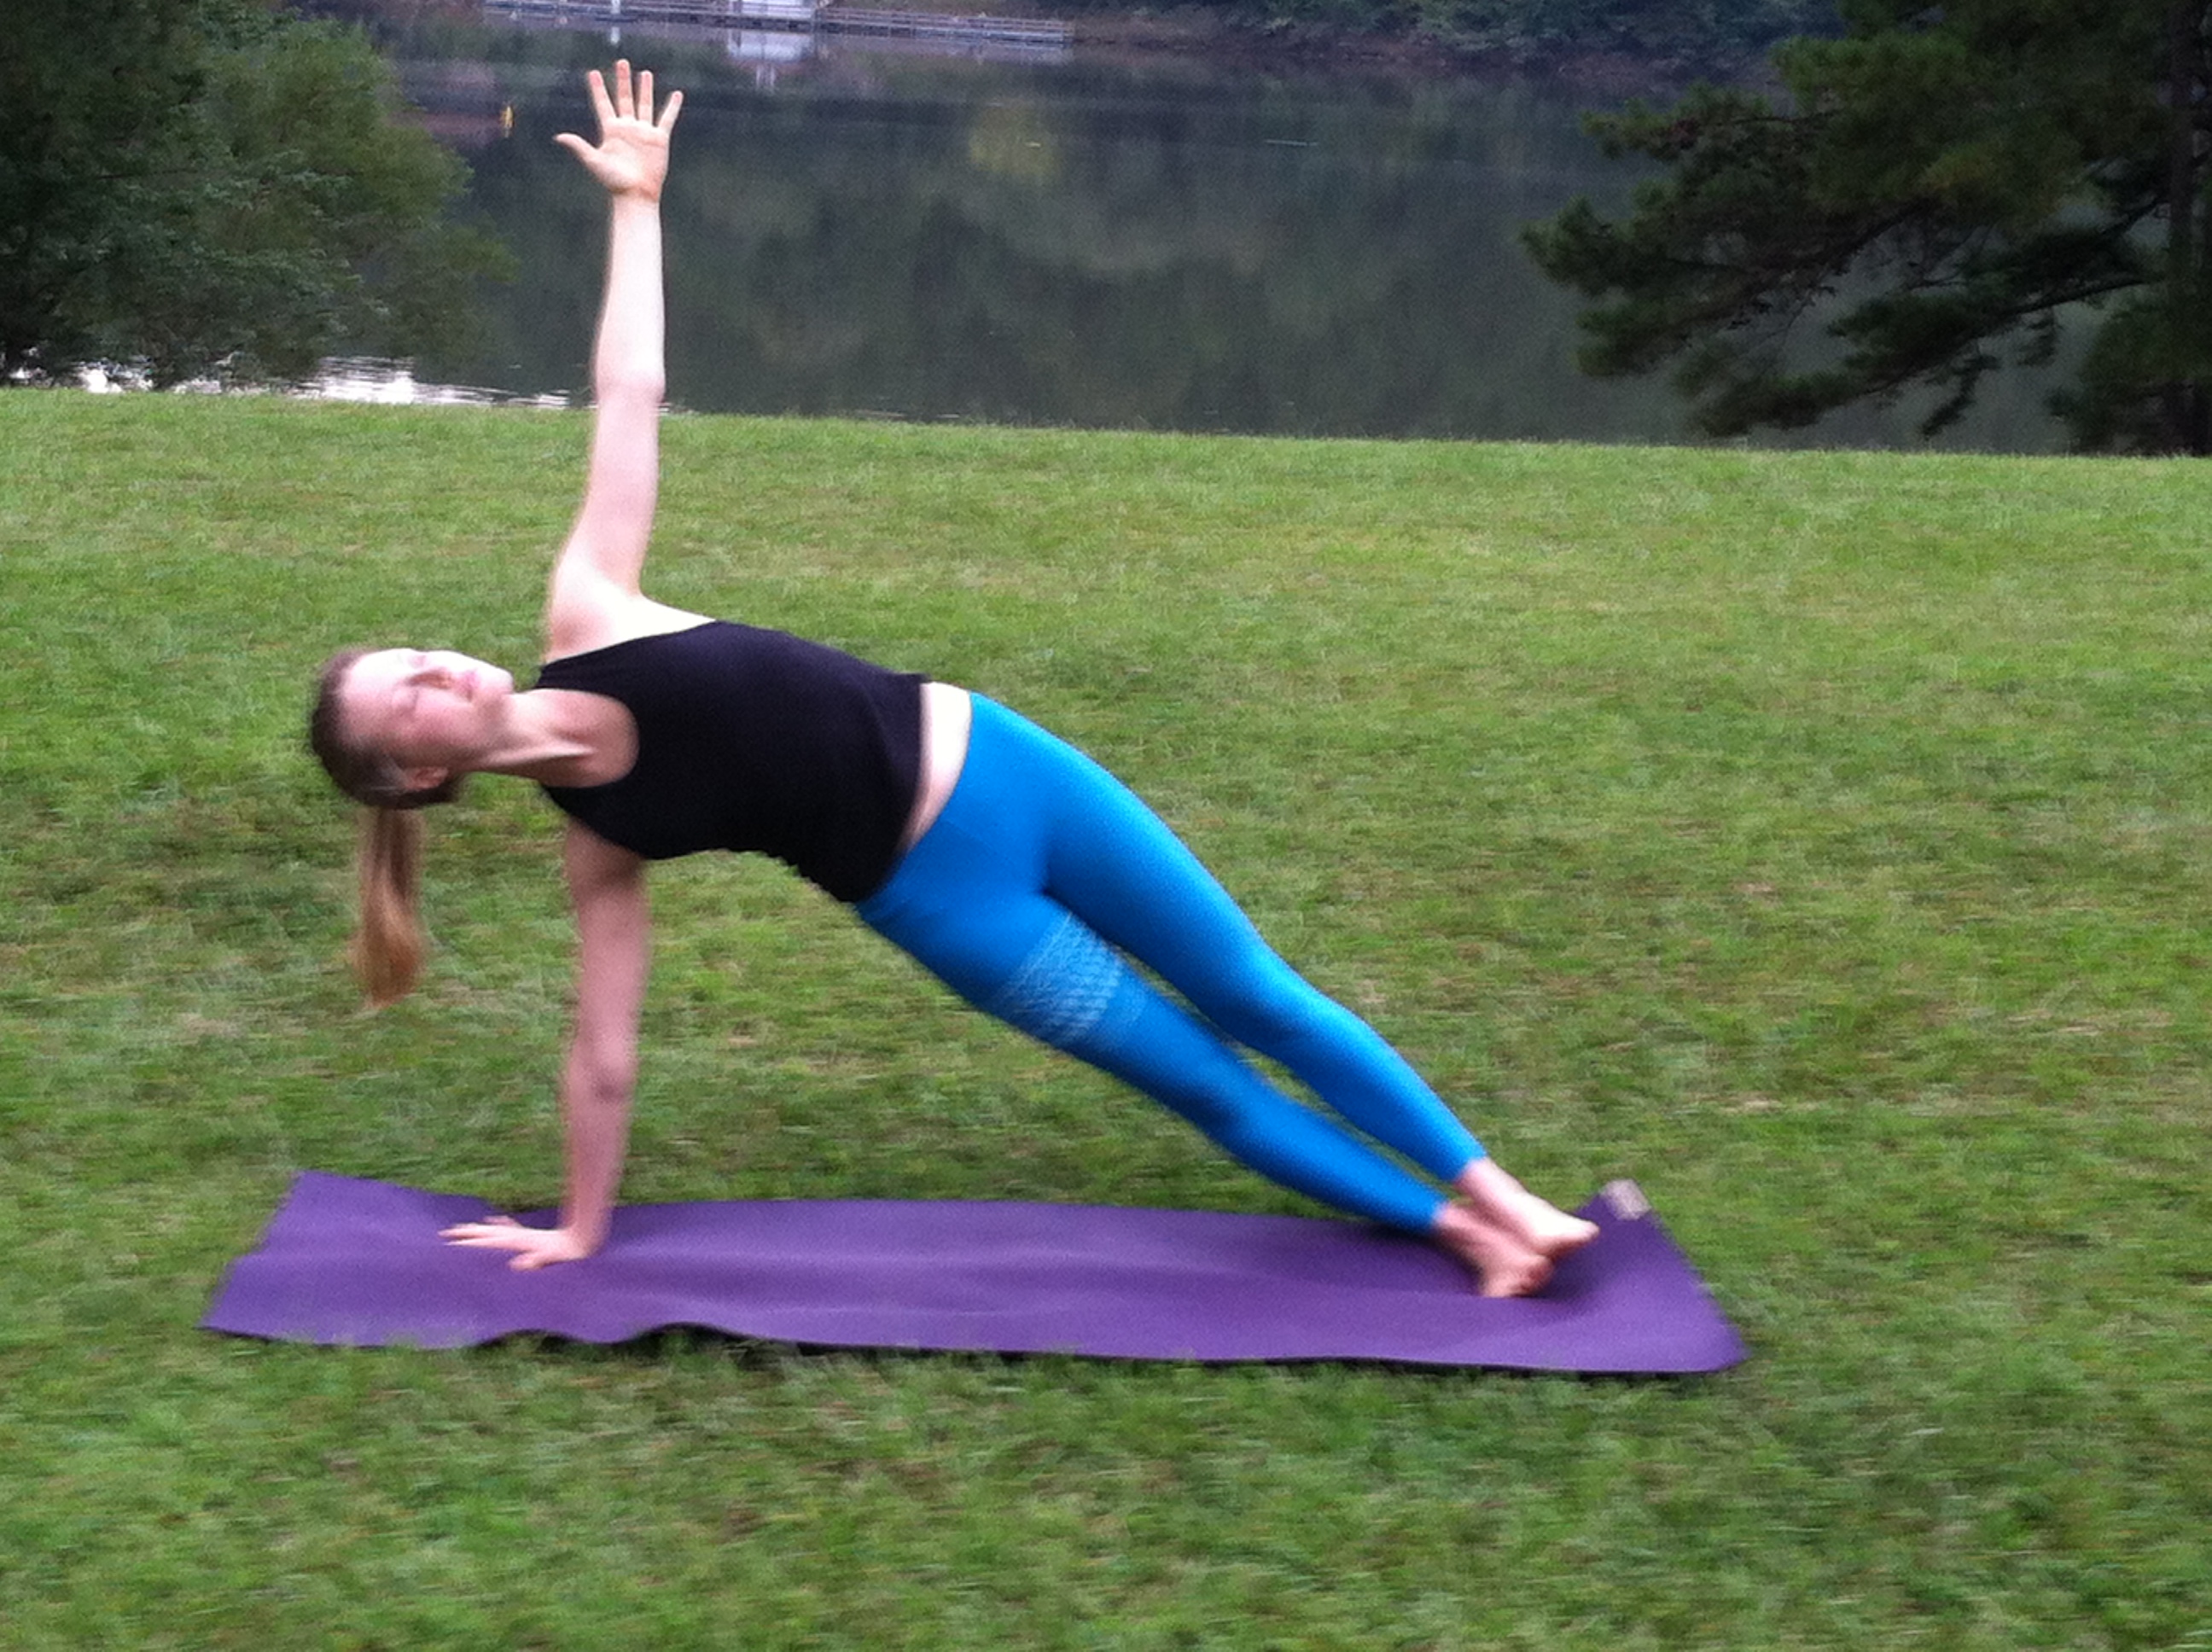
Side plank
- From Plank, shift your weight into your right hand and the outside edge of your right foot.
- Turn torso and hips to the right. Be sure the right wrist is directly under right shoulder.
- Strengthen the thighs, and press through the heels toward the floor. Align your entire body into one long diagonal line from the heels to the crown.
- If you’d like you can stretch the top arm toward the ceiling, parallel to the line of the shoulders. Keep the head in a neutral position, or turn it to gaze up at the top hand.
- Switch to the other side.
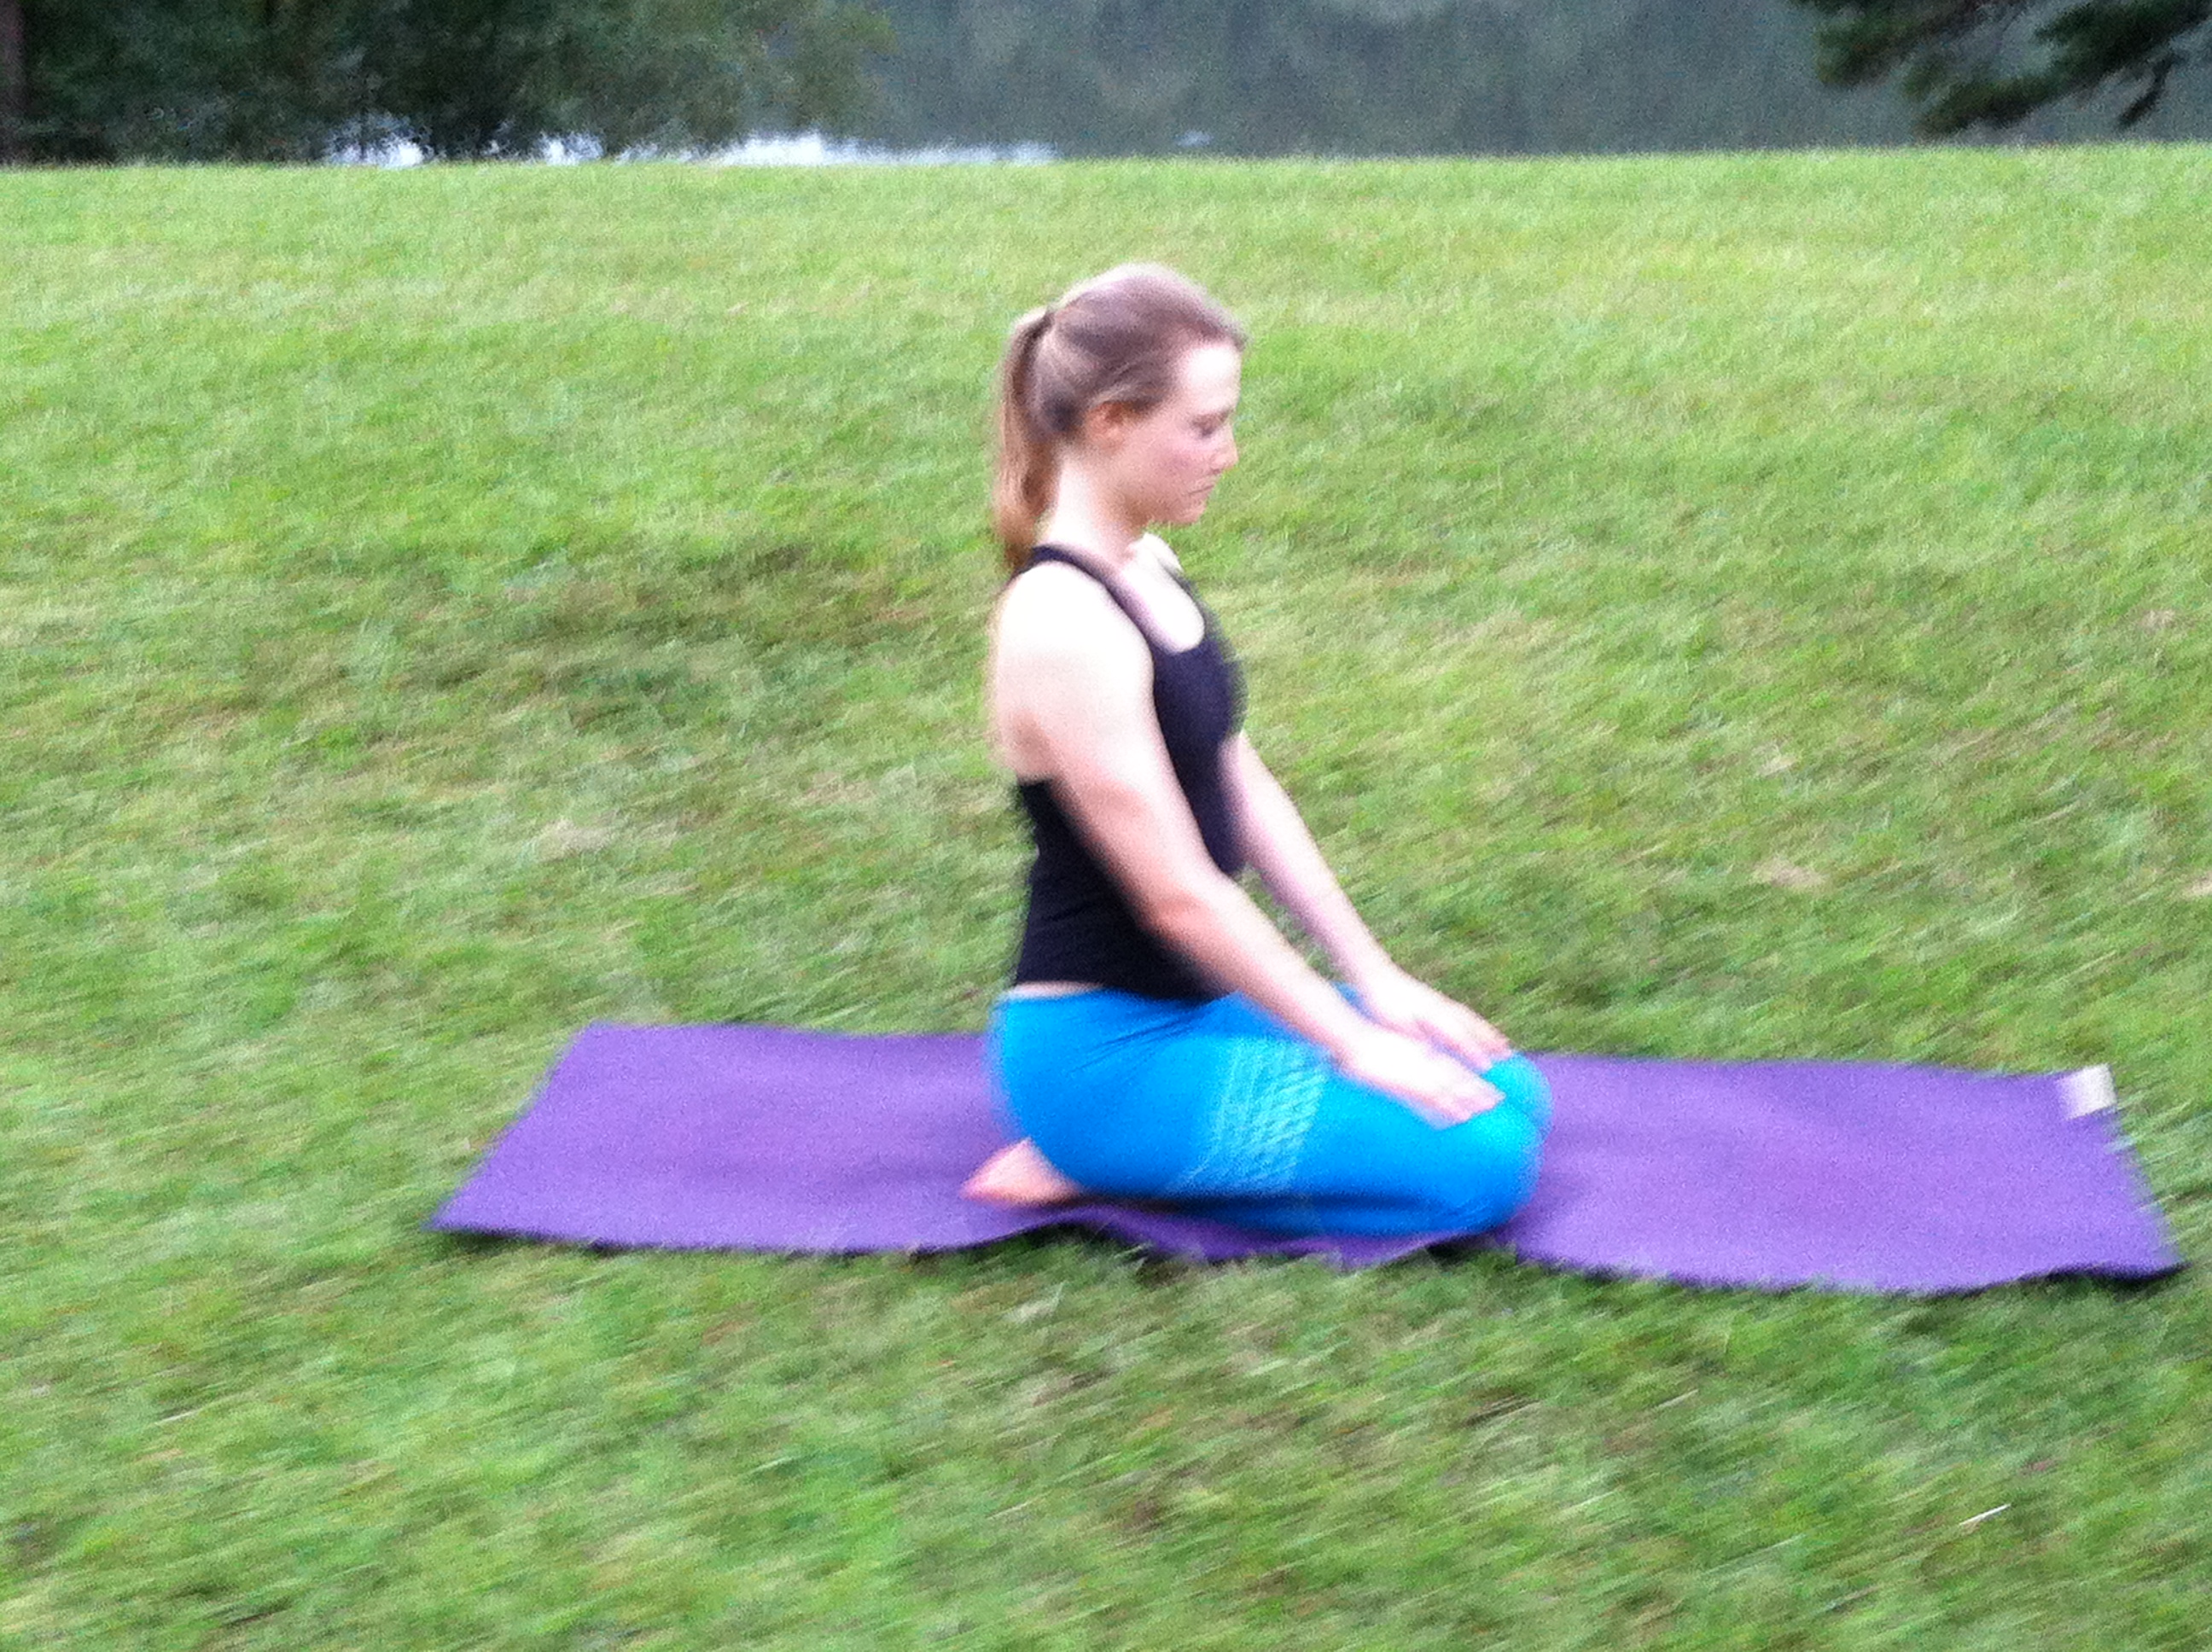
Garland
- Bring your feet back to the mat and squat with feet as close together as possible.
- Separate your thighs slightly wider than your torso. Exhaling, lean your torso forward and fit it snugly between your thighs.
- Either bring hands to prayer position at the heart, or curl the spine and grasp the ankles as preparation for the next pose. You can also reach arms straight out in front of you on the mat.
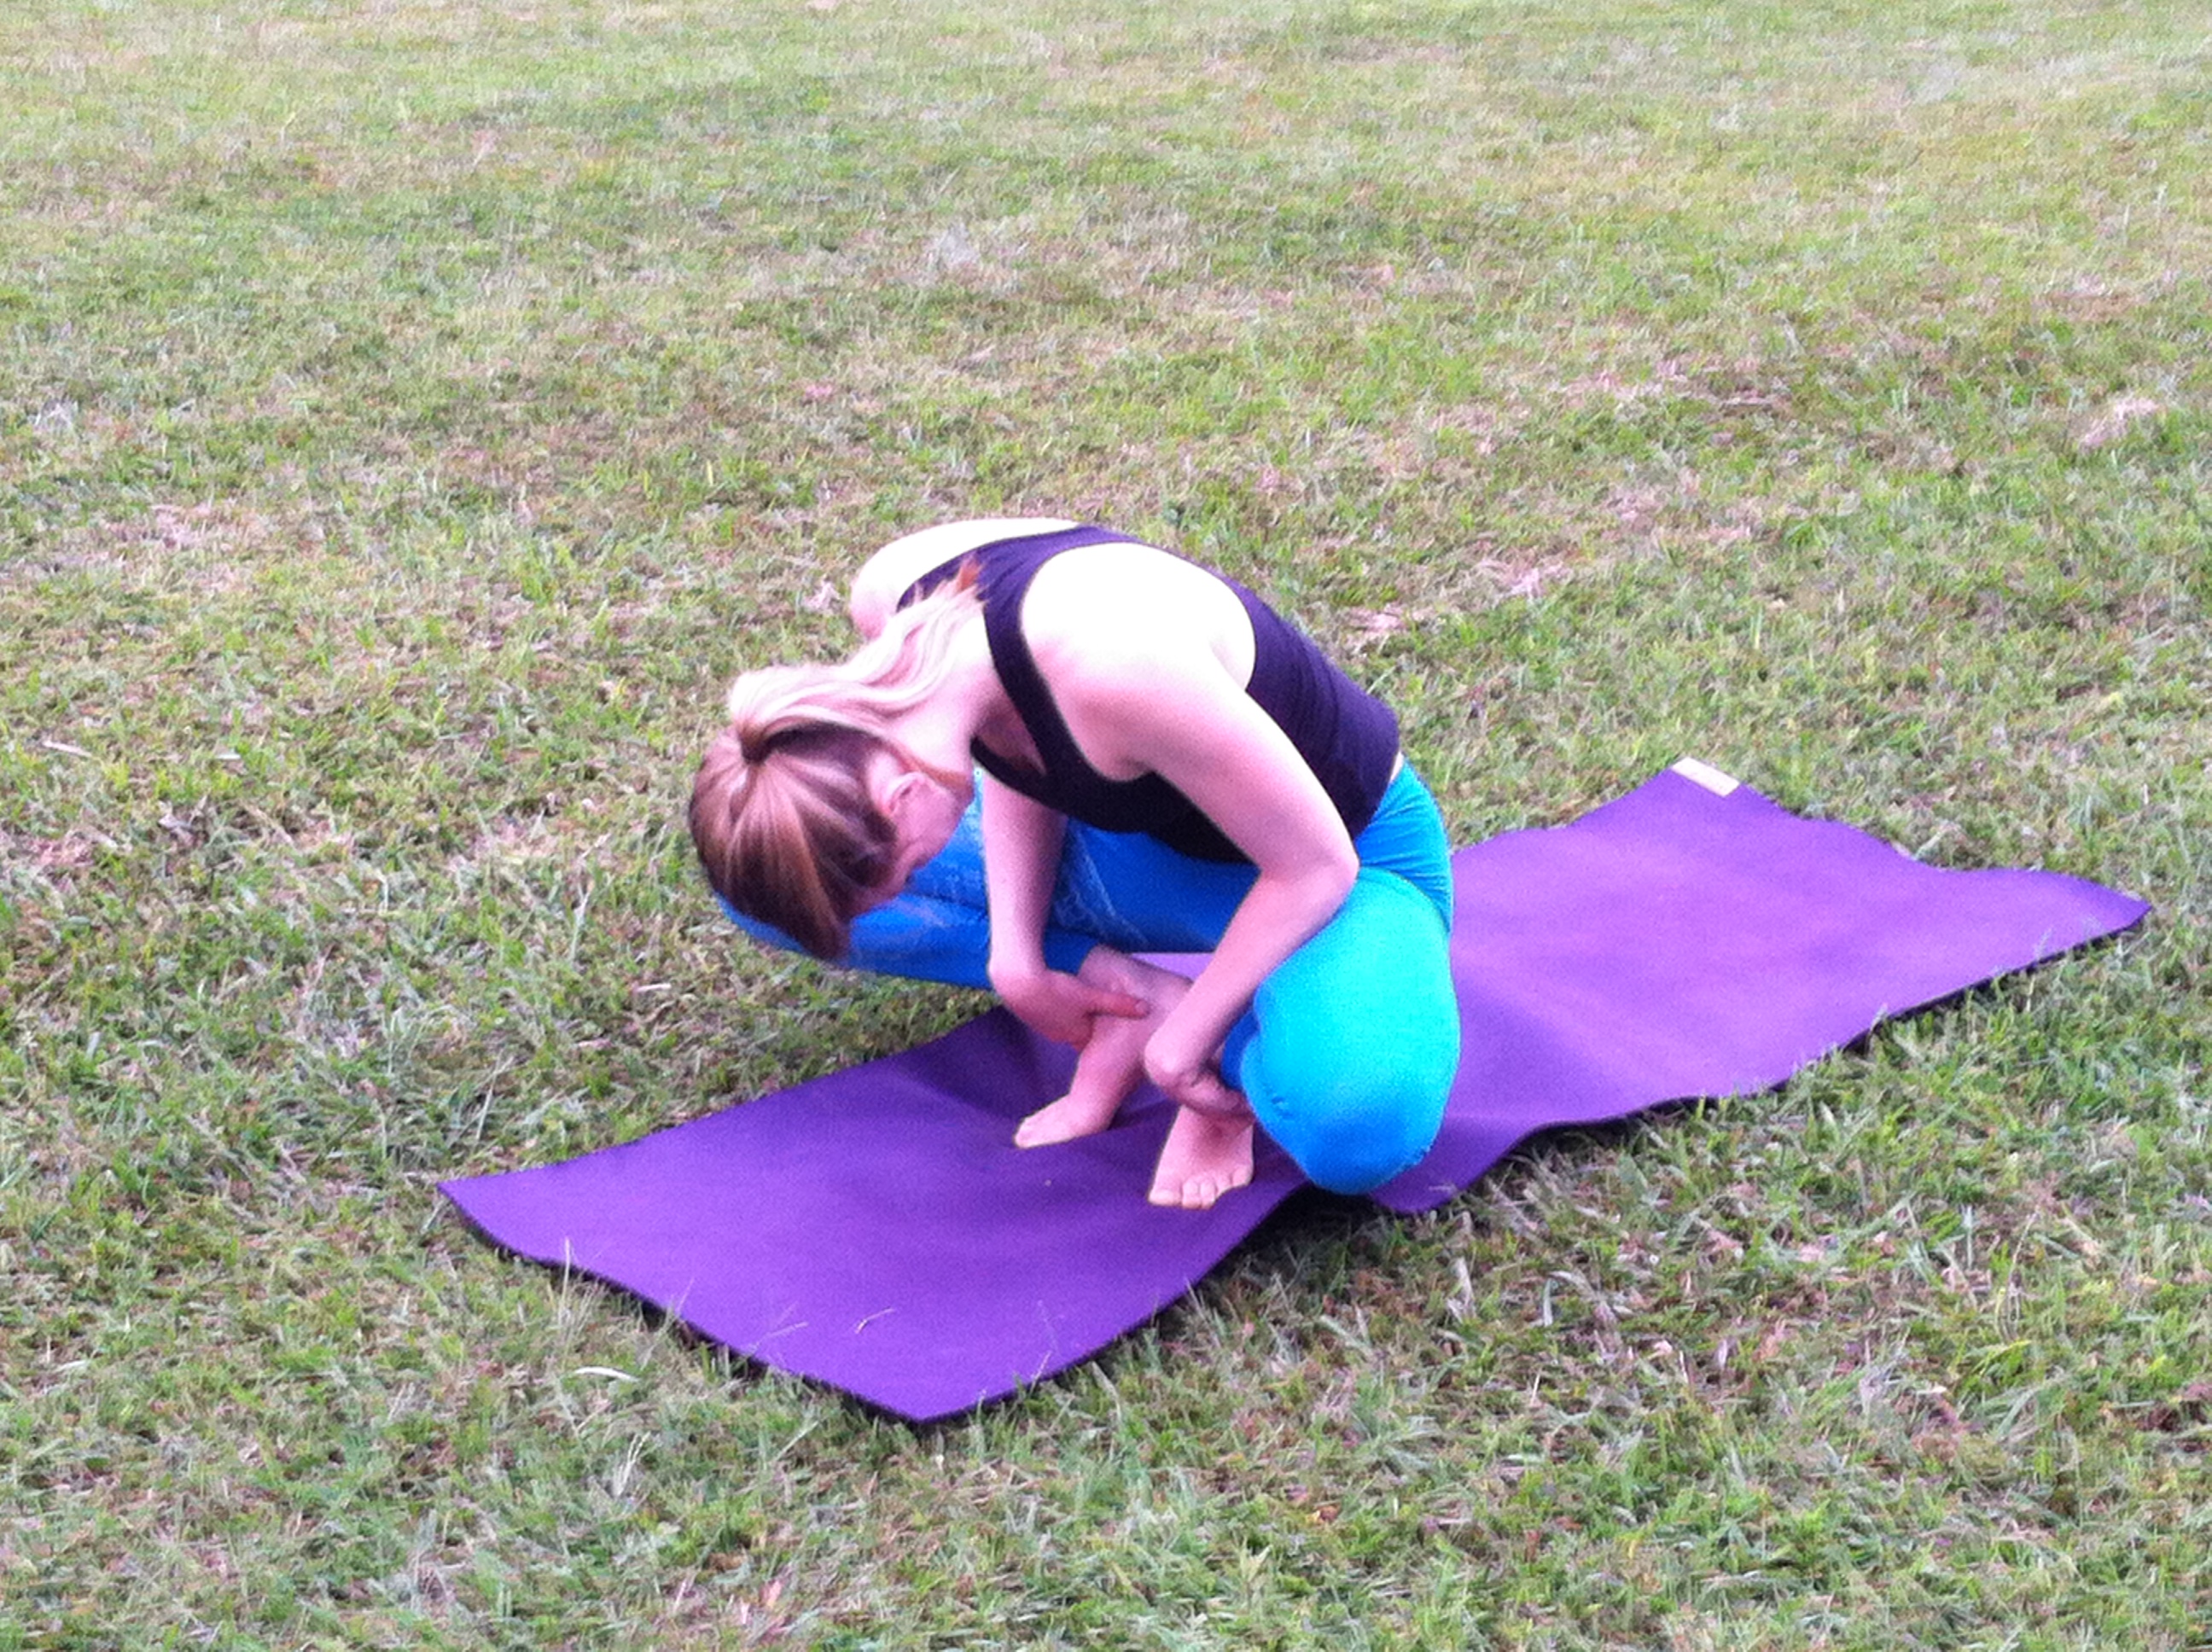
Crane
- From Garland, bring your palms to the mat in front of you. Place hands as wide as the shoulders. Bend the elbows and place the backs of the upper arms onto the shins.
- Snuggle your inner thighs against the sides of your torso, and your shins into your armpits, and slide the upper arms down as low onto the shins as possible. Lift up onto the balls of your feet and lean forward even more, taking the weight of your torso onto the backs of the upper arms. In Crane pose you consciously attempt to contract your front torso and round your back completely. To help yourself do this, keep your tailbone as close to your heels as possible.
- With an exhalation, lean forward even more onto the backs of your upper arms, to the point where the balls of your feet leave the floor. Now your torso and legs are balanced on the backs of your upper arms. As a beginner at this pose, you might want to stop here, perched securely on the bent arms.
- But if you are ready to go further, squeeze the legs against the arms, press the inner hands firmly to the floor and (with an inhalation) straighten the elbows. Seen from the side the arms are angled slightly forward relative to the floor. The inner knees should be glued to the outer arms, high up near the armpits. Keep the head in a neutral position with your eyes looking at the floor, or lift the head slightly, without compressing the back of the neck, and look forward.
- Breathe.
Dolphin
- From plank, come to tabletop position on hands and knees.
- Bring your forearms to the mat, palms facing down.
- Press deeply into forearms, curl your toes under, exhale and lift knees away from the floor. At first, keep your knees slightly bent and heels off the floor.
- Begin to lift the sit bones back and apart as you gently straighten your legs as is comfortable to you.
- Firm shoulder blades against your back, then widen them away from the spine and down toward the tailbone. Neck relaxed.

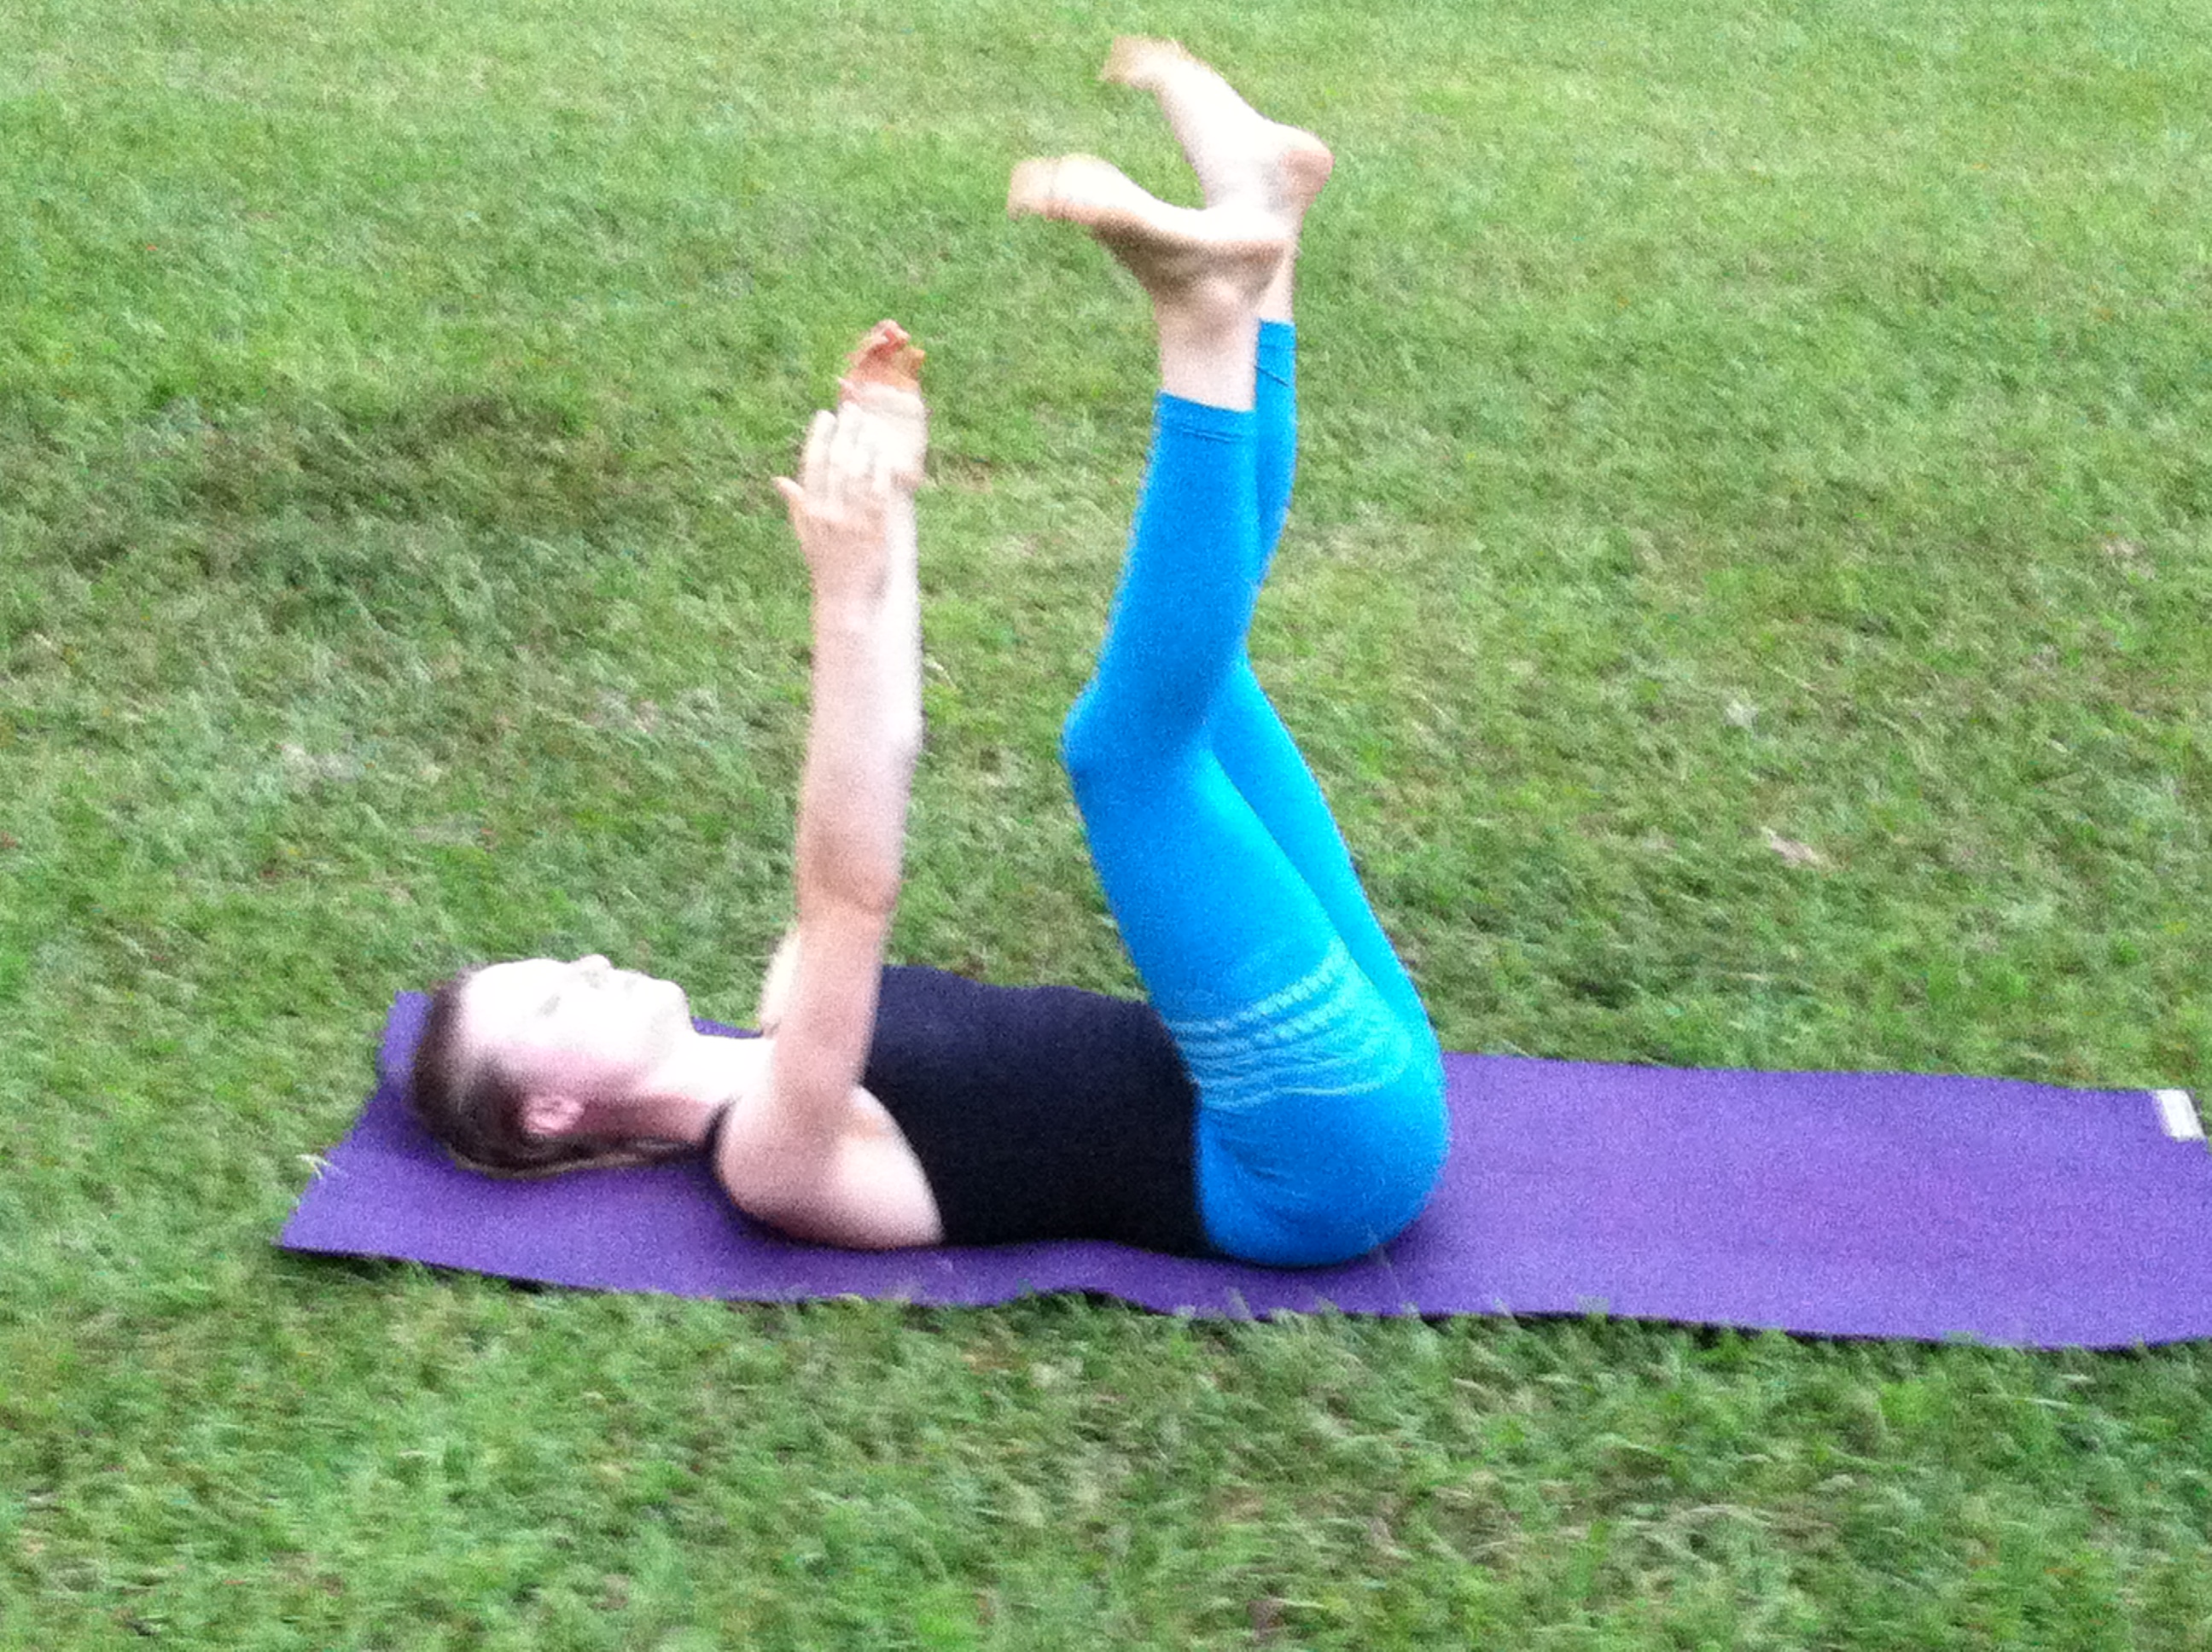
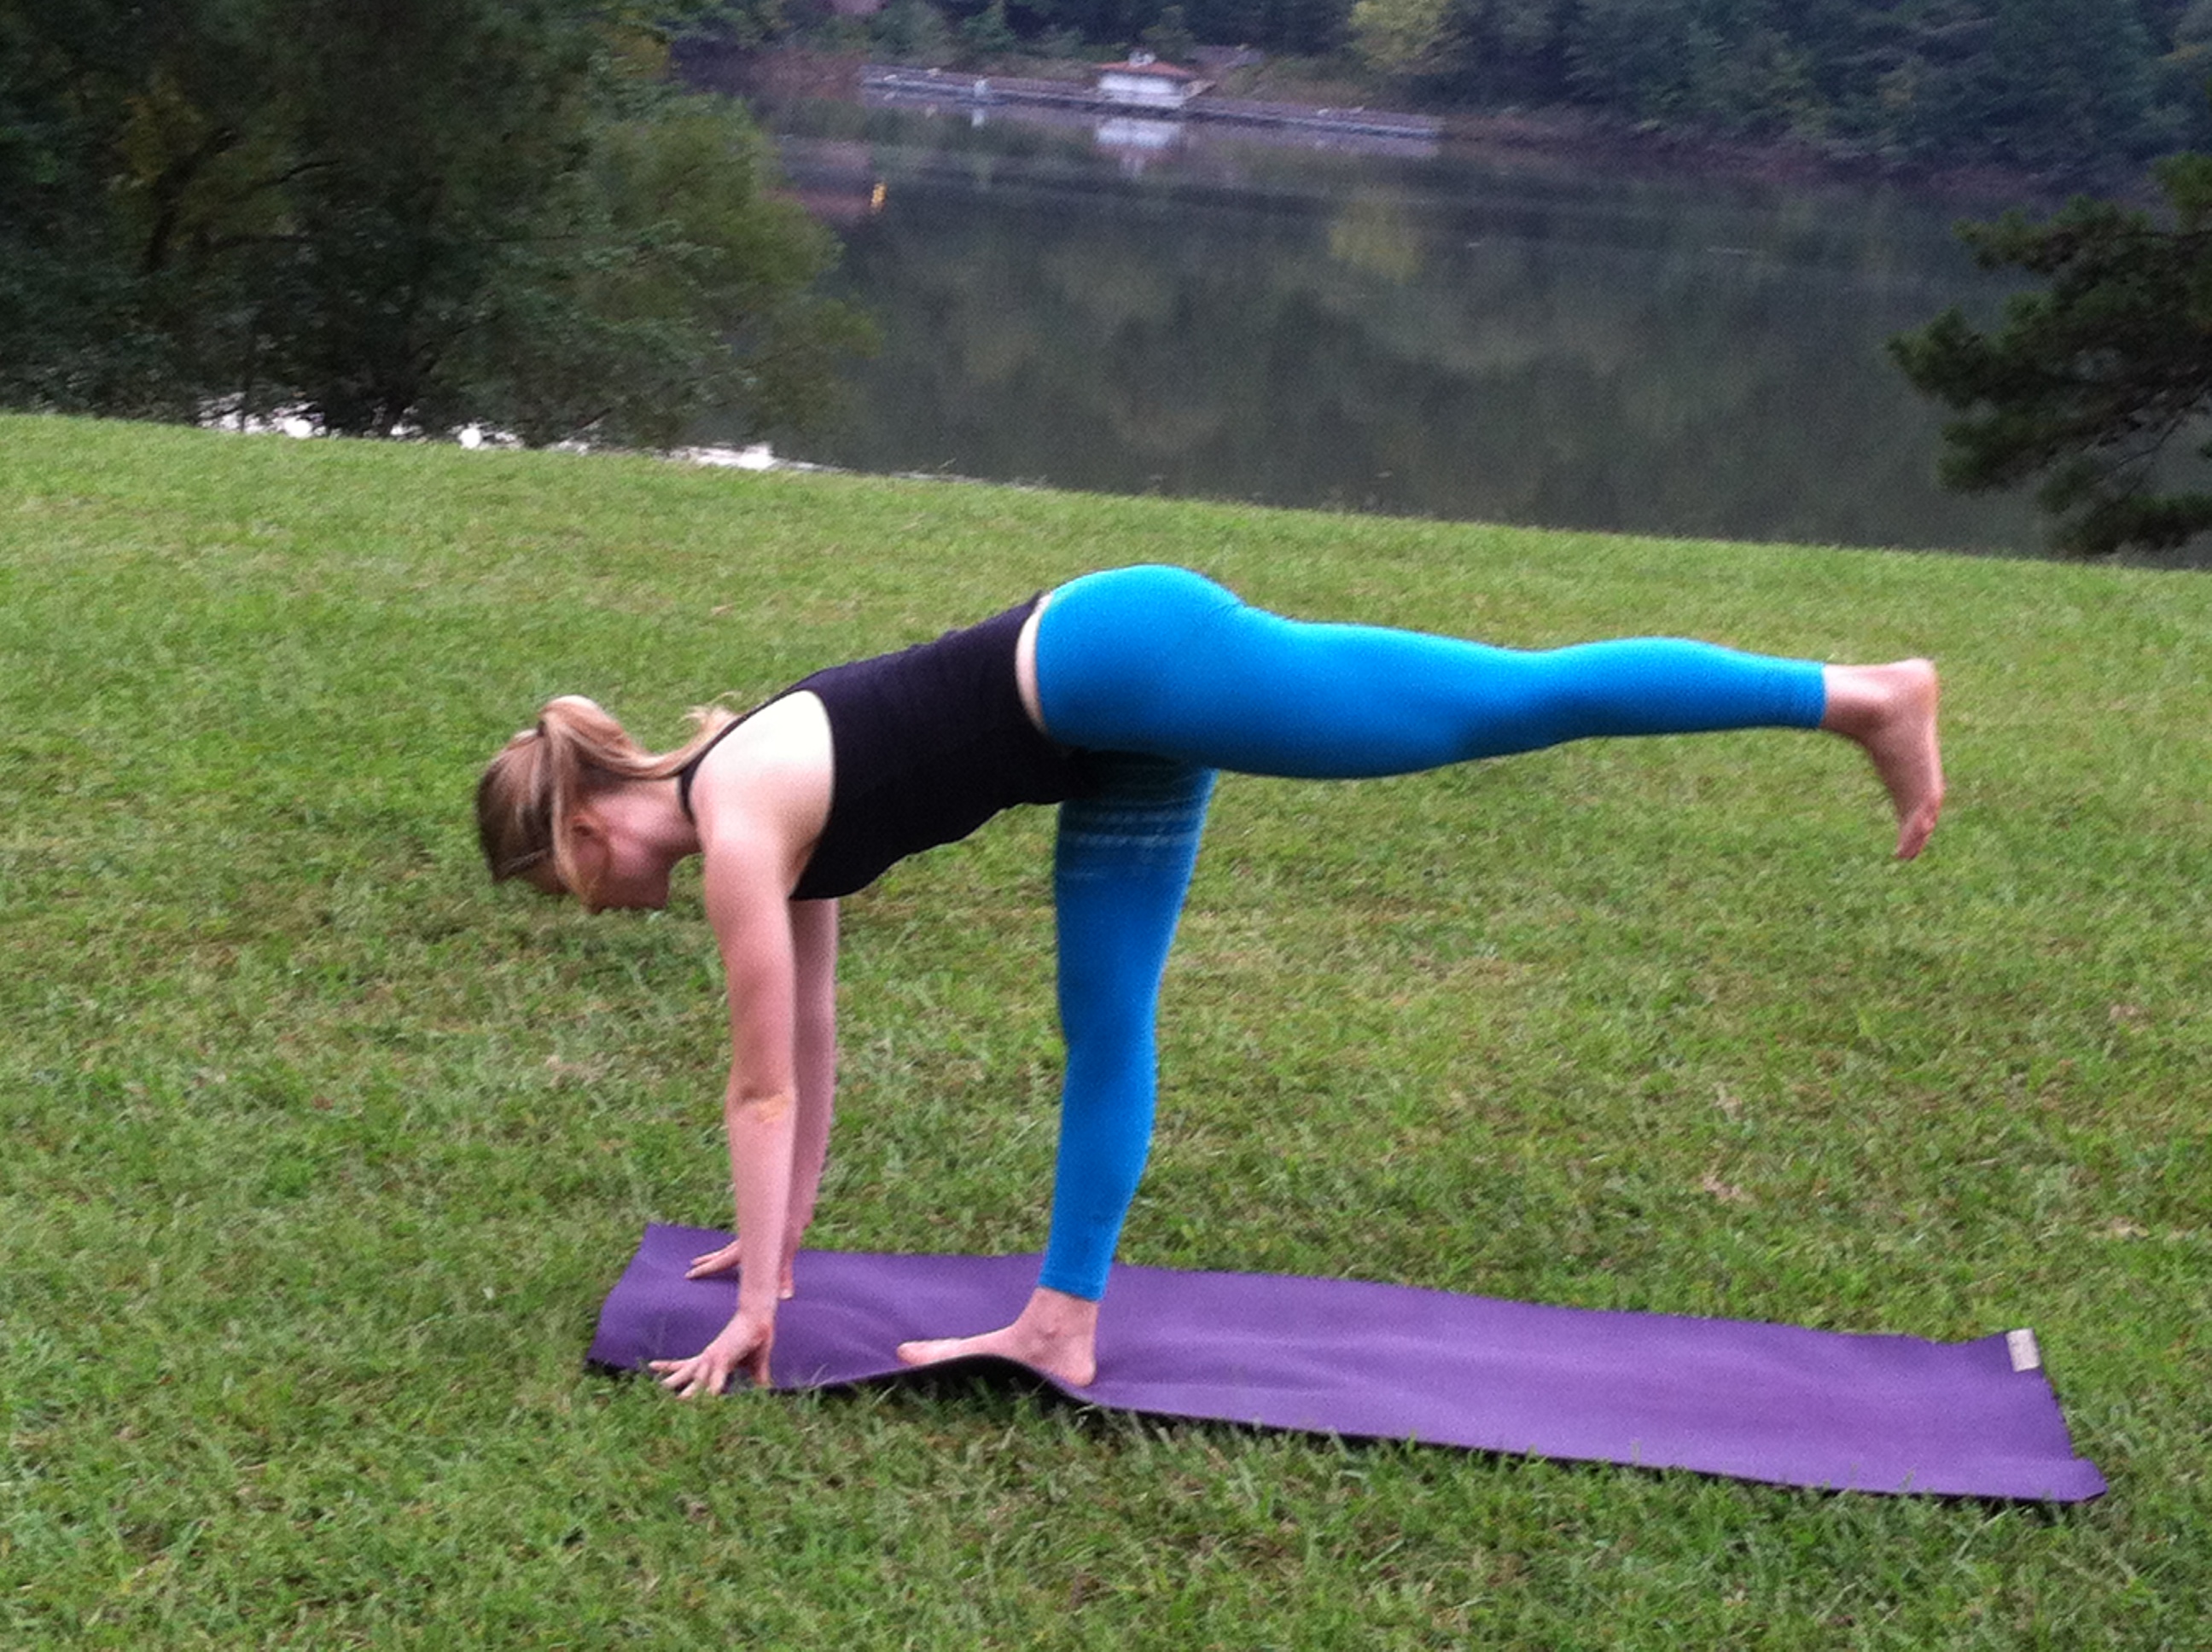
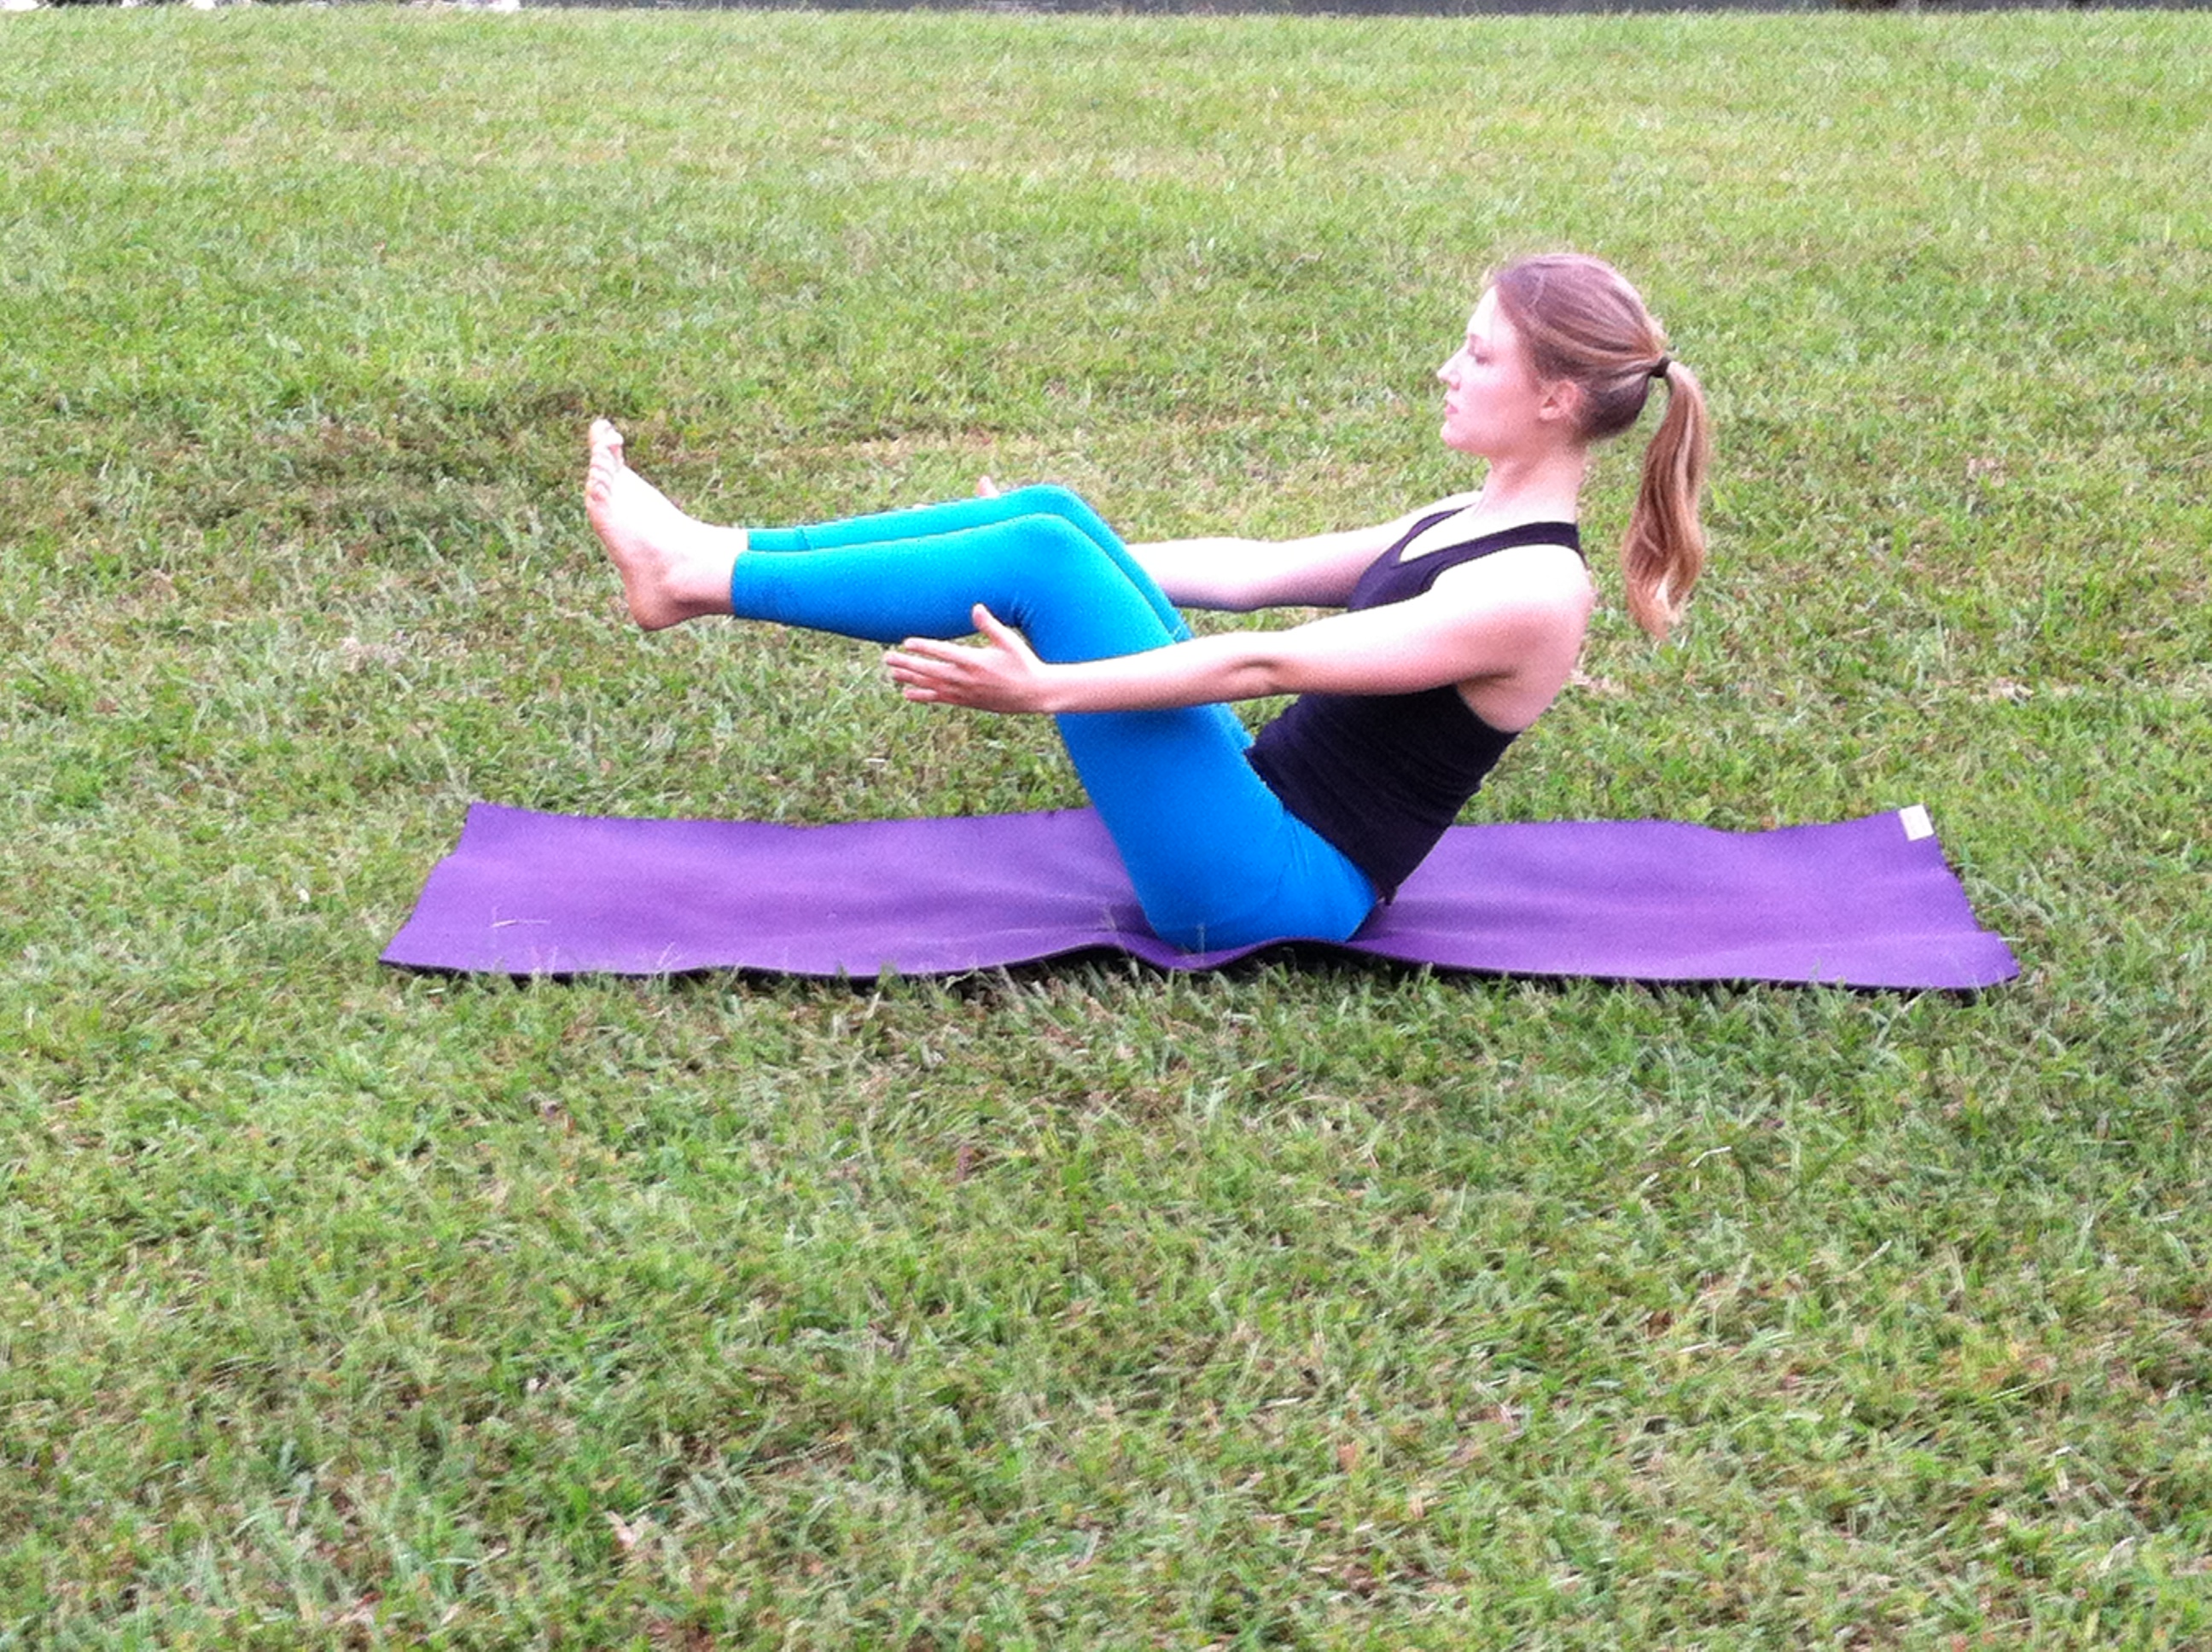
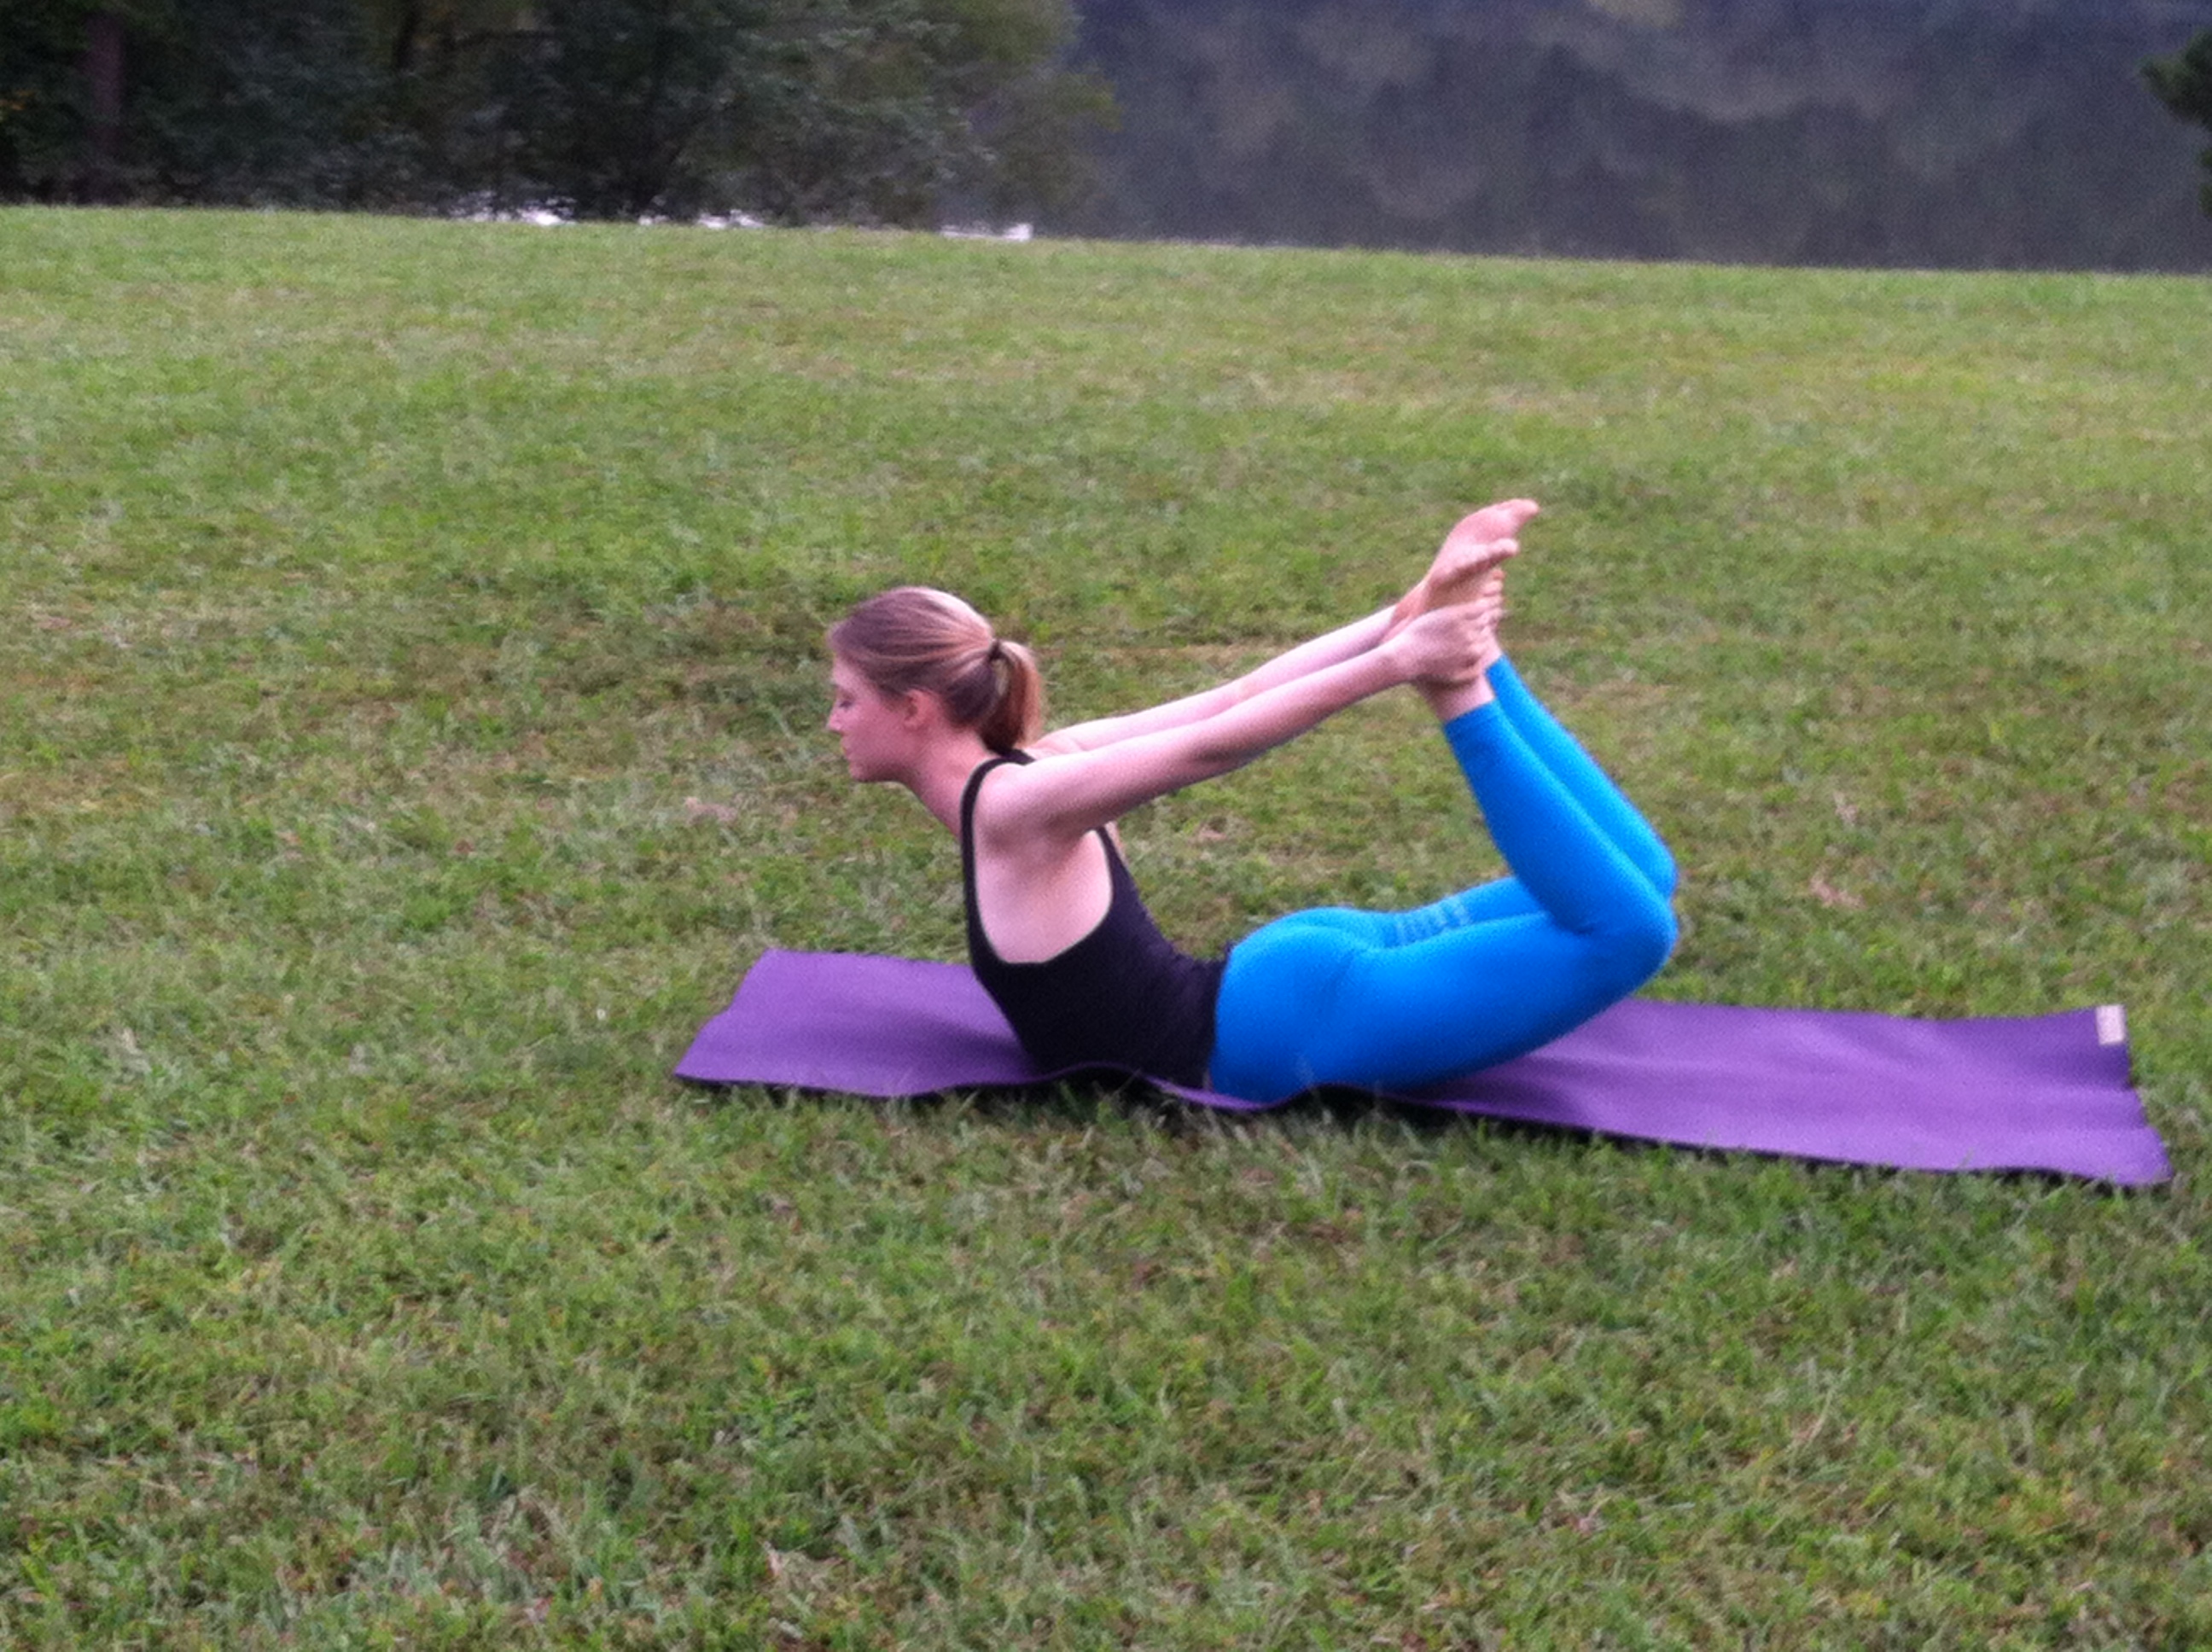
Boat
- Sit on the floor with knees bent in front of you. Press your hands on the floor a little behind your hips, fingers pointing toward the feet, and strengthen the arms. Lift through the top of the sternum and lean back slightly. As you do this make sure your back doesn’t round; continue to lengthen the front of your torso. Sit on the “tripod” of your two sitting bones and tailbone.
- Lift your feet off the floor, so that the thighs are angled about 45-50 degrees relative to the floor. Lengthen your tailbone into the floor and lift your pubis toward your navel. If possible, slowly straighten your knees, raising the tips of your toes slightly above the level of your eyes. If this isn’t possible remain with your knees bent, perhaps lifting the shins parallel to the floor.
- Stretch your arms alongside the legs, parallel to each other and the floor. Spread the shoulder blades across your back and reach strongly out through the fingers. If this isn’t possible, keep the hands on the floor beside your hips or hold on to the backs of your thighs.
- Firm the lower belly, but do not strain. Breath easily and tuck chin slightly.
Vinyasa
Cool Down
HIPS AND LEGS
Purpose: Stimulate synovial fluid through hips, knees, and ankles, increase flexibility, cultivate fluid power and balance.
Warm up
From Standing Forward Fold, step right foot back into Lunge.
Press into the feet and squeeze inner legs in toward each other to revolve the upper body into
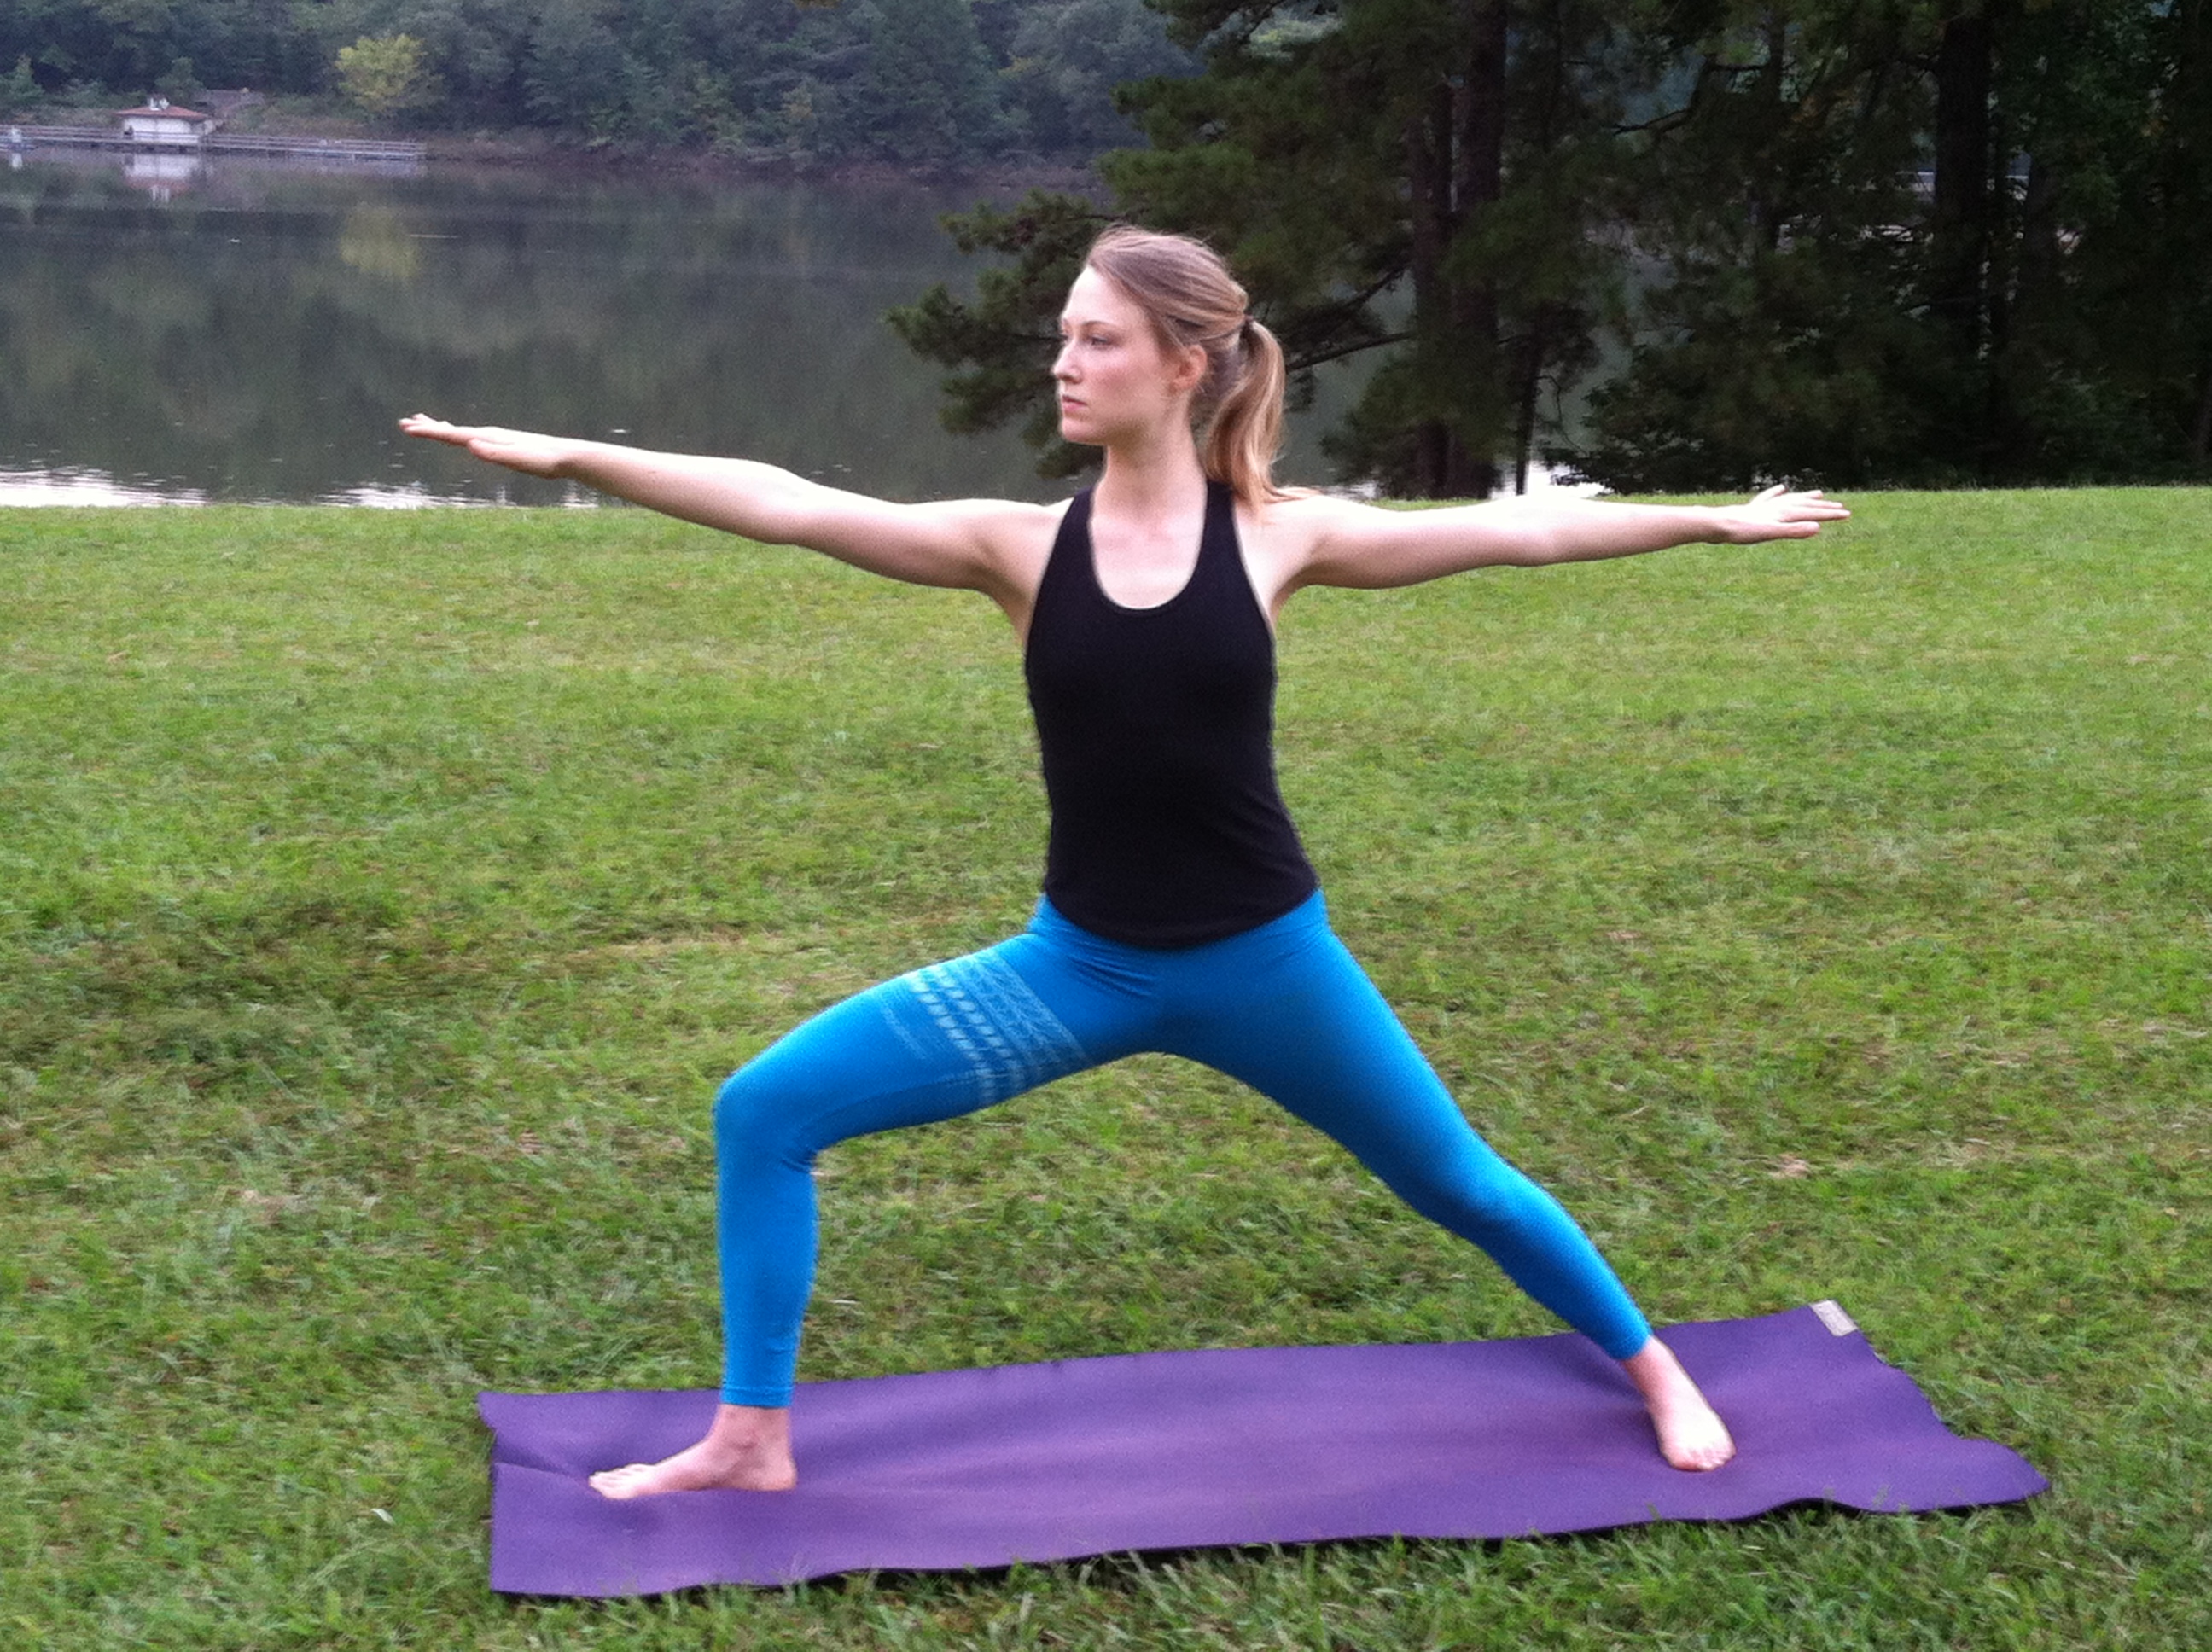
Warrior 2
- Heels are aligned with each other. Turn left foot out so that the edge of your foot is parallel to the small edge of your mat. Right toes point forward.
- Bend your right knee to track directly over your second two toes. Left leg is straight. Firm your inner thighs and lift your kneecaps. Keep your weight evenly distributed between your feet.
- Reach your arms out to the sides and drop your shoulder blades down and together on the back body. Neck is relaxed.
- Gaze over your front fingertips.
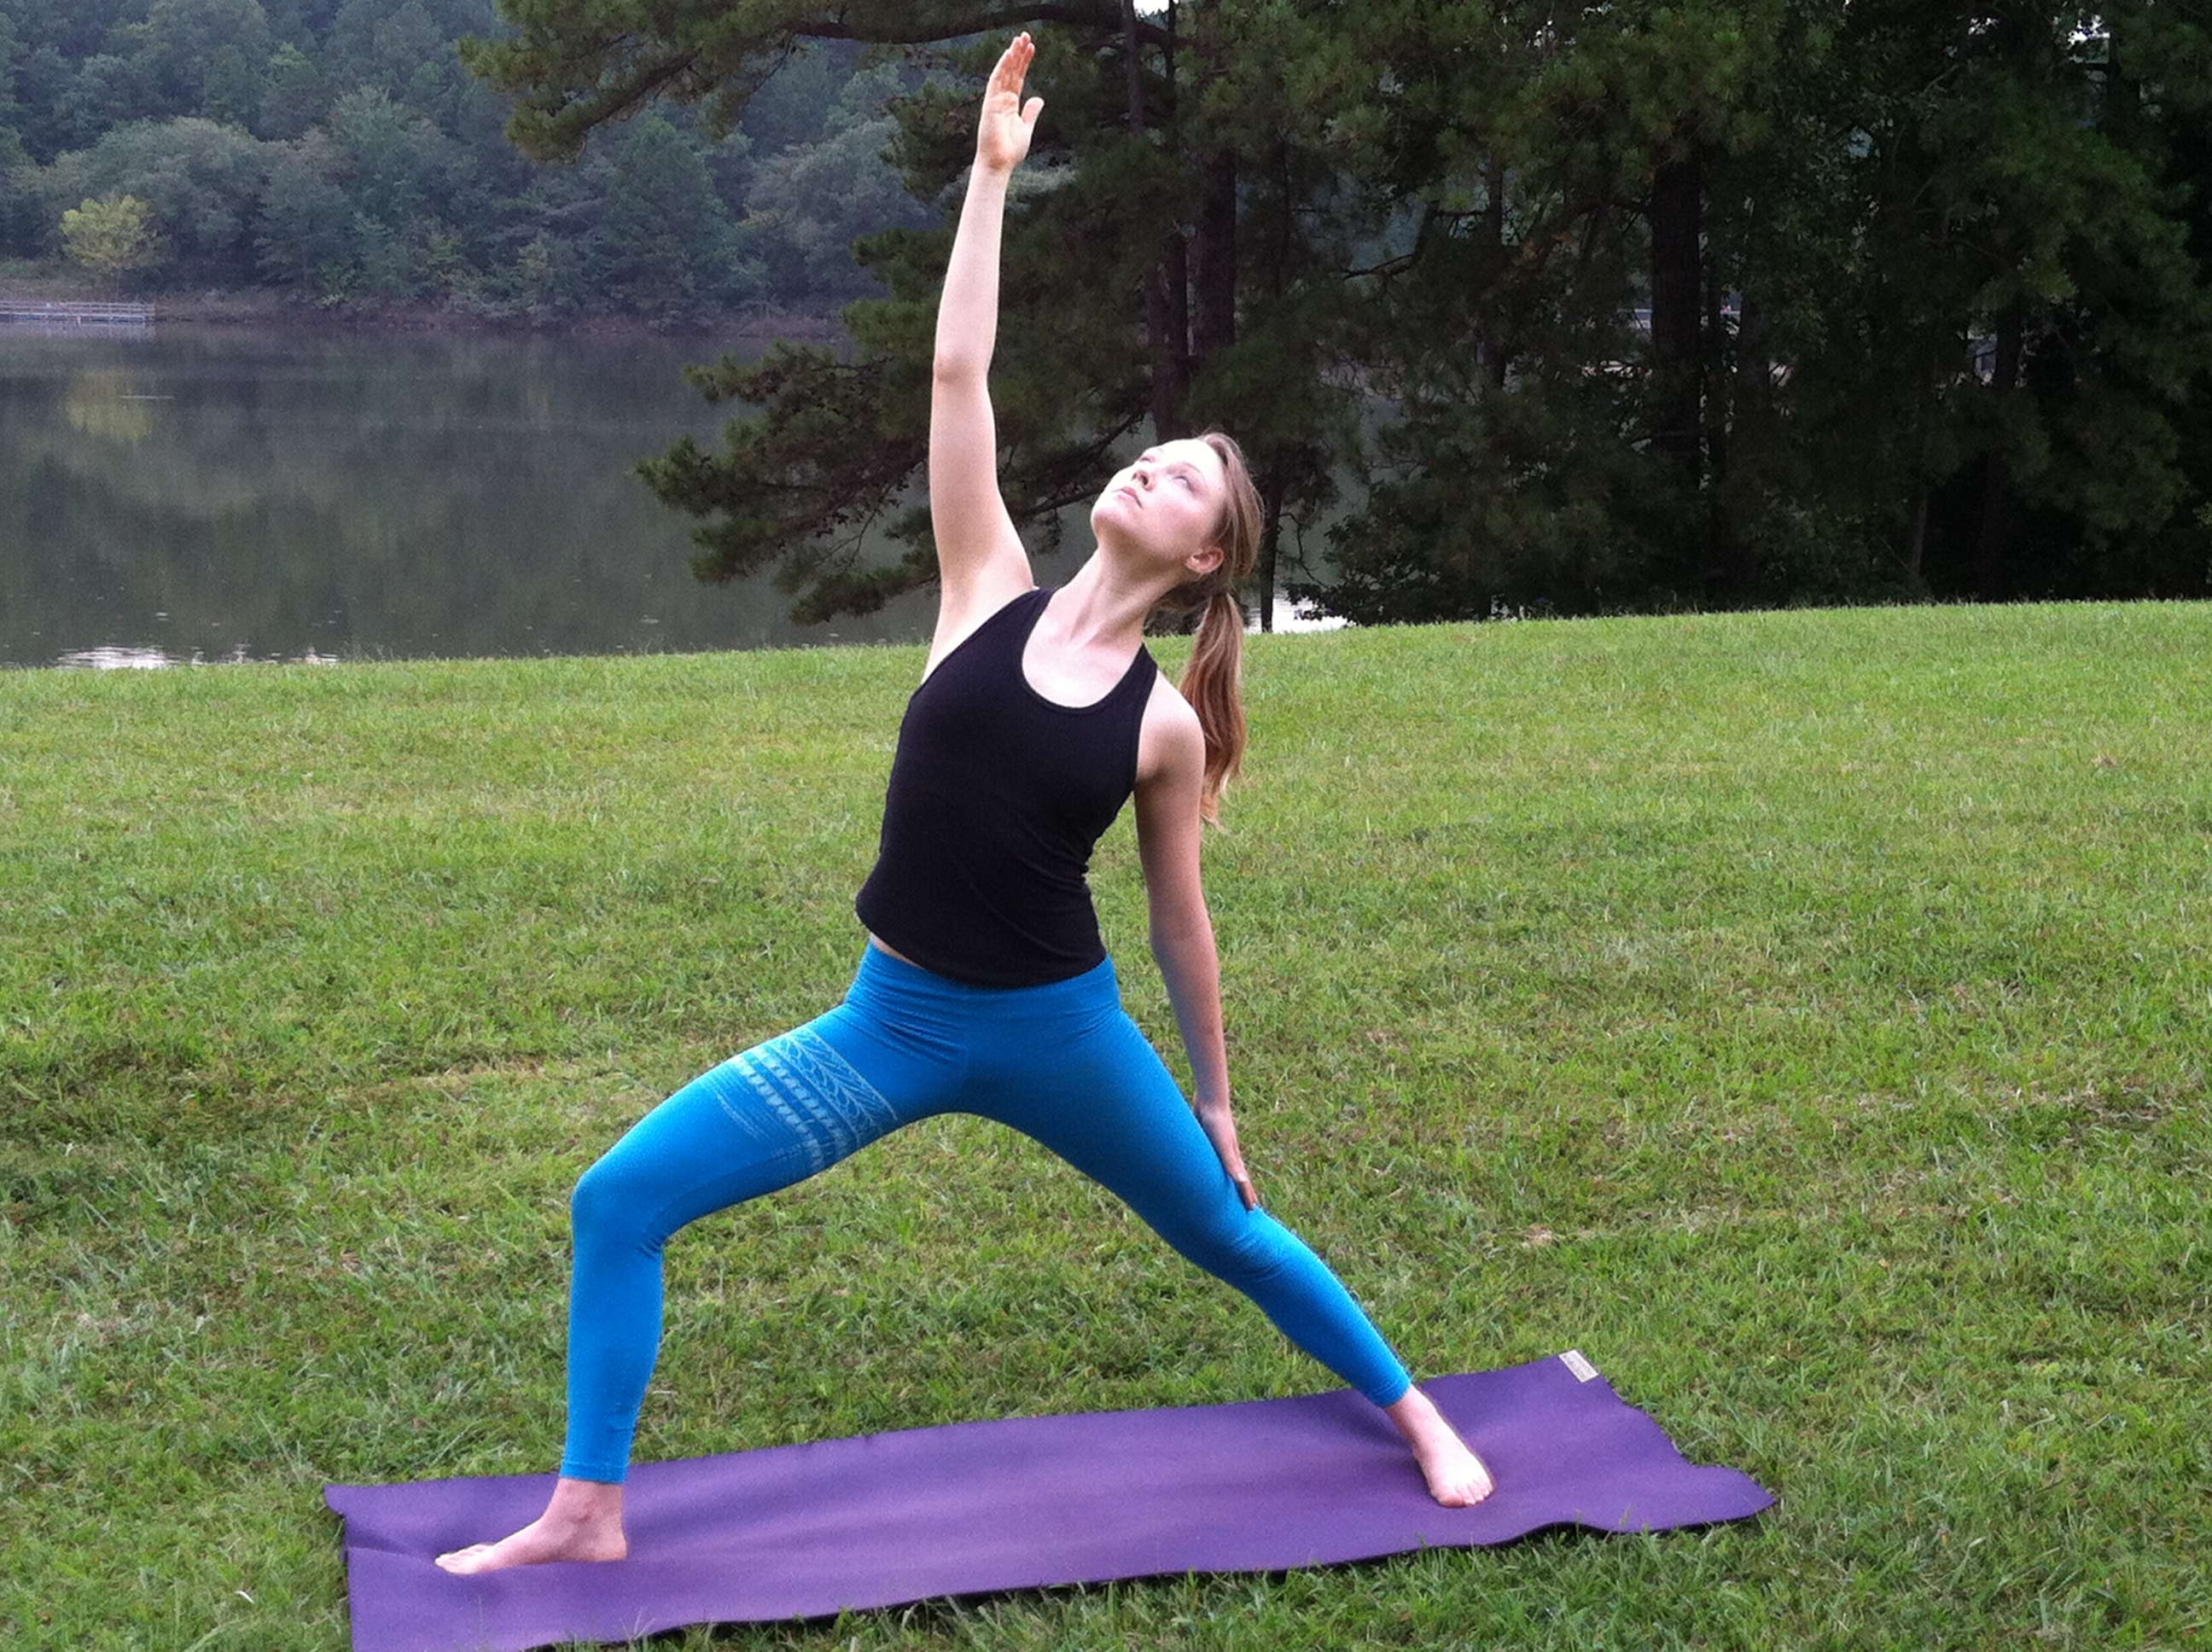
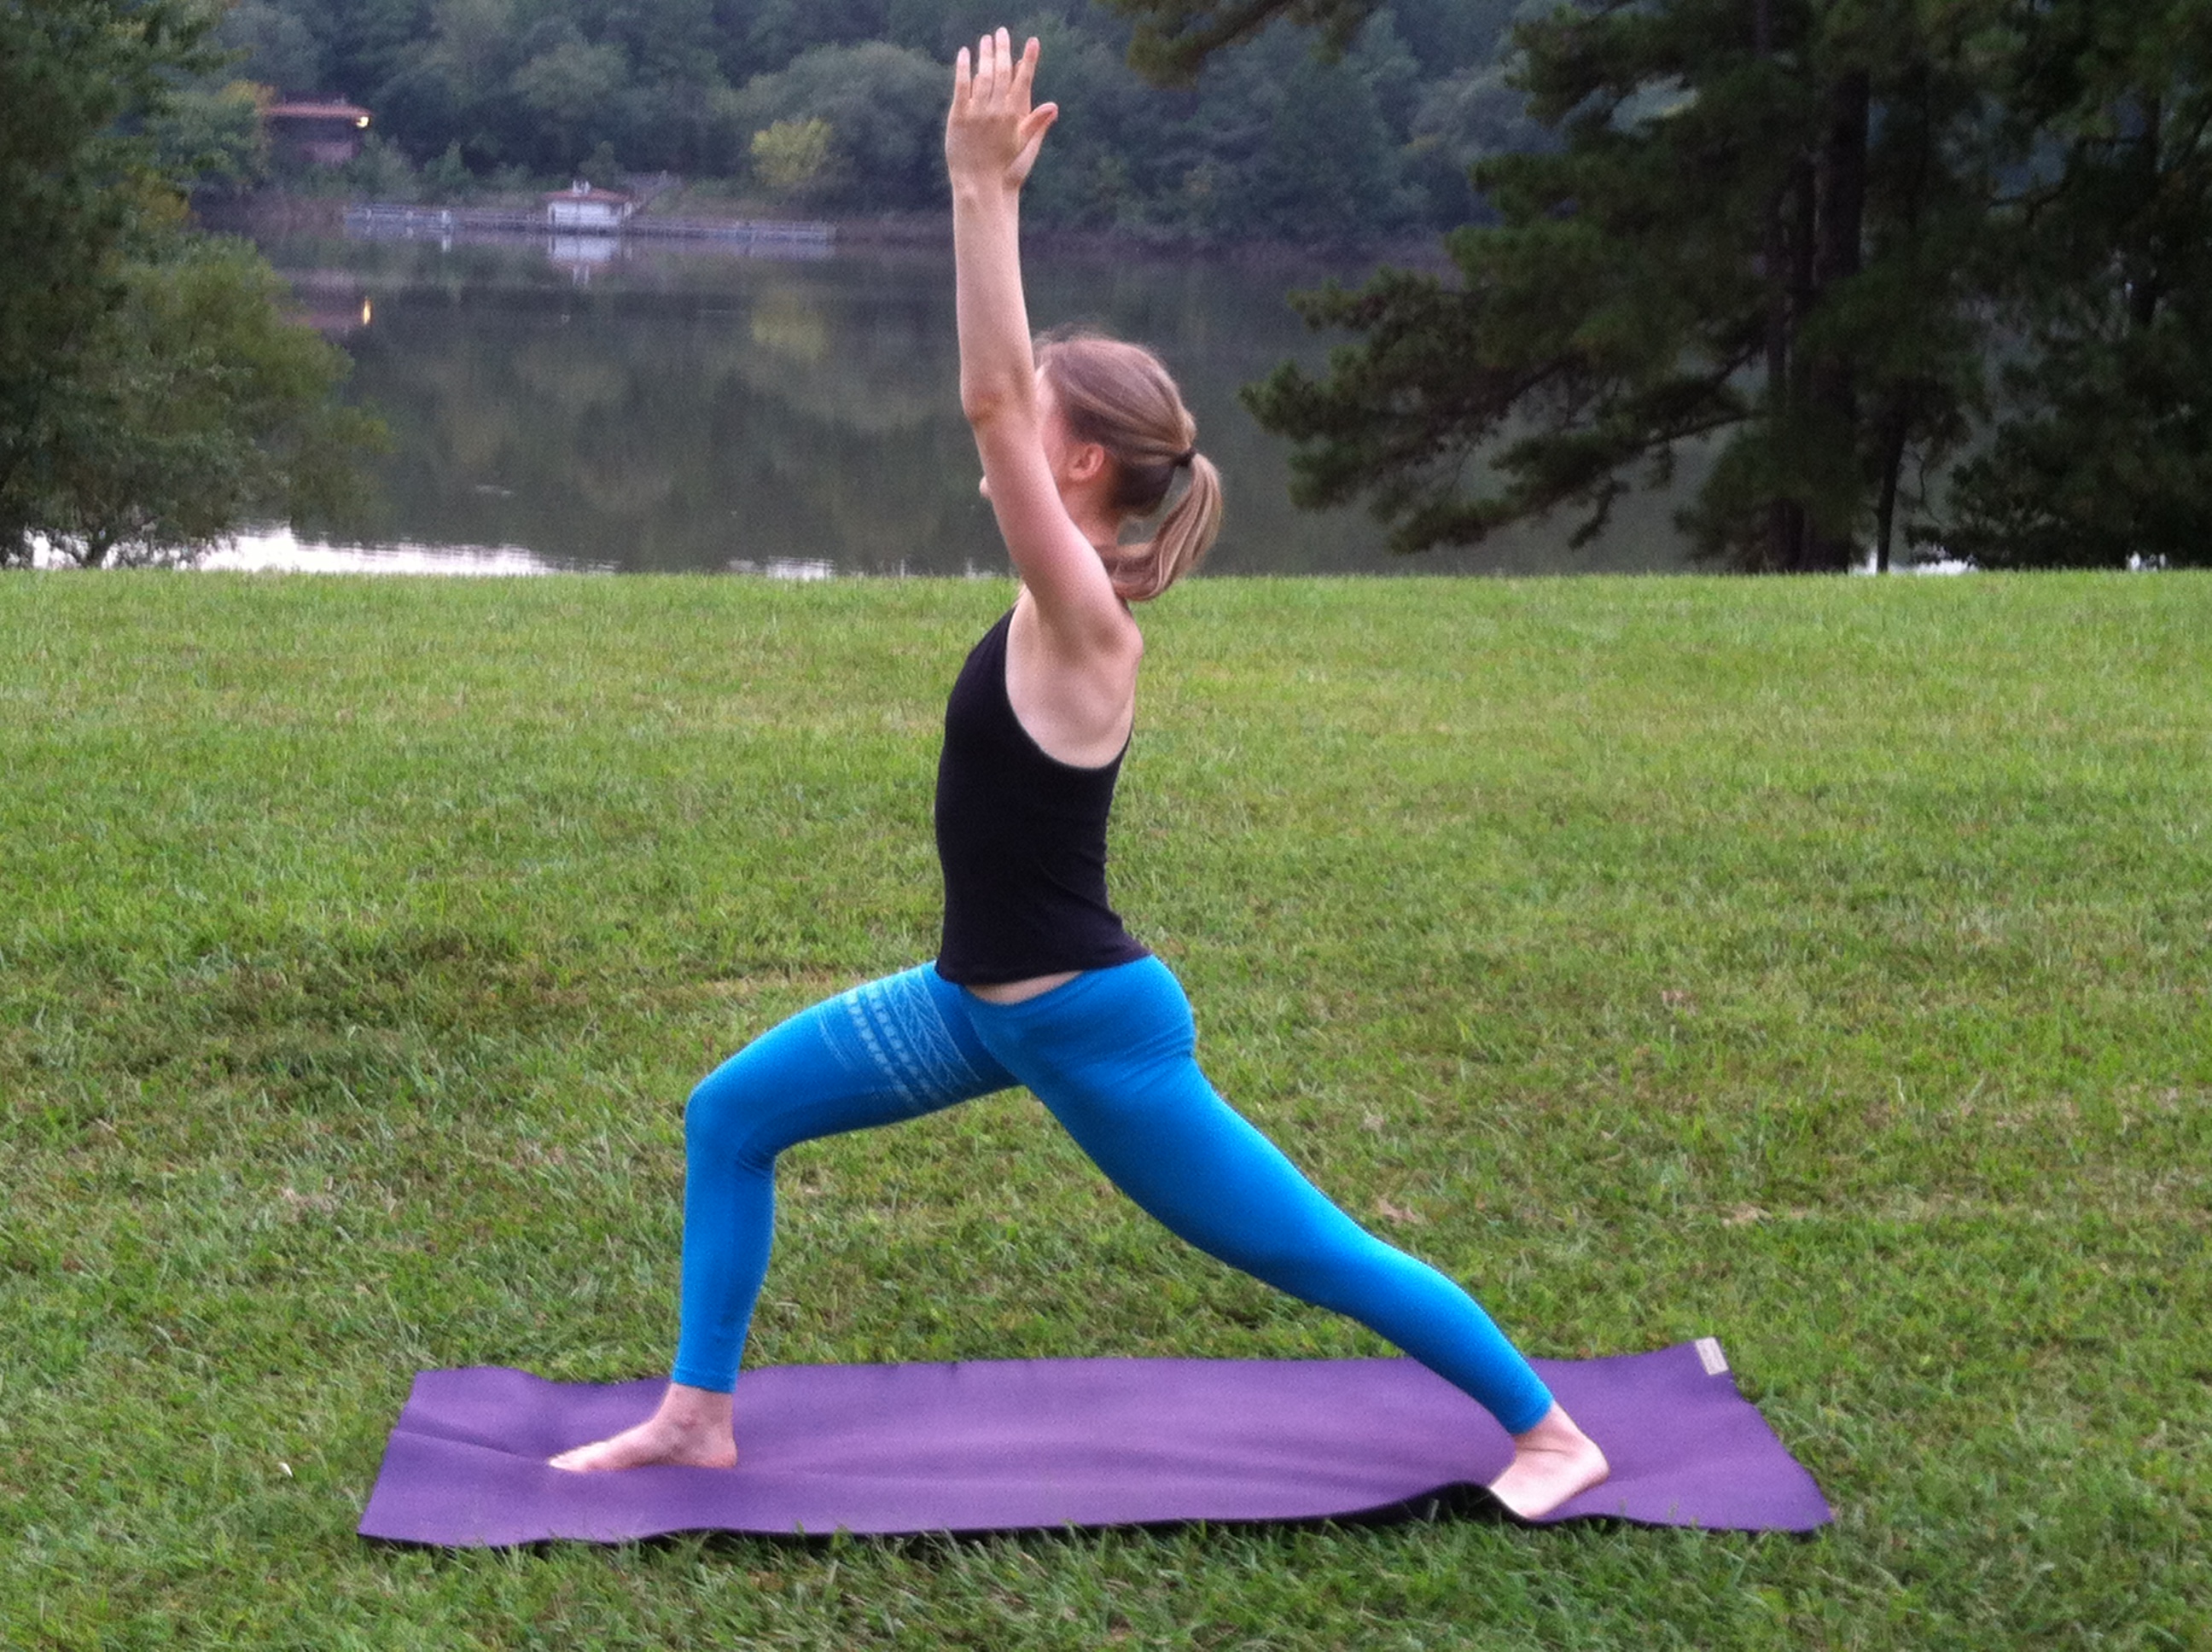
Exalted Warrior
- From Warrior 2, drop your left hand onto your left leg, palm facing down. Inhale and extend your right arm up toward the sky while maintaining your legs as you did in Warrior 2.
- Lift the lower belly up and in as you reach up through the sternum. Lift your gaze up toward your hand and keep your neck soft. Breath into the lower back to support healthy arch of your spine.
Extended Side Angle Pose
- From Exalted Warrior, bring your right elbow to your right knee and your left hand to your left hip.
- Tuck your right gluteus under, then circle your left arm beside your right ear. Imagine reaching through the right foot and out the right fingertips, making one long line.
- Lift your gaze up toward your right hand, finding a slight twist through the torso, opening the heart toward the sky.
Bring your hands to the mat, step into a Lunge. Flow through your Vinyasa and repeat on the other side.
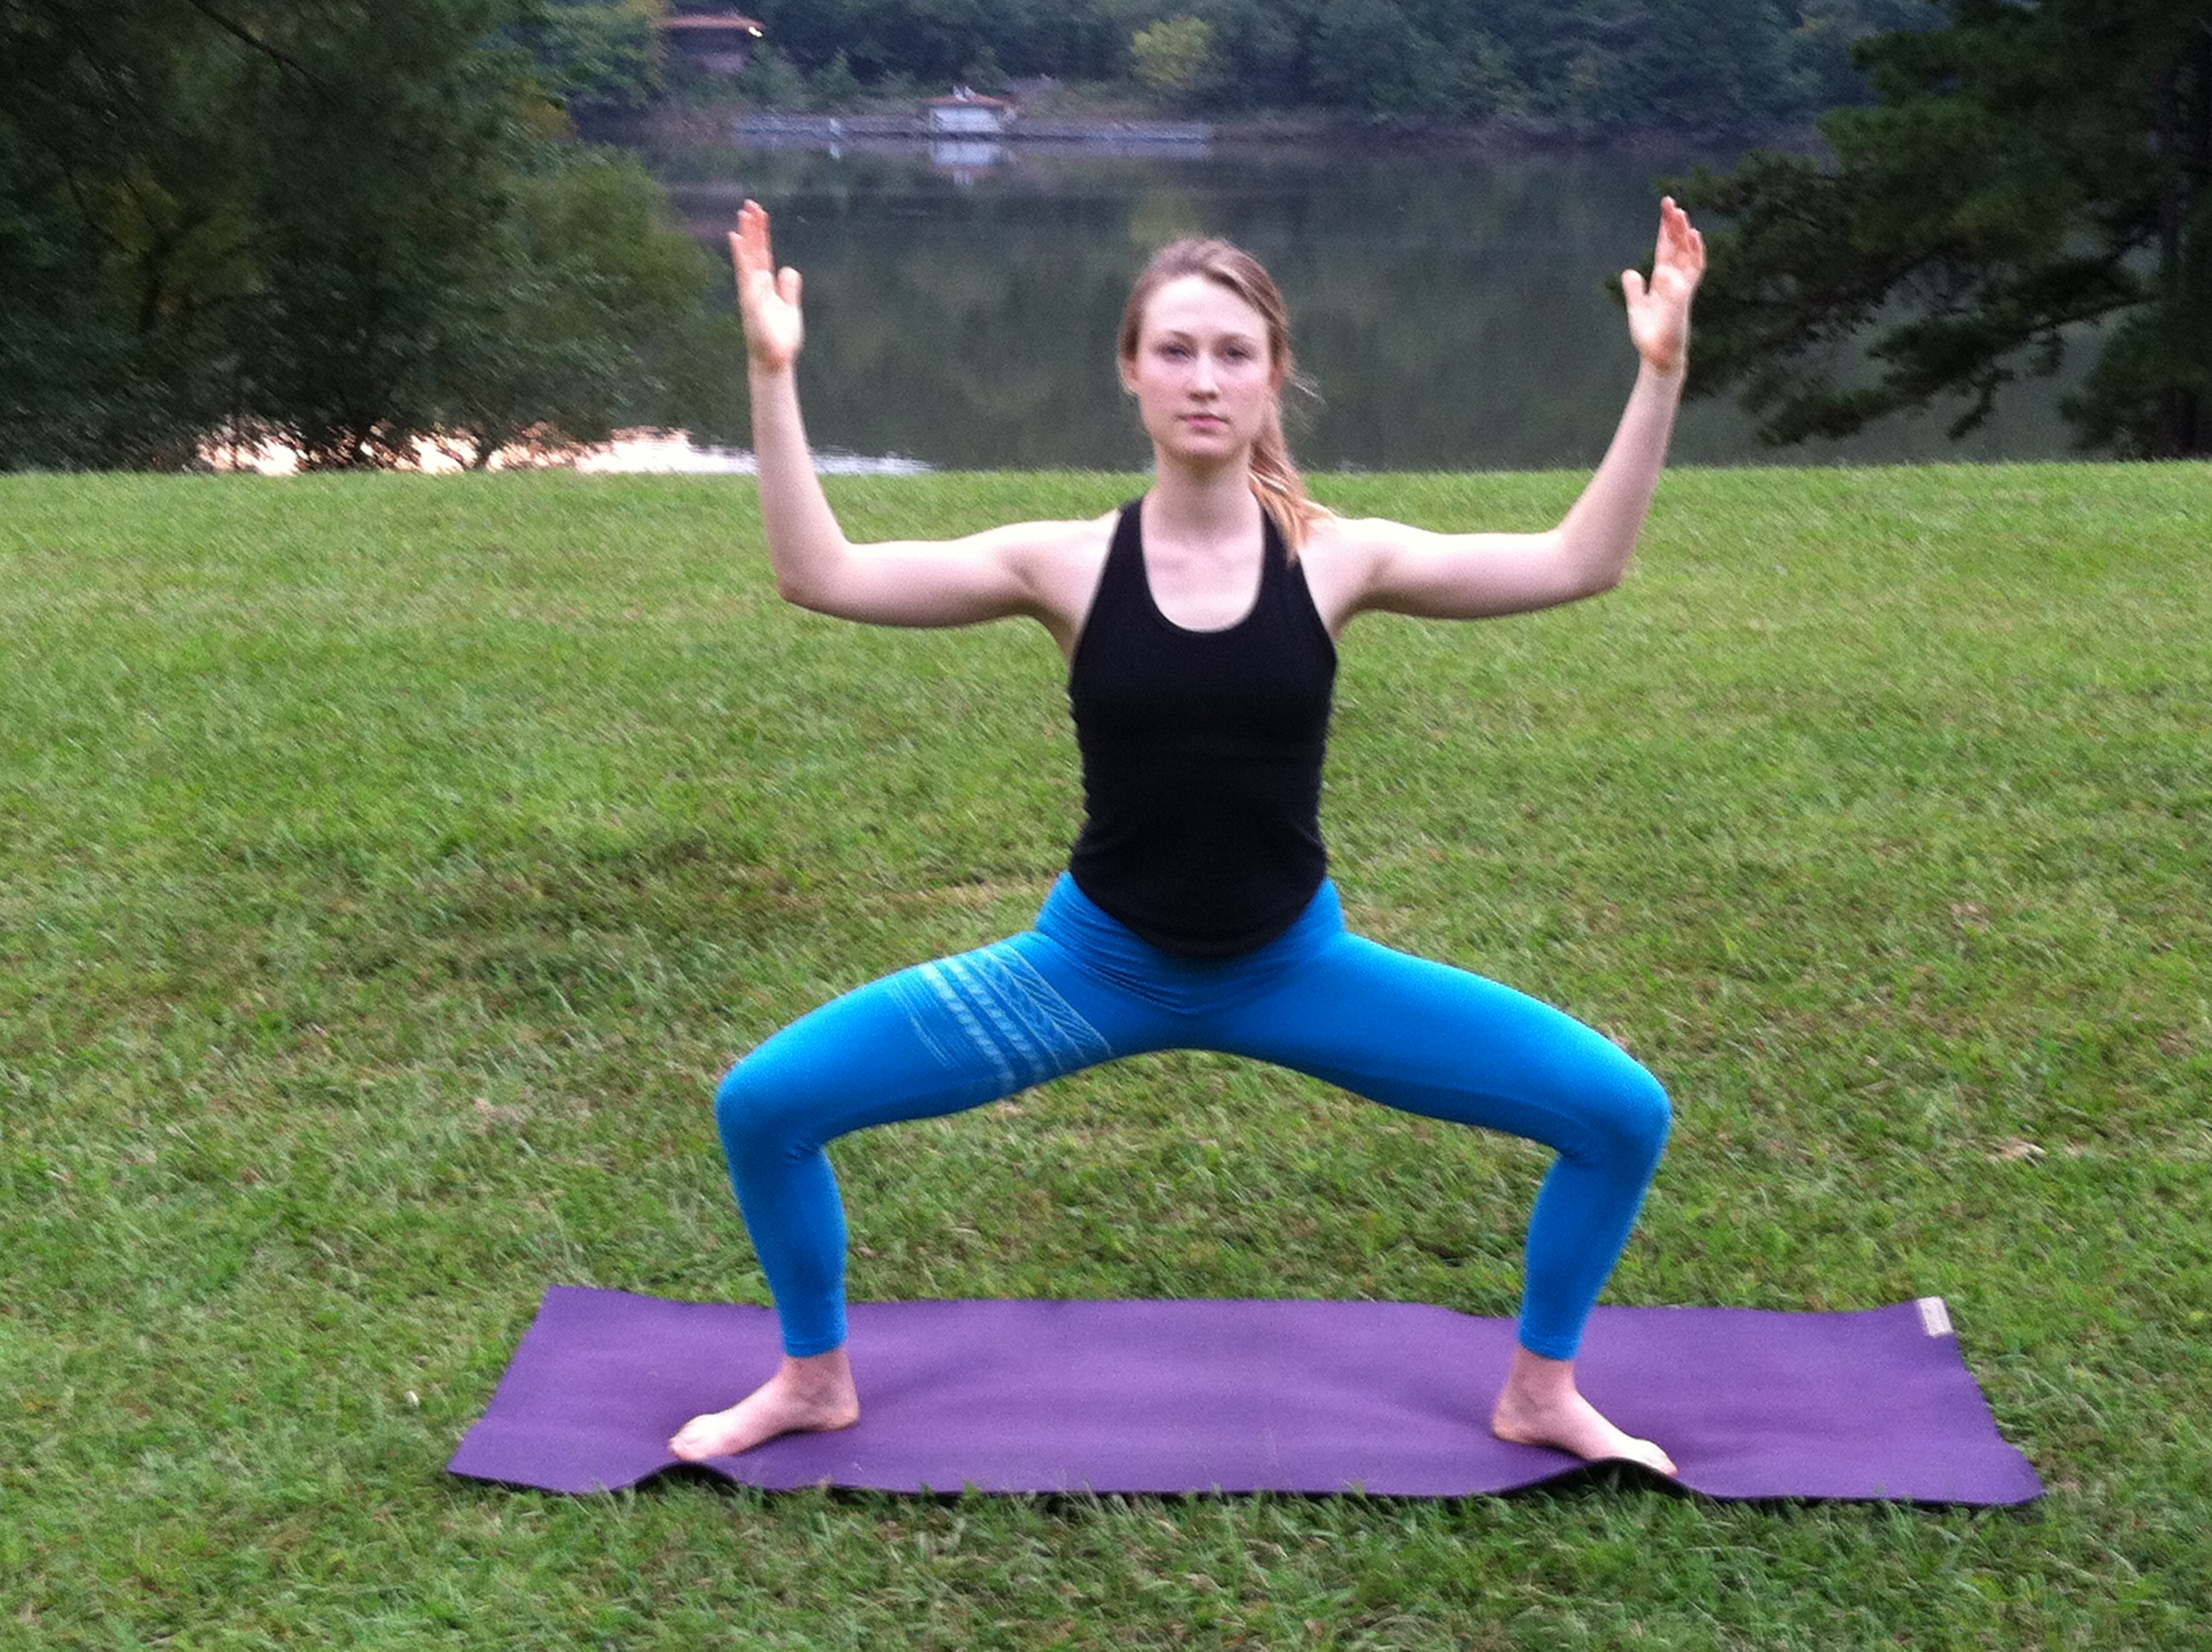
Goddess Squats
- From Mountain Pose, step your legs out wider than your hips and turn your toes slightly out.
- Bend your elbows and reach fingertips up.
- Exhale and squat, dropping your tailbone straight down toward the earth. Inhale to straighten the legs. You can either hold the squat for a few breaths, or bend and straighten with the breath.
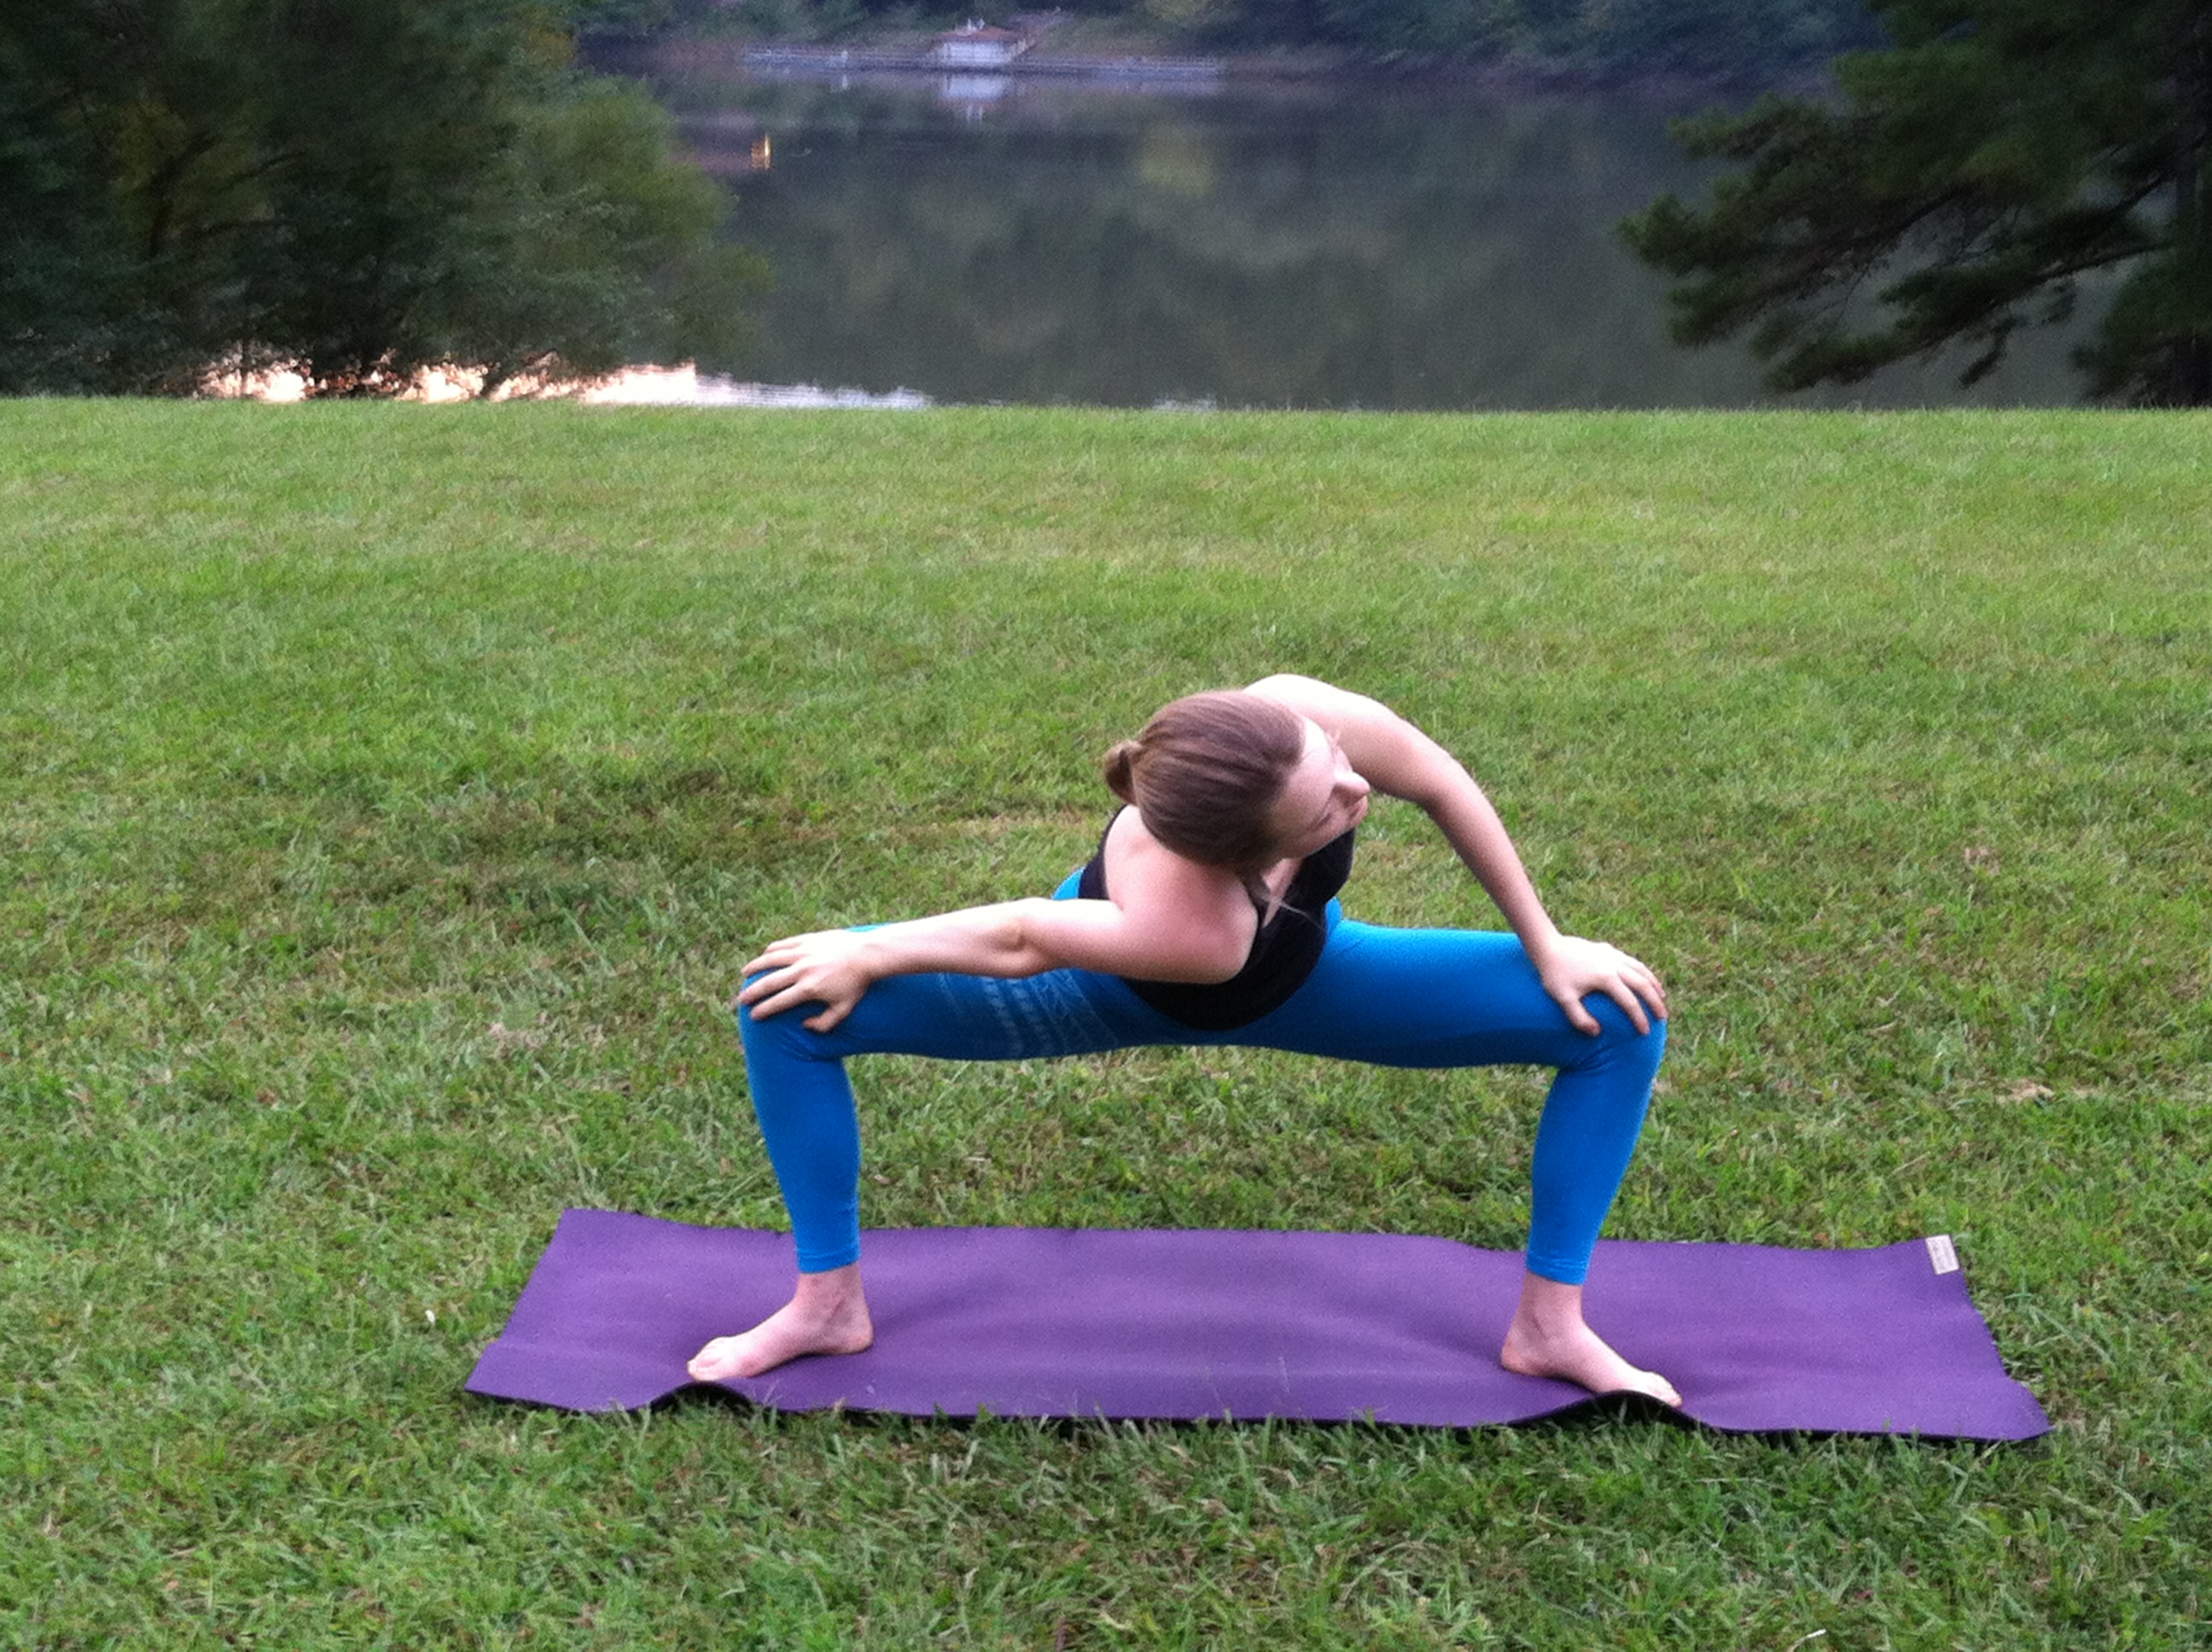
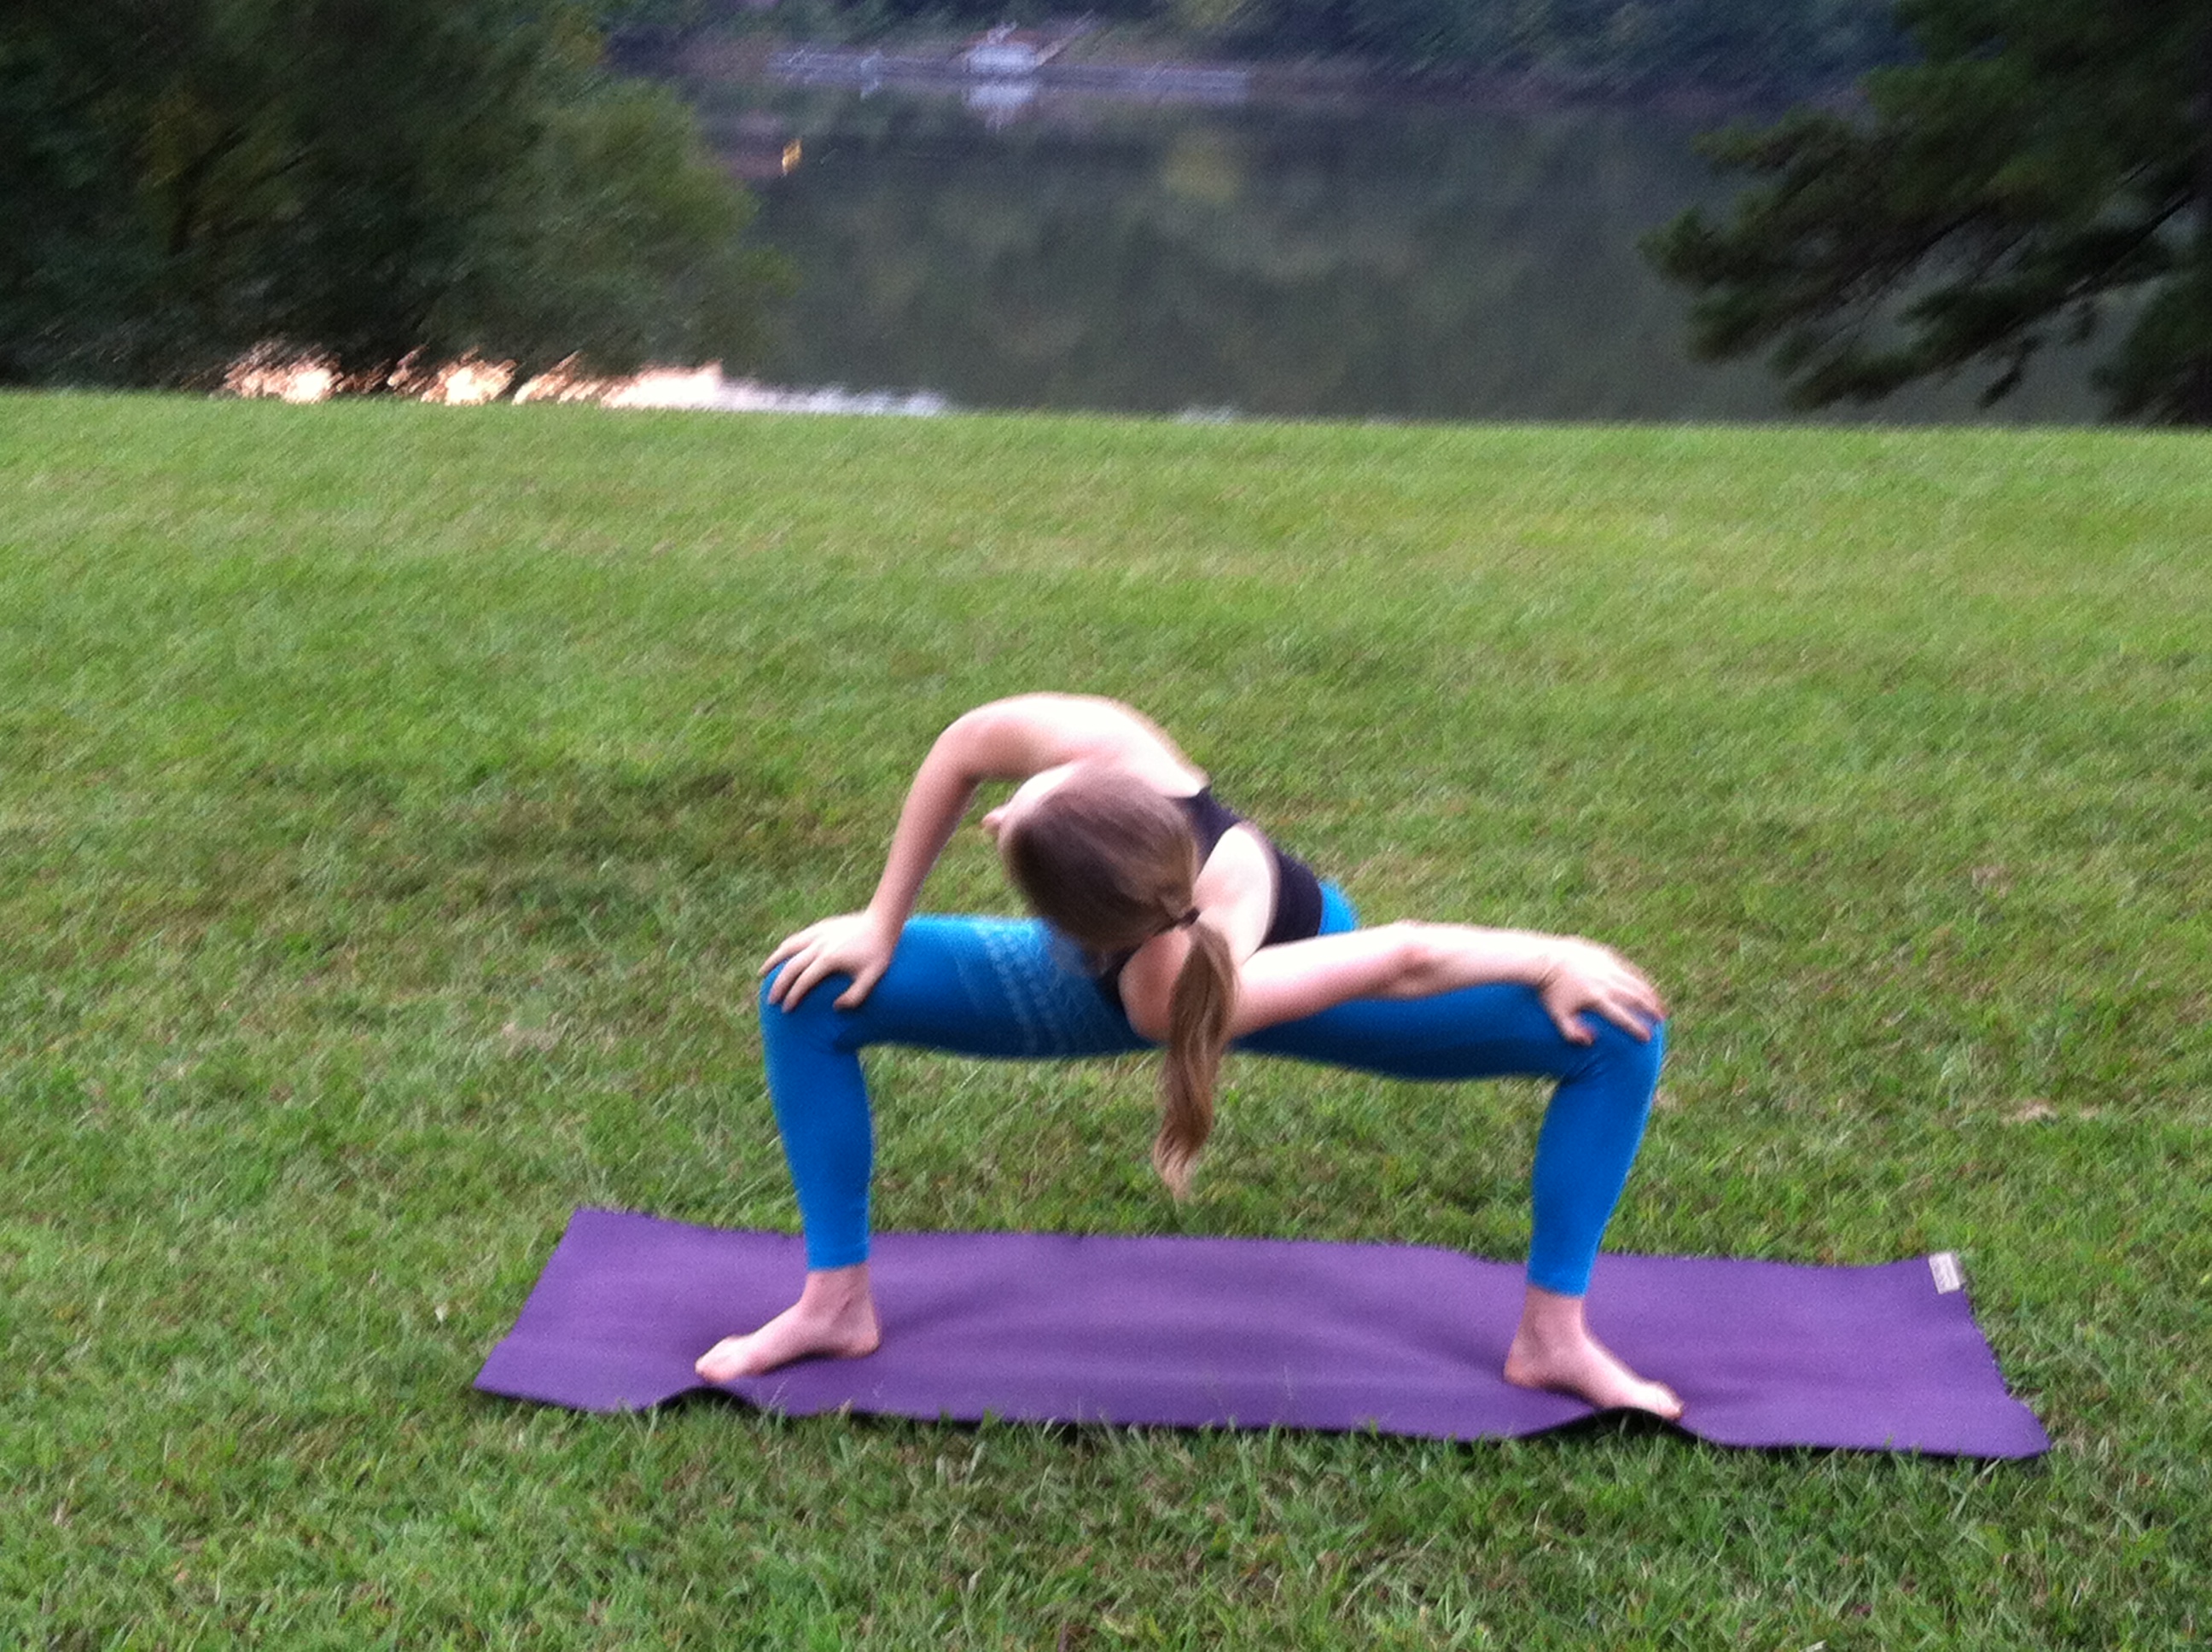
Goddess Shoulder Stretch
- Bring your hands to your upper knees.
- Lean forward with your torso and drop one shoulder down at a time, while using your hands to press the knees wide. Move with your breath.
Mountain
Vinyasa
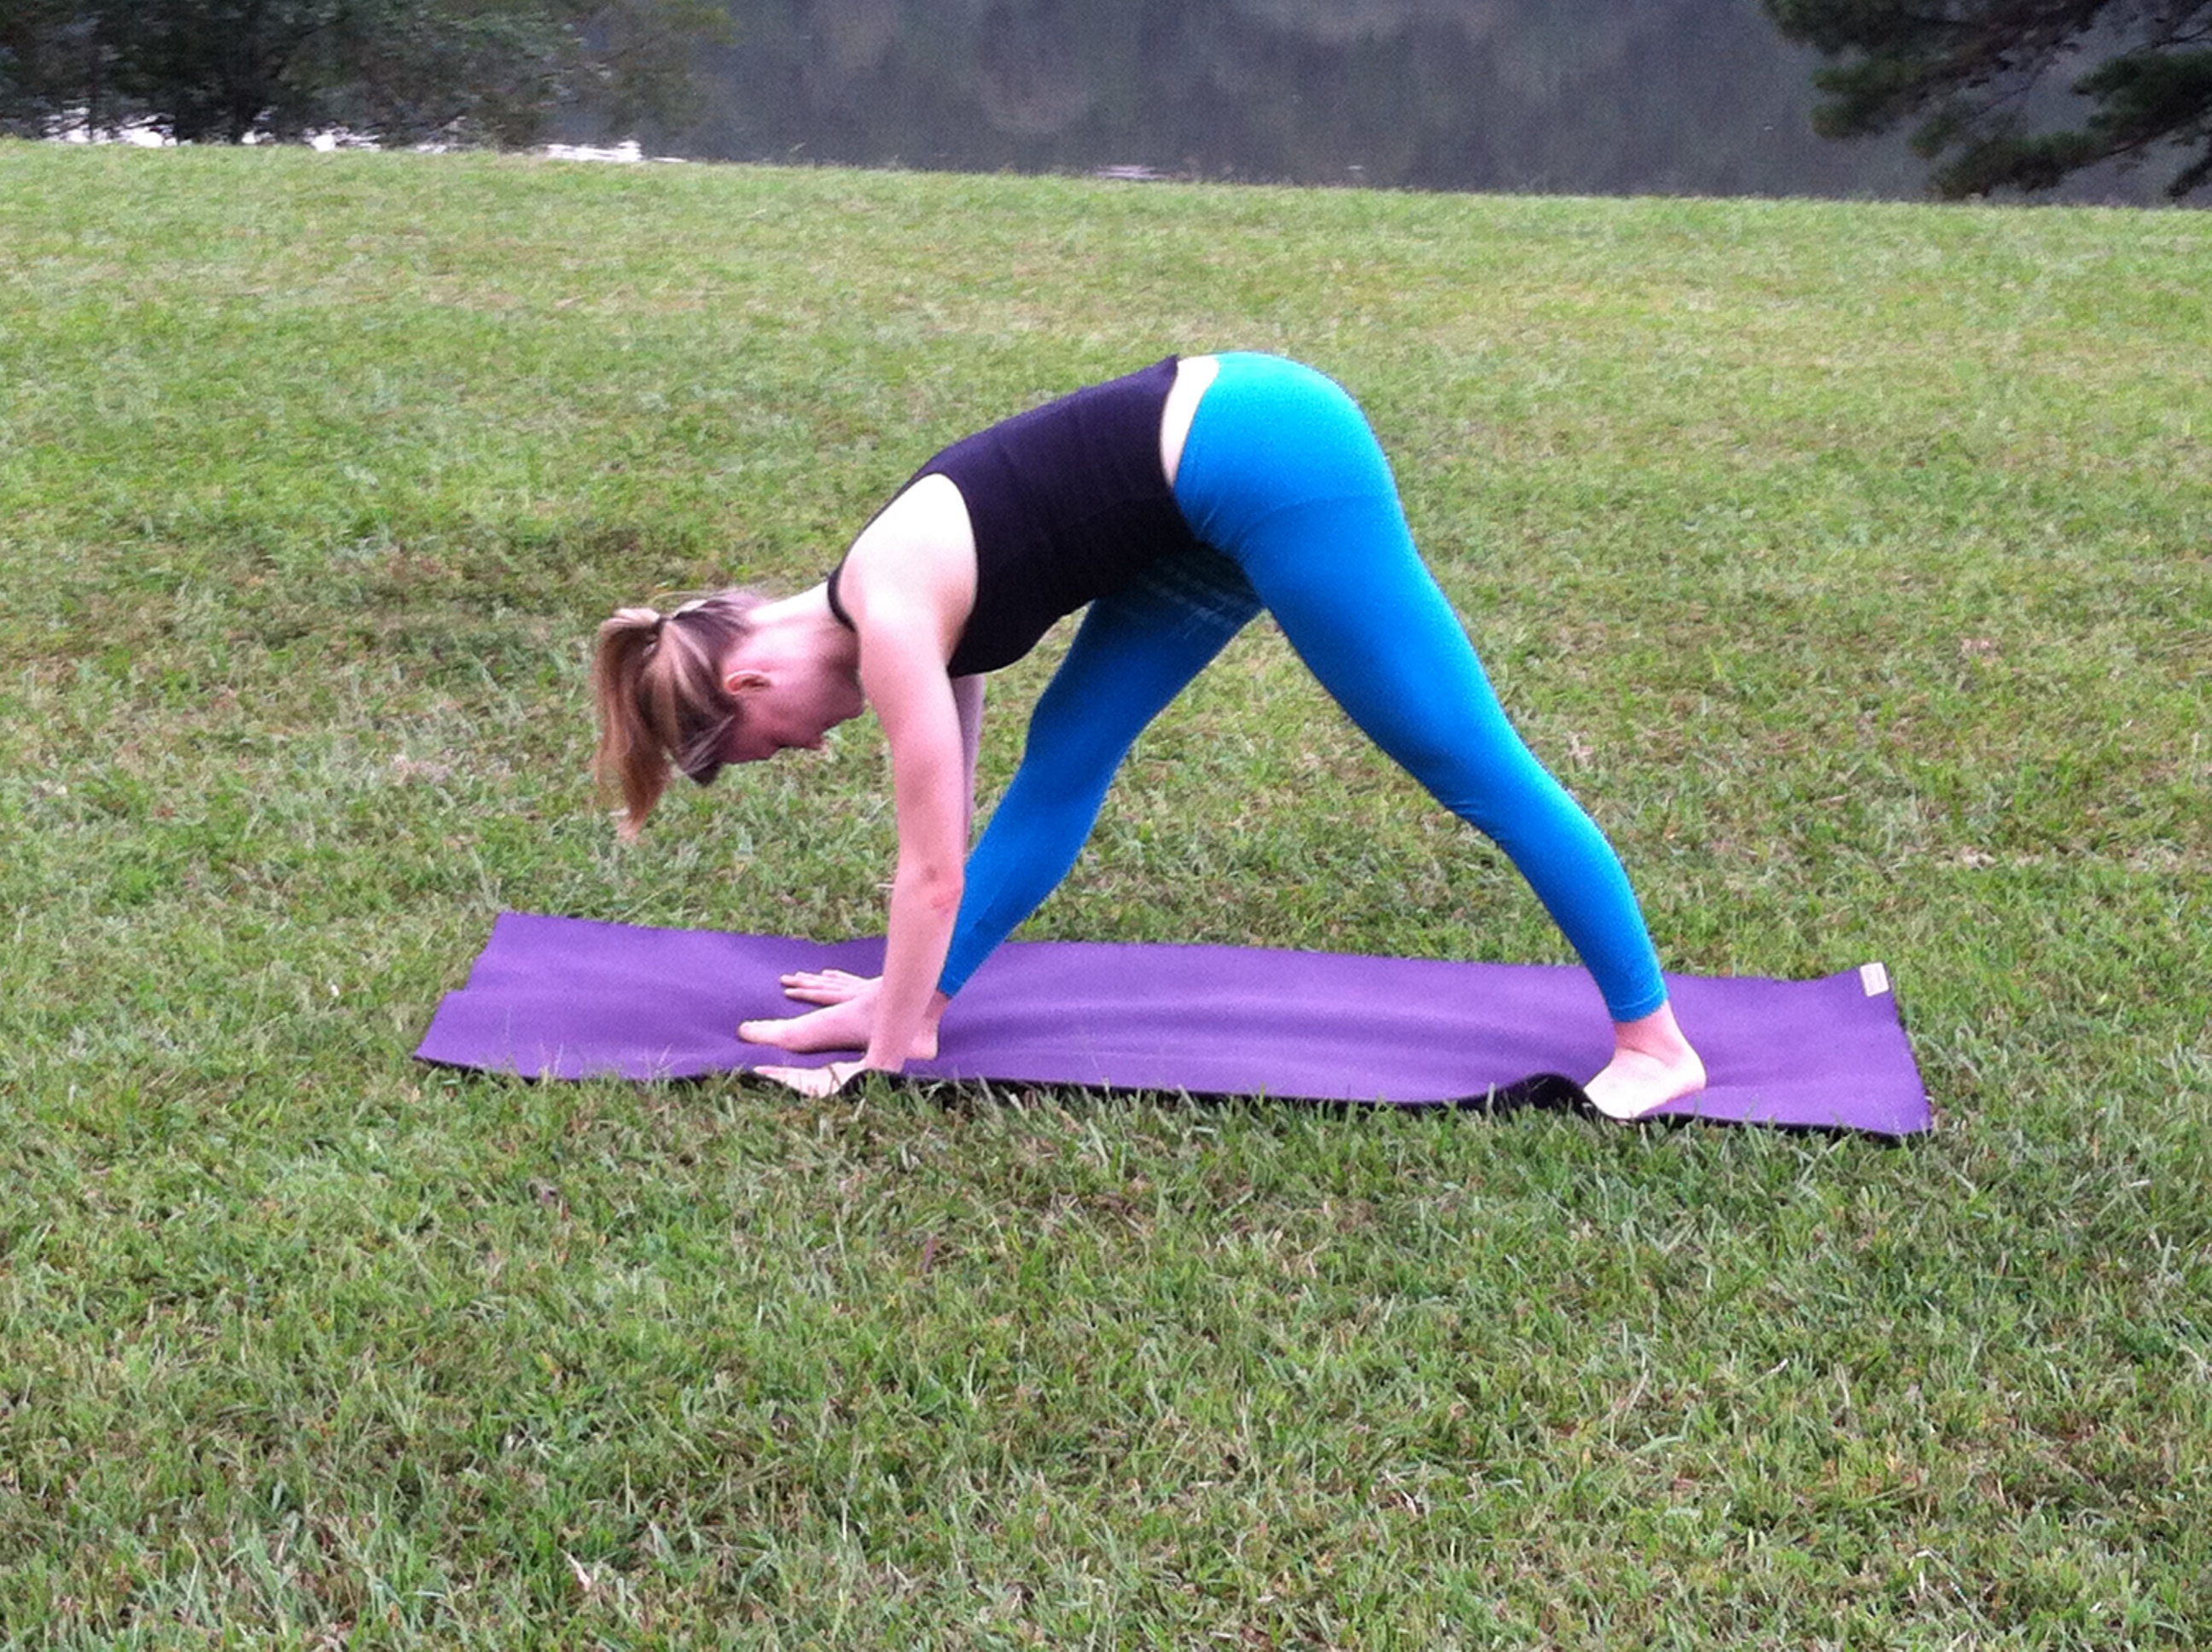
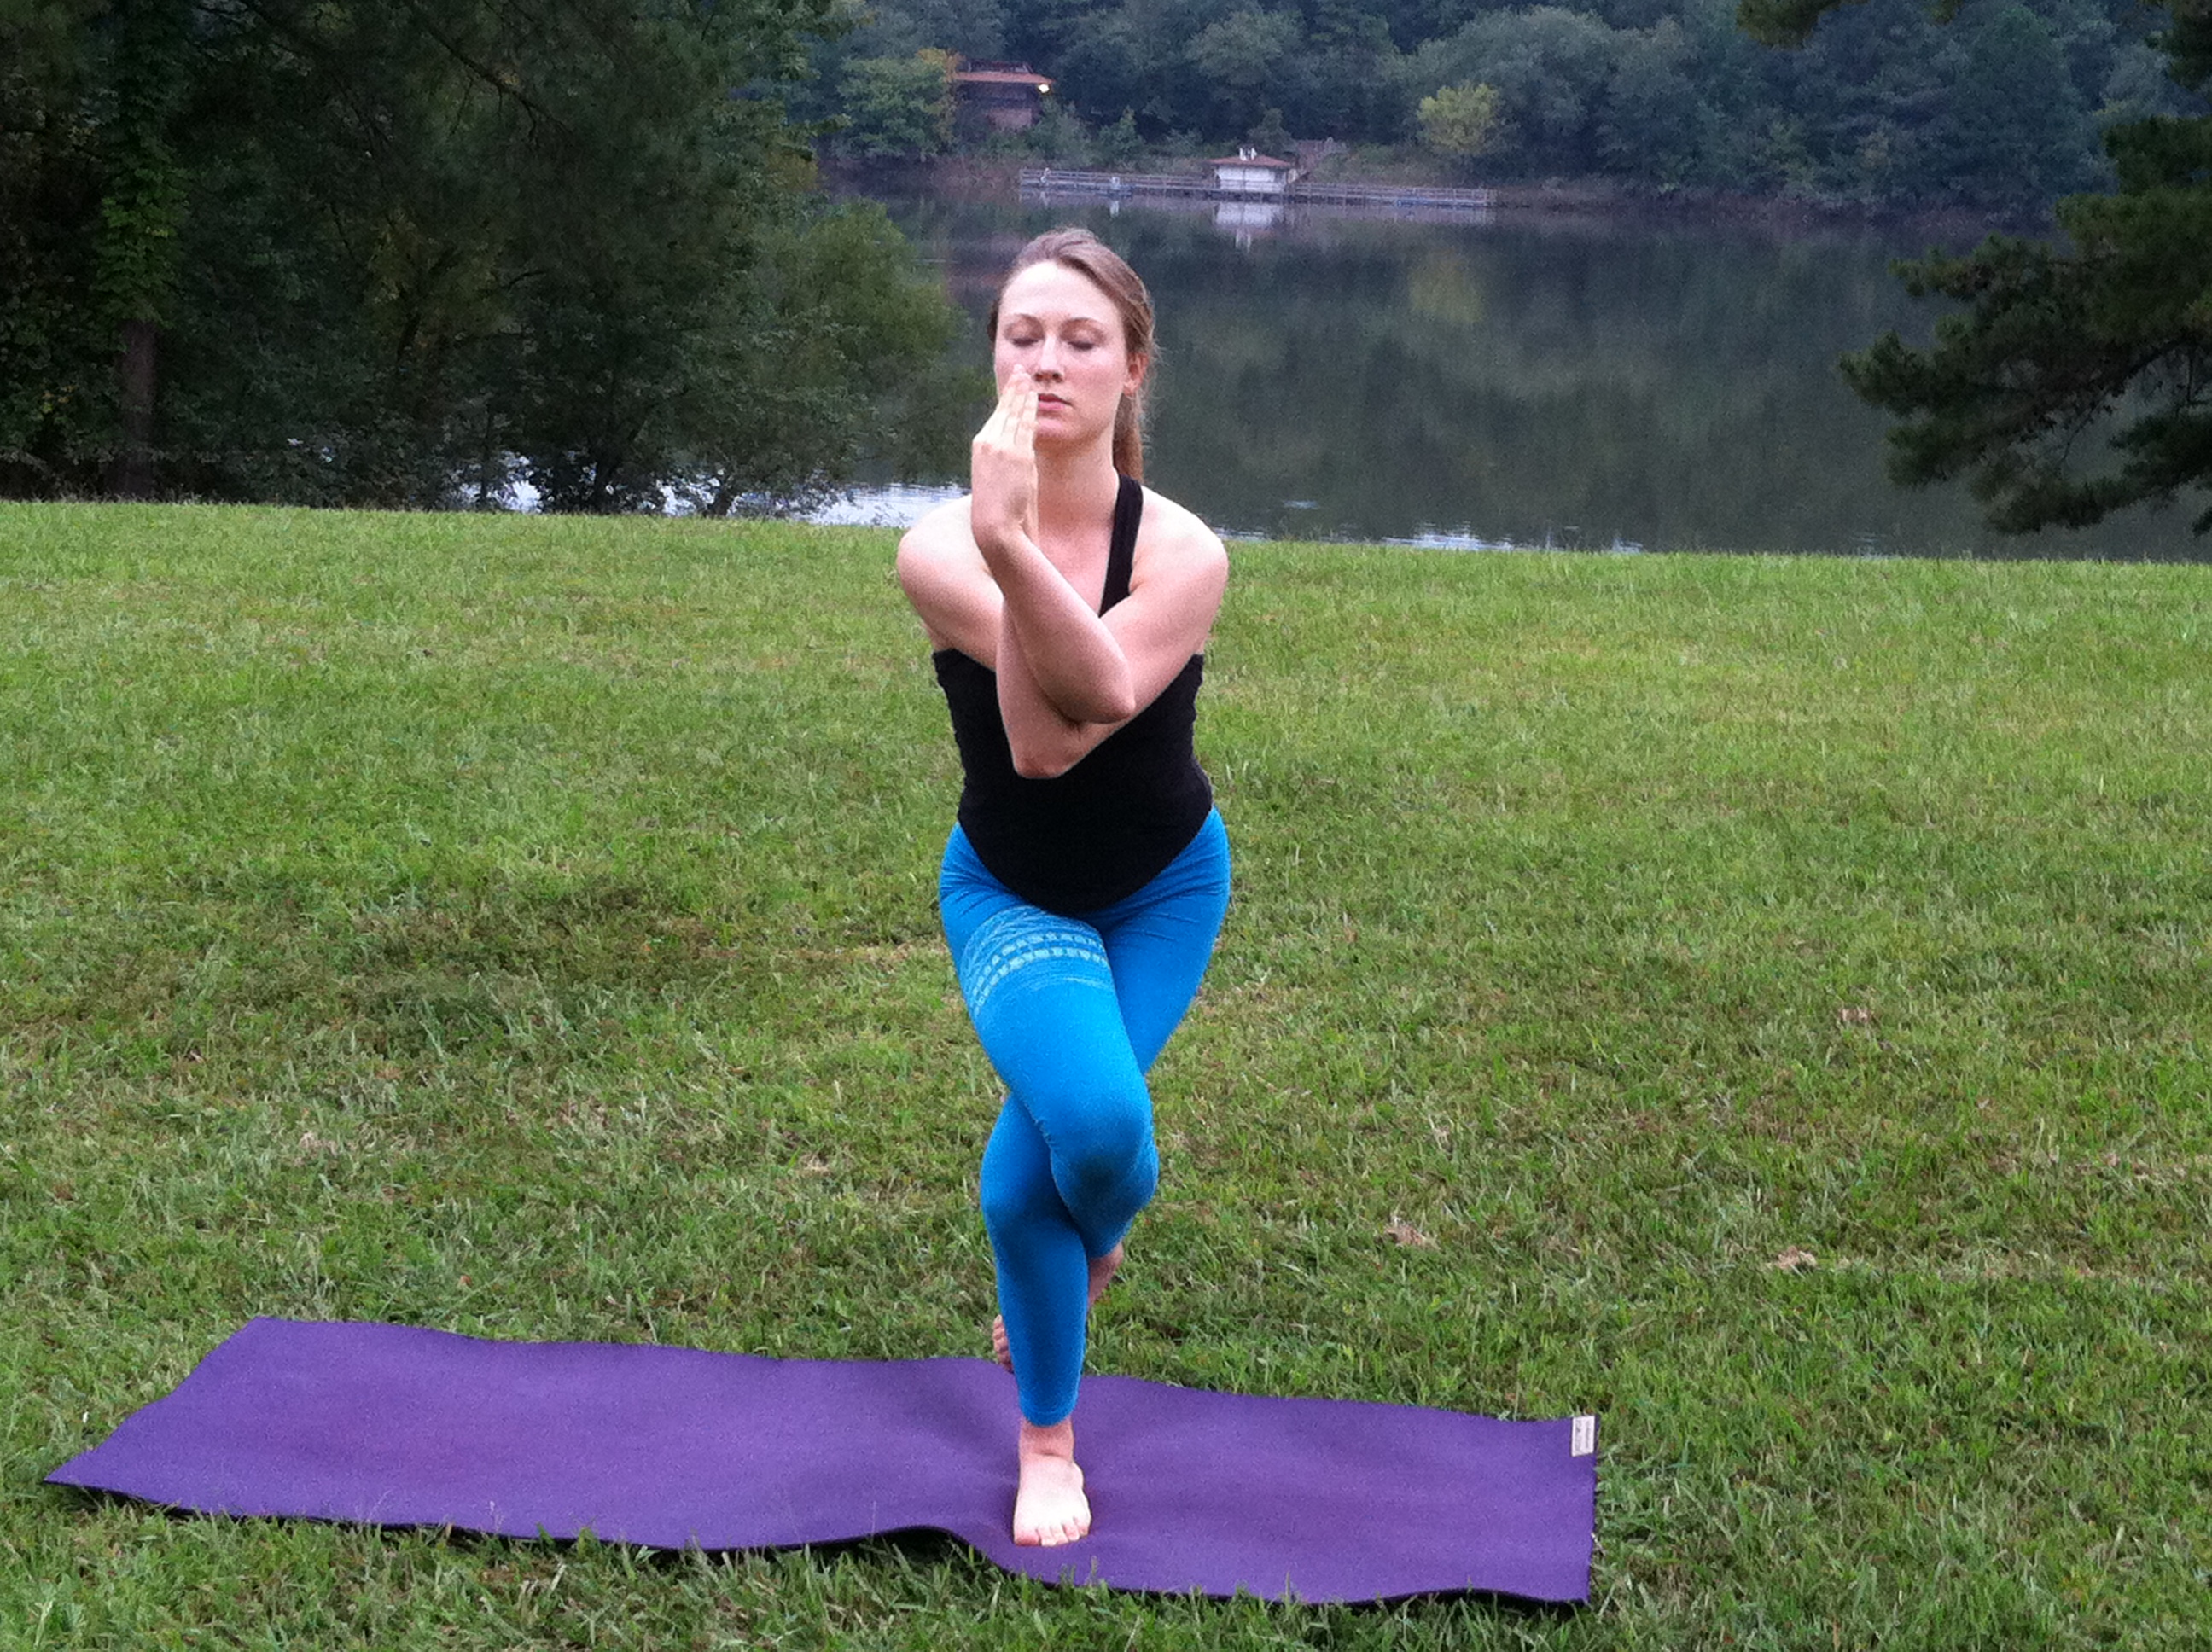
Three-Legged Dog
- From Downward Facing Dog, bring your feet together so your toes are touching.
- Shift your weight into your hands and left foot. Inhale and lift right foot up, stretching through the inner heel. Keep your hips level with the ground, and your shoulders aligned.
- Exhale and bend your knee. Bring knee into your chest. Round the spine.
- Inhale to extend the right leg and exhale to bend the knee into chest for a few repetitions if you like, then step into a lunge.
Warrior 1
- From your lunge, turn your left foot out 45 degrees. Heels are aligned and thighs firm.
- Inhale to lift your torso up. You can let the arms dangle, then bring them to your hips to begin the stretch.
- On another inhale, reach the arms straight up so your biceps are by your ears. Shoulder blades press down. Neck is long and chest lifted. Soften the eyes.
Low Lunge
- From Warrior 1, exhale and bring your hands down to the mat on either side of your right foot.
- Drop your left knee onto the mat. Keep your right knee stacked directly over your right ankle. Come onto your fingertips.
Low Lunge Quad Stretch
- Reach your left hand back to grasp your outer left ankle or foot. If your knee is uncomfortable, roll a towel, blanket, or mat underneath the joint.
- Keep your chest open and shoulders down. Invite a slight twist through your torso to the left.
- Think about sending your breath into any tense areas. Use a wall for balance if needed.
Lizard Pose
- Exhale and rest your forearms on the mat or a block on the inside of your right foot. If it is too much to rest on your forearms, you can support yourself on your hands. You can extend the left knee straight or keep it on the mat.
- Your right toes may turn out slightly to the right.
- Maintain a natural curve through your spine. Keep your hips square.
Pigeon
- Walk your right foot over to the left side of your mat, and rest your right knee onto the mat. Your right foot may be in front of you, so that your shin is parallel to the top edge of the mat, or your foot may be slightly underneath you. Avoid this pose if you feel pain in your knee!
- Extend your left leg straight out behind you and rotate the outer thigh slightly down toward the mat.
- If you can, make sure your hips are level, and walk your hands back toward your hips and lift the torso up, and then extend the spine forward to fold over the right leg. Maintain the natural curve through your spine.
- Rest your forehead on a block or on your hands in front of you.
To release, press the hips up and back into Downward Facing Dog. Repeat this series on the other side.
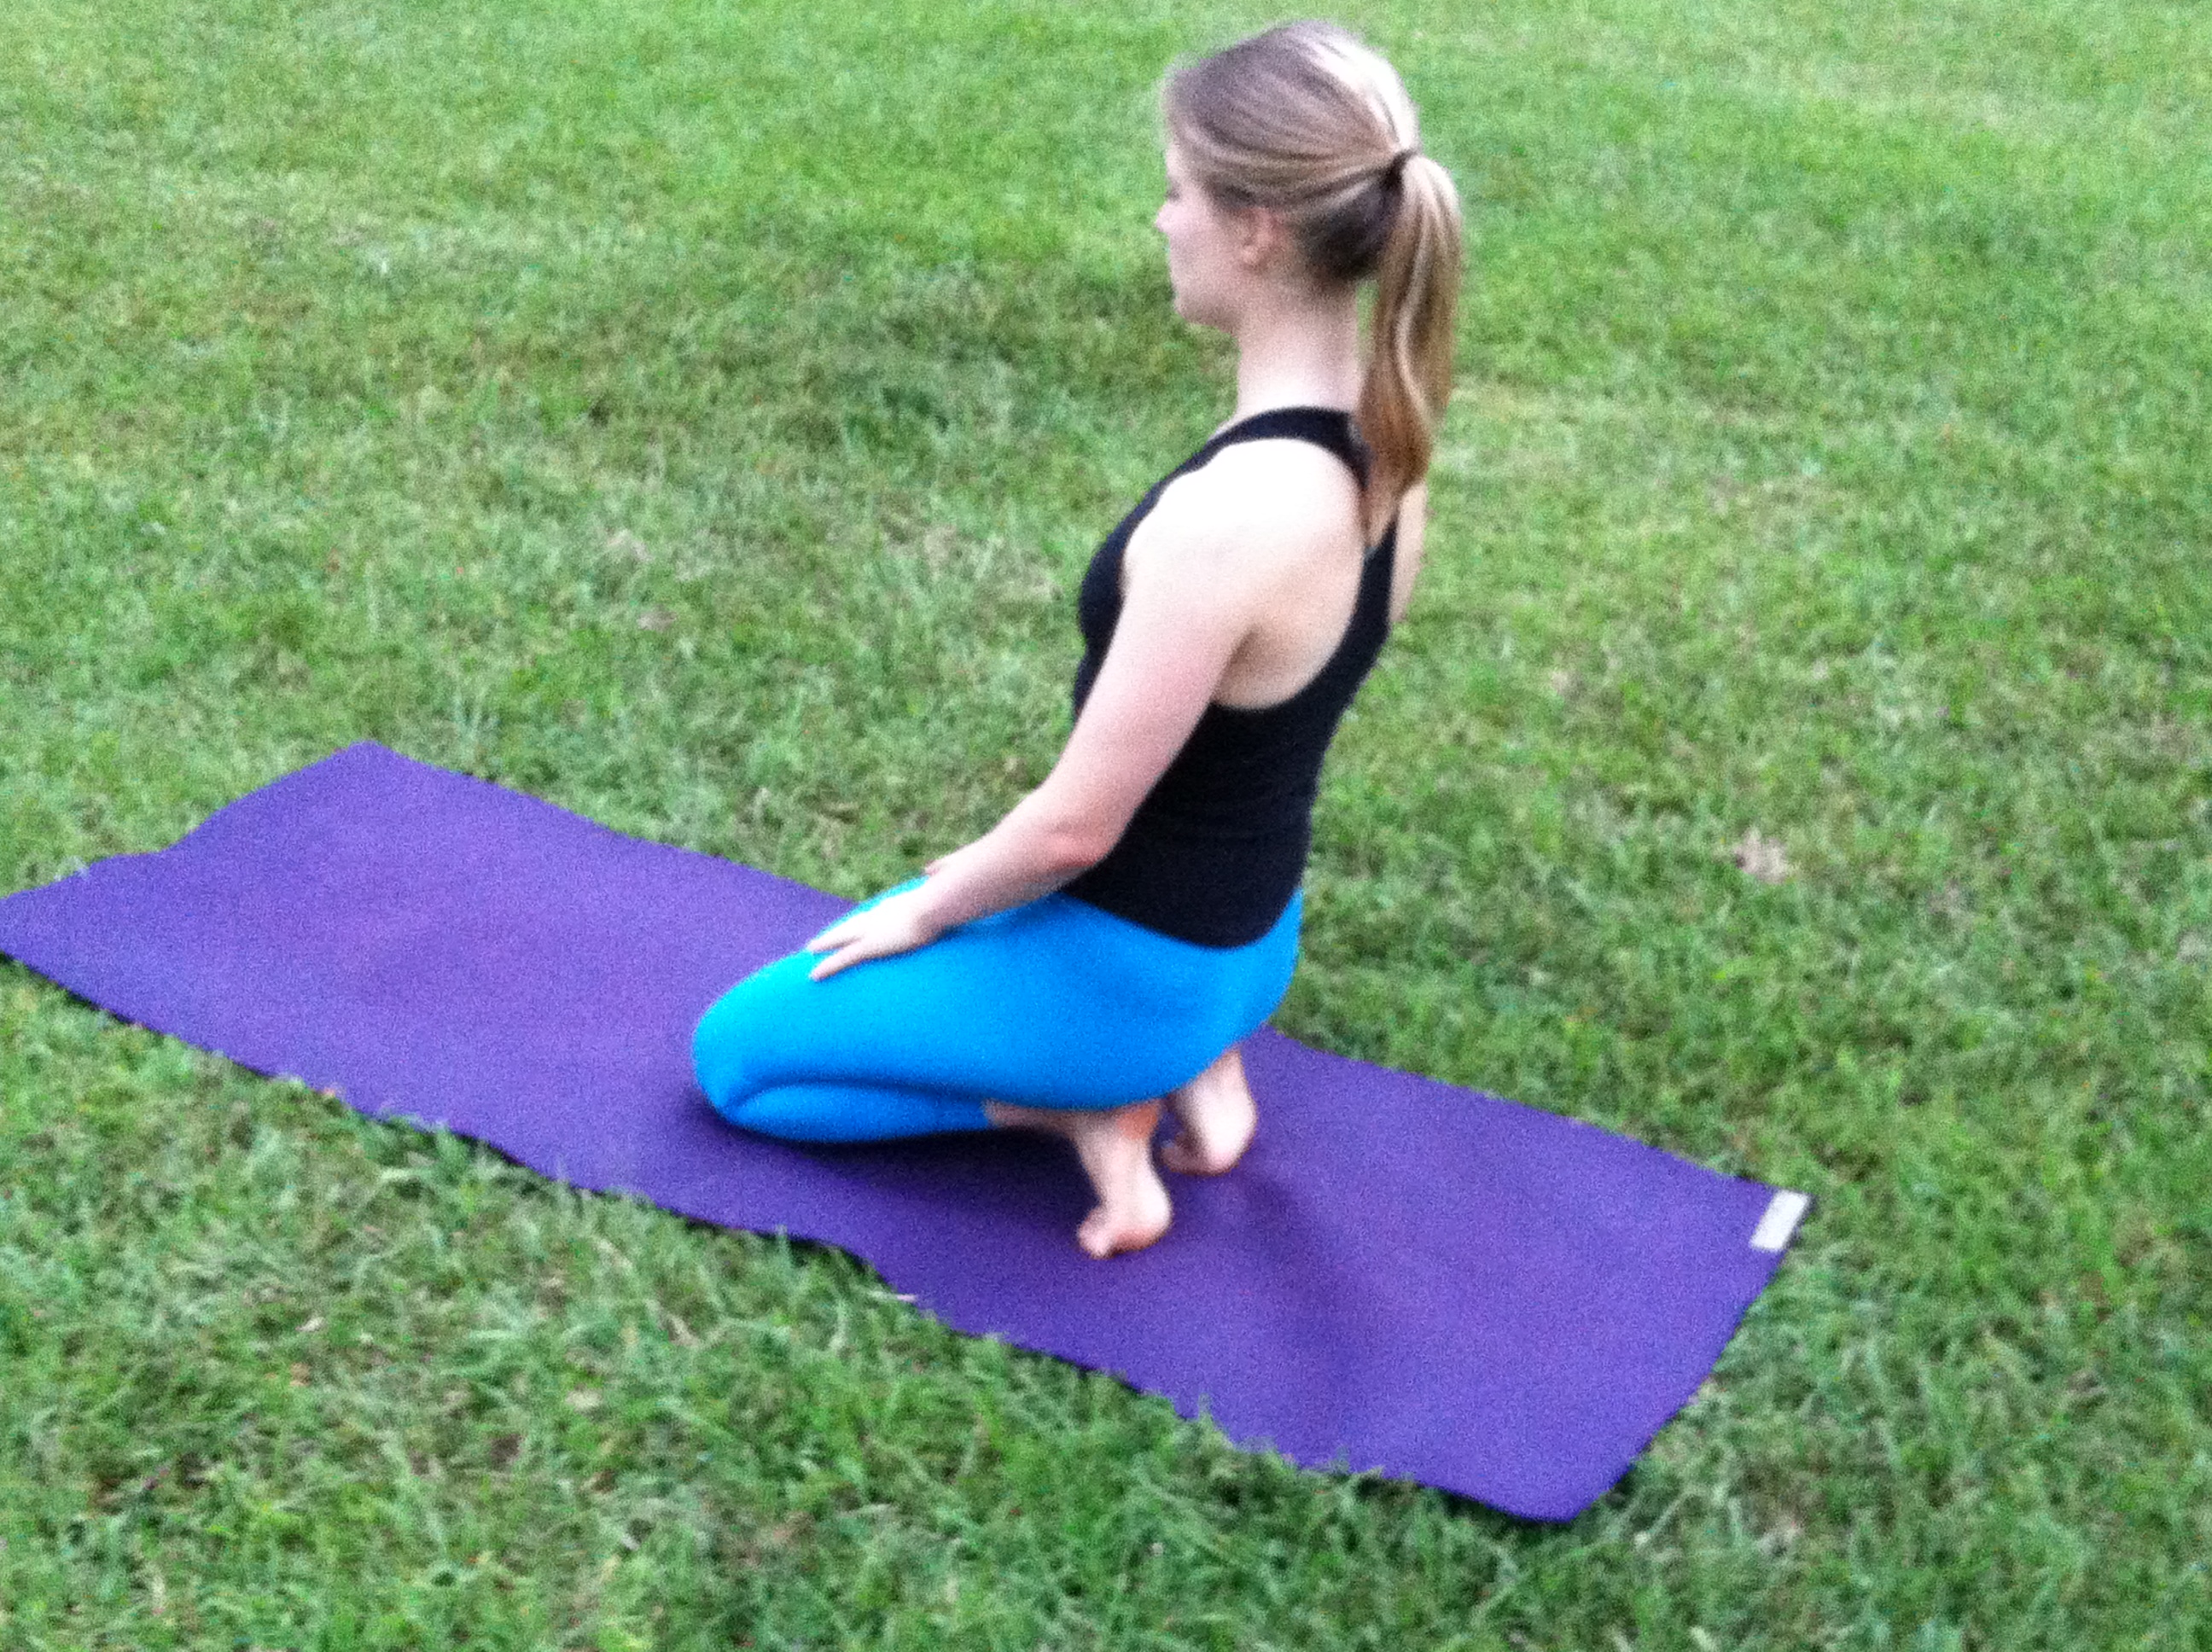
Kneeling Foot Stretch
- Kneel with your knees together and toes tucked underneath you.
- Sink your hips back on your heels. Place your hands on your thighs.
- Breath deeply and smile!
- To release, exhale and bring your hands to the mat. Come into tabletop. Curl your toes under if you like.
Happy Baby
- Lie on your back. With an exhale, bring your knees into your belly.
- Grip the outsides of your feet with your hands. Open your knees slightly wider than your torso, then bring them toward your armpits.
- Make sure the ankle stays directly over your knee. Flex through the heels.
- If it feels good, you can roll gently from one side to the other.
Cool Down
CHEST, SHOULDER & HEART OPENING
Purpose: Find expansive space through chest, heart and shoulders; increase mobility in shoulders, improve posture, energizing
Warm Up
Tree
- From Mountain, shift your weight onto your left foot. Lift the inner arch of the left foot by squeezing your toes and heels isometrically together.
- Bend your right knee and press right foot into your left leg. Be sure to avoid pressing into the right knee.
- Widen the left knee out, and make sure your pelvis stays in a neutral position. Lengthen the tailbone toward the floor.
- You can bring your palms together at the heart, or reach arms up overhead. Shoulder blades lower down and together on the back. Neck is long and relaxed.
- Switch sides
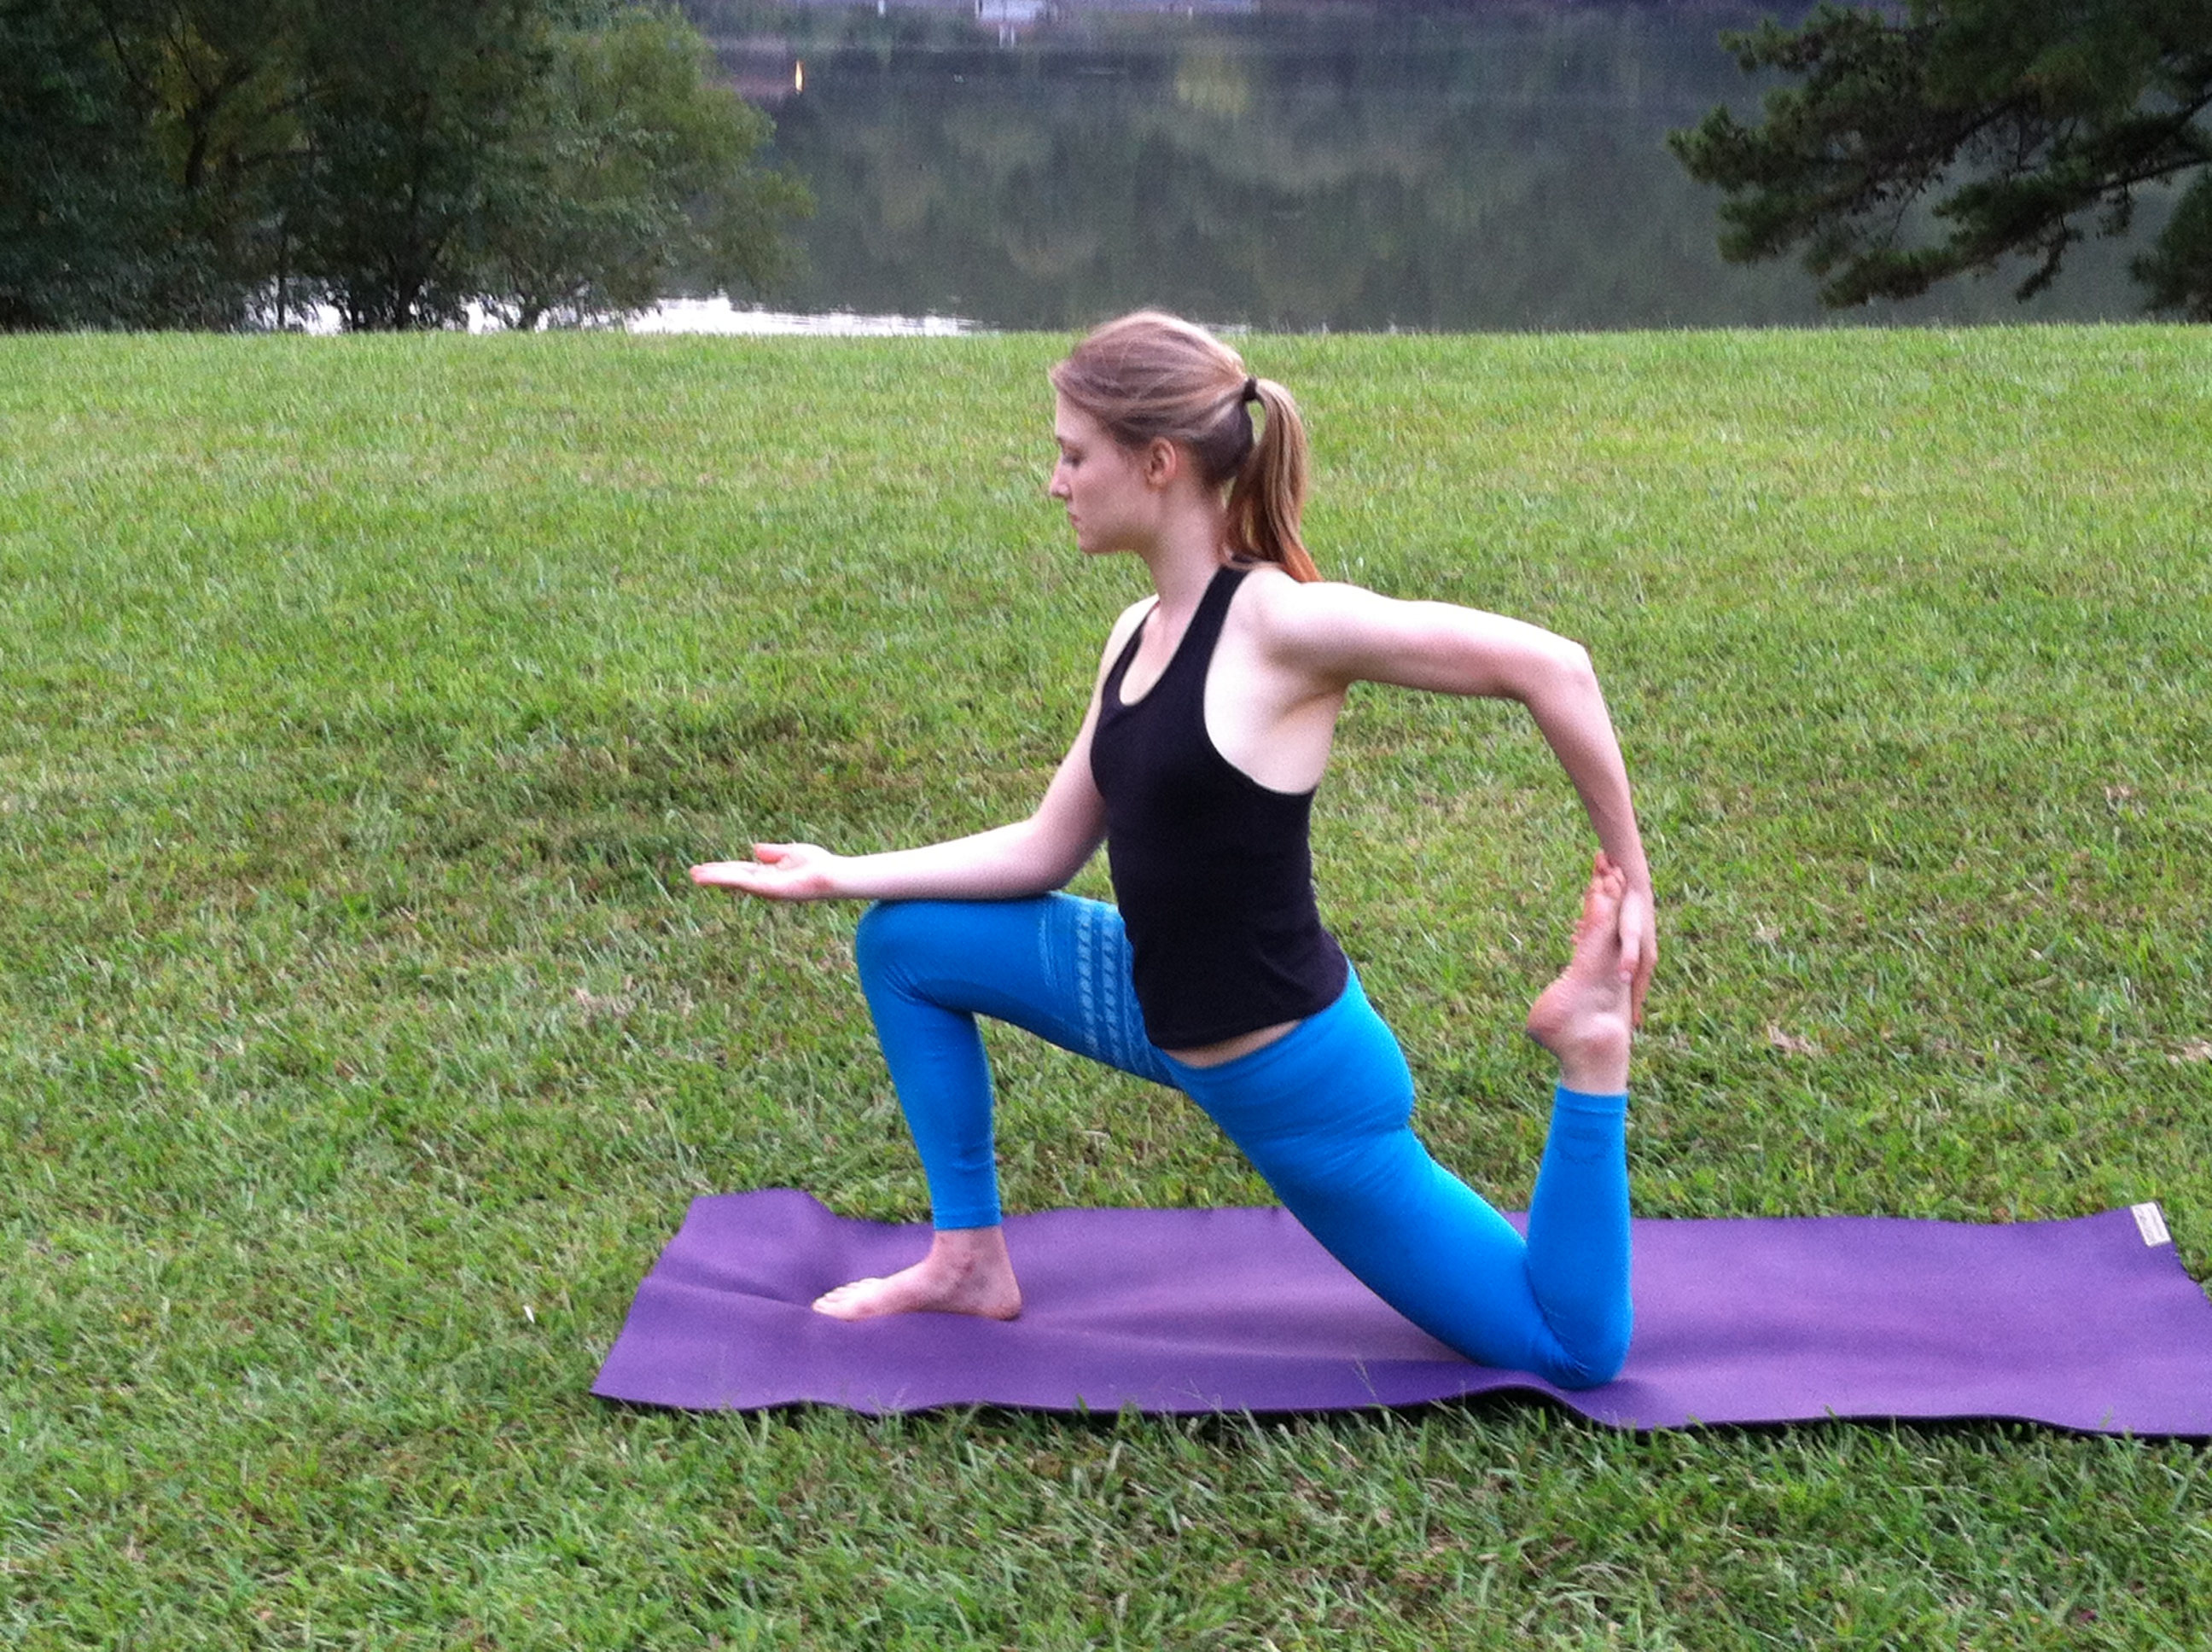
Dancer
- From Mountain, shift your weight back into your left foot, and kick your right heel up toward your buttocks.
- Reach back and grasp your right foot or ankle with your right hand.
- Inhale to extend the left hand up by your left ear.
- Exhale and begin to kick your right foot up, away from the ground and out, away from your torso. Keep your hips level.
- Invite a slight twist and opening of the chest toward the right. Relax the shoulders.
- Release with control and switch sides.
Forward Fold with Shoulder Stretch
- With feet hip width apart, interlace your fingers behind you.
- Exhale and come into a forward fold. Lift your hands away from your back. Keep your shoulders away from your ears.
- To release, exhale and drop the arms. Tuck your tailbone toward your heels and inhale to lift the torso up into Mountain.
Eagle
- Shift your weight into your left foot. Bend the left knee and sink the tailbone toward the heels.
- Bend your right knee toward your chest and cross it over the left thigh.
- Point the right toes toward the ground, and hook the right foot around the left calf.
- Stretch your arms straight forward, parallel to the floor, and spread your scapulas wide across the back of your torso. Cross the arms in front of your torso so that the right arm is above the left, then bend your elbows. Snug the right elbow into the crook of the left, and raise the forearms perpendicular to the floor. The backs of your hands should be facing each other.
- Lift your elbows up, and stretch the fingers toward the ceiling.
- Exhale to release with control, and switch sides.
Vinyasa
Sphinx
- Lie on your belly and lengthen your tailbone toward your heels. Roll your outer legs toward the mat to broaden and lengthen the lower back and sacrum. Maintain this position and continue lengthening the tailbone toward the heels throughout the pose.
- Reach your toes actively back and place your elbows directly under your shoulders, so you are resting on your forearms. Relax your buttocks.
- Inhale and lift your chest into a backbend.
- Gently lift the lower belly up and in to protect the spine. Breathe!

Bow
5. Lie on your belly with your hands alongside your torso, palms up. Exhale and bend your knees, bringing your heels as close as you can to your buttocks. Reach back with your hands and take hold of your ankles (but not the tops of the feet). Make sure your knees aren’t wider than the width of your hips, and keep your knees hip width for the duration of the pose.
6. Inhale and strongly lift your heels away from your buttocks and, at the same time, lift your thighs away from the floor. This will have the effect of pulling your upper torso and head off the floor. Burrow the tailbone down toward the floor, and keep your back muscles soft. As you continue lifting the heels and thighs higher, press your shoulder blades firmly against your back to open your heart. Draw the tops of the shoulders away from your ears. Gaze forward.
7. Breathe into the back body.
8. Exhale to release.
Extended Puppy Pose
- Tuck your toes under and exhale to press your hips halfway back over your heels.
- Actively reach your arms in front of you and don’t let your elbows touch the ground.
- Massage your forehead on the mat and enjoy the lengthening of the spine.
- Breathe into your lower back.
- Inhale to draw yourself into a kneeling posture.
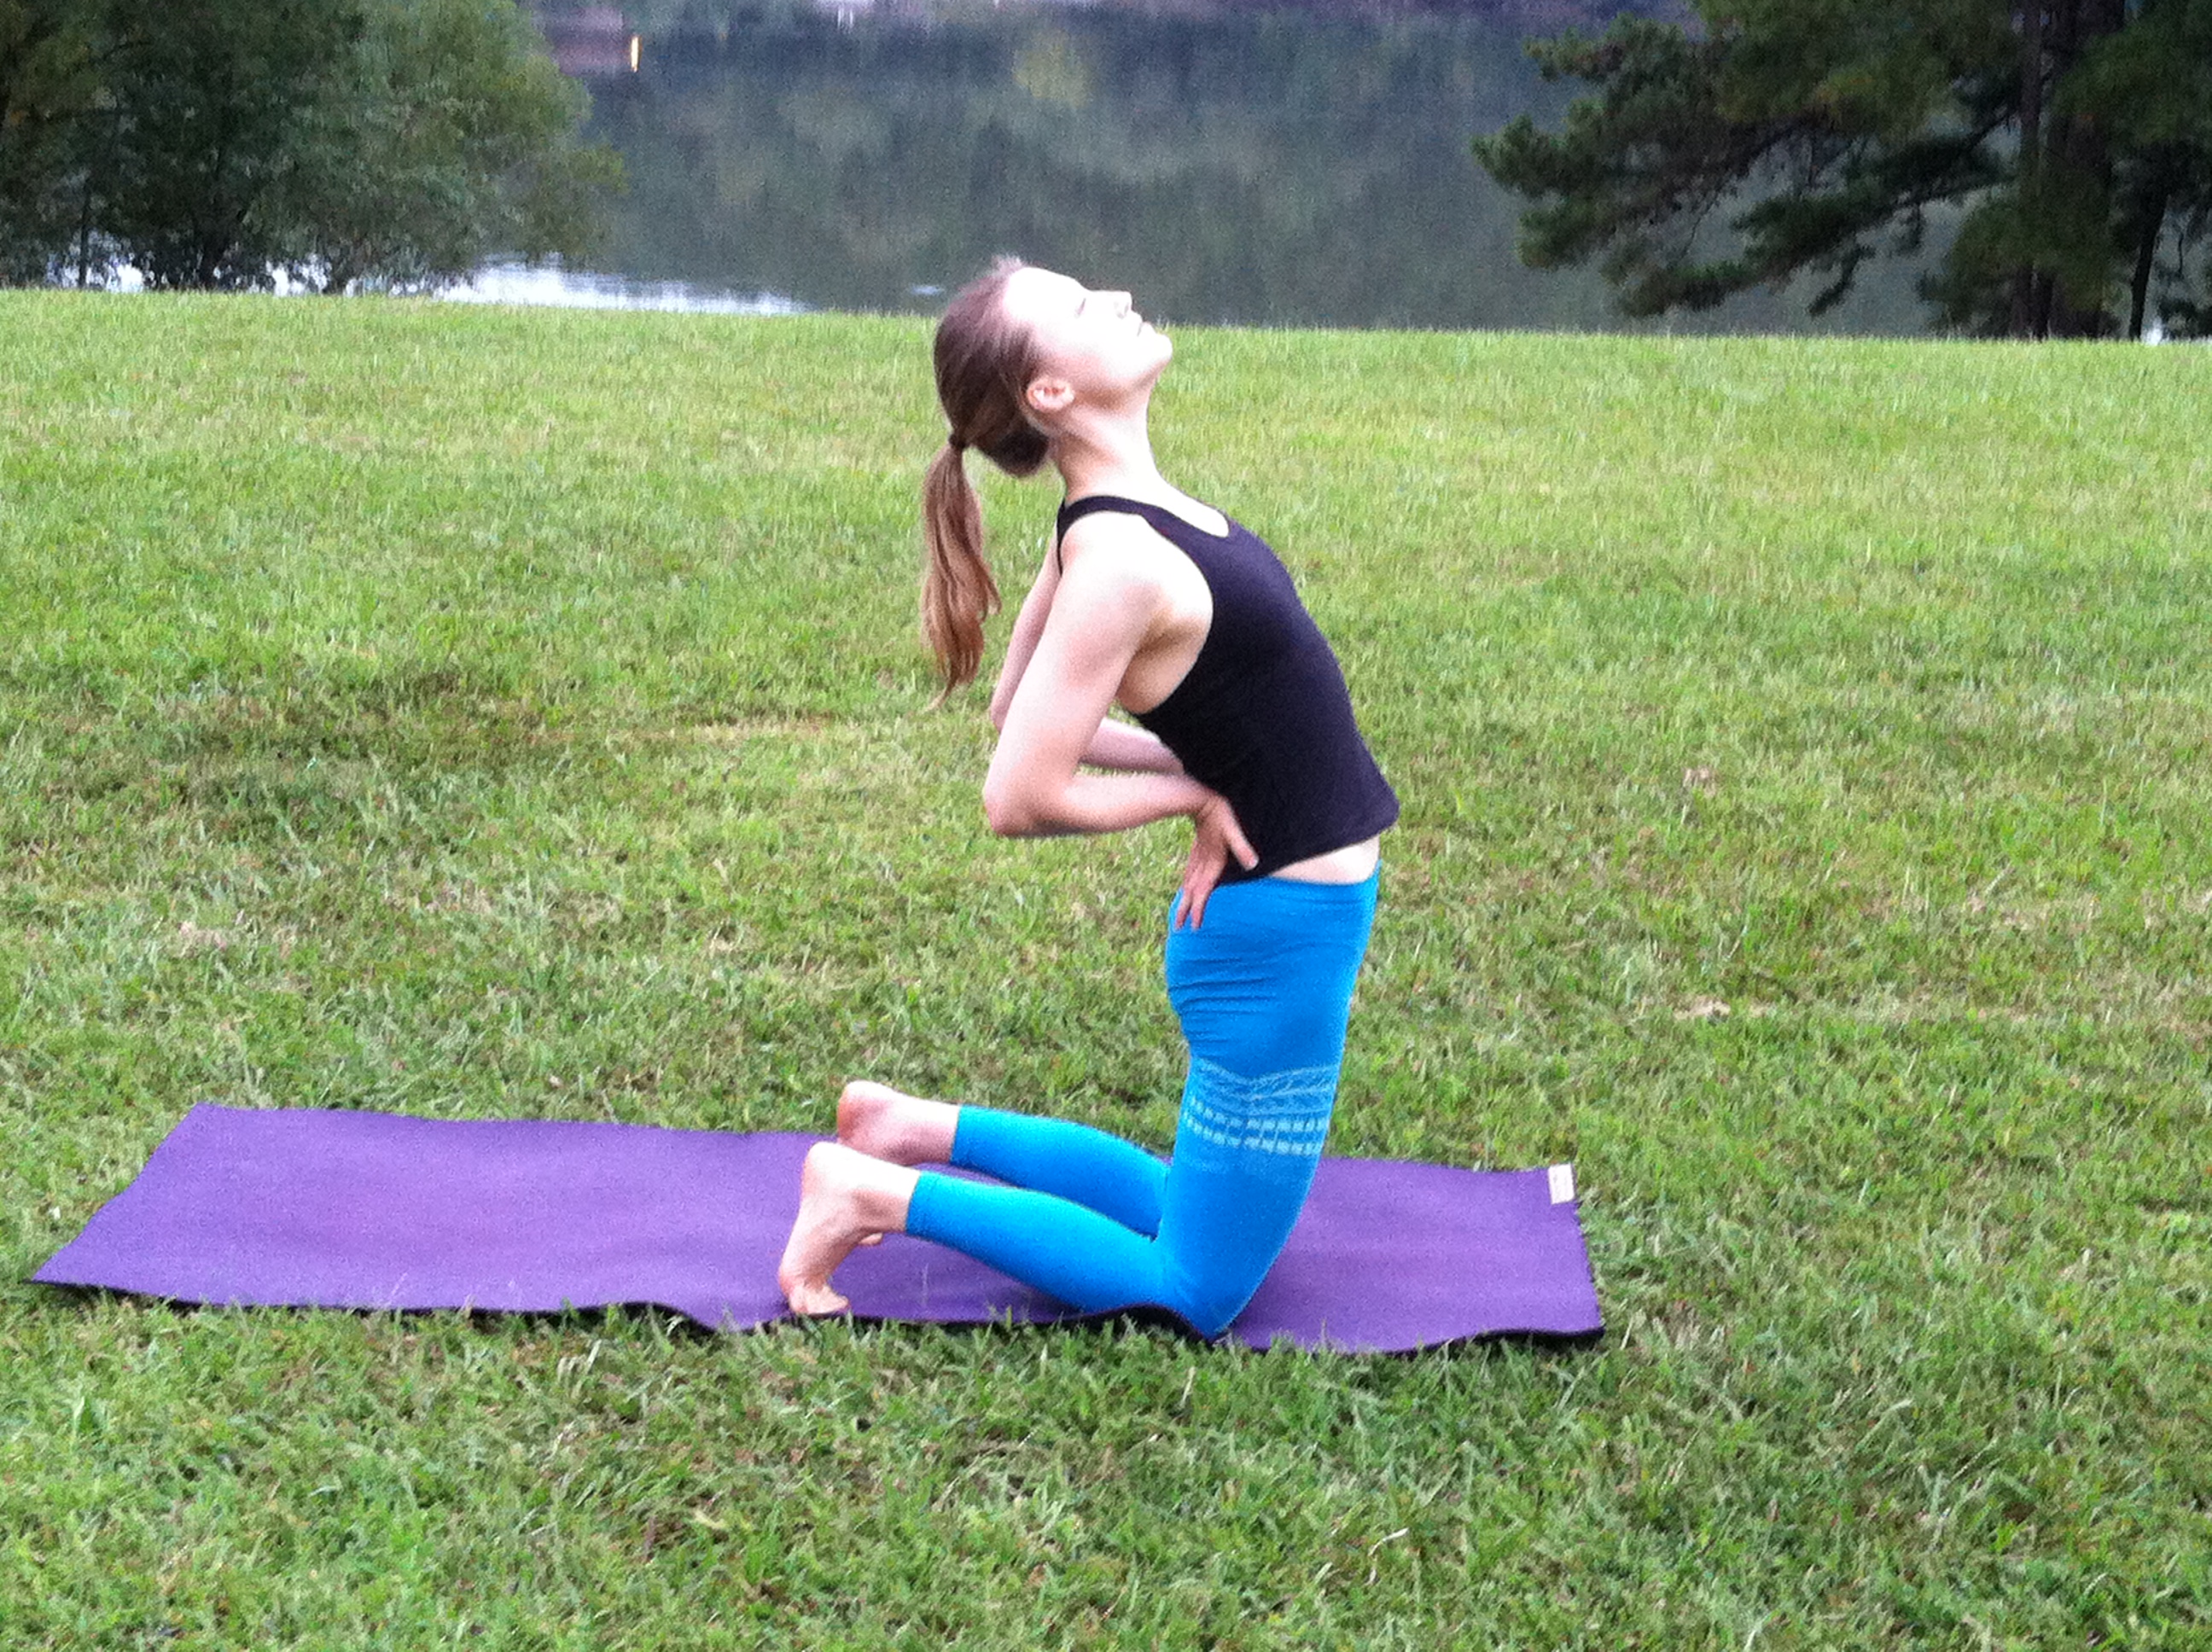
Modified Camel
- Kneel on the floor with your knees hip width and thighs perpendicular to the floor. Rotate your thighs inward slightly, and tuck your toes under your heels.
- Rest your hands on the back of your pelvis, bases of the palms on the tops of the buttocks, fingers pointing down. Use your hands to spread the back pelvis and lengthen it down through your tail bone. Then lightly firm the tail forward, toward the pubis. Make sure though that your front groins don’t “puff” forward. To prevent this, press your front thighs back, countering the forward action of your tail. Inhale and lift your heart by pressing the shoulder blades against your back ribs.
- Now lean back against the firmness of the tail bone and shoulder blades. For the time being keep your head up, chin near the sternum, and your hands on the pelvis.
- Lift through the sternum and breathe. Keep your neck soft.
- To release, bring your hands onto the front of your pelvis, at the hip points. Inhale and lift the head and torso up by pushing the hip points down, toward the floor. If your head is back, lead with your heart to come up.
Pause for a few breaths with your spine in a neutral position.
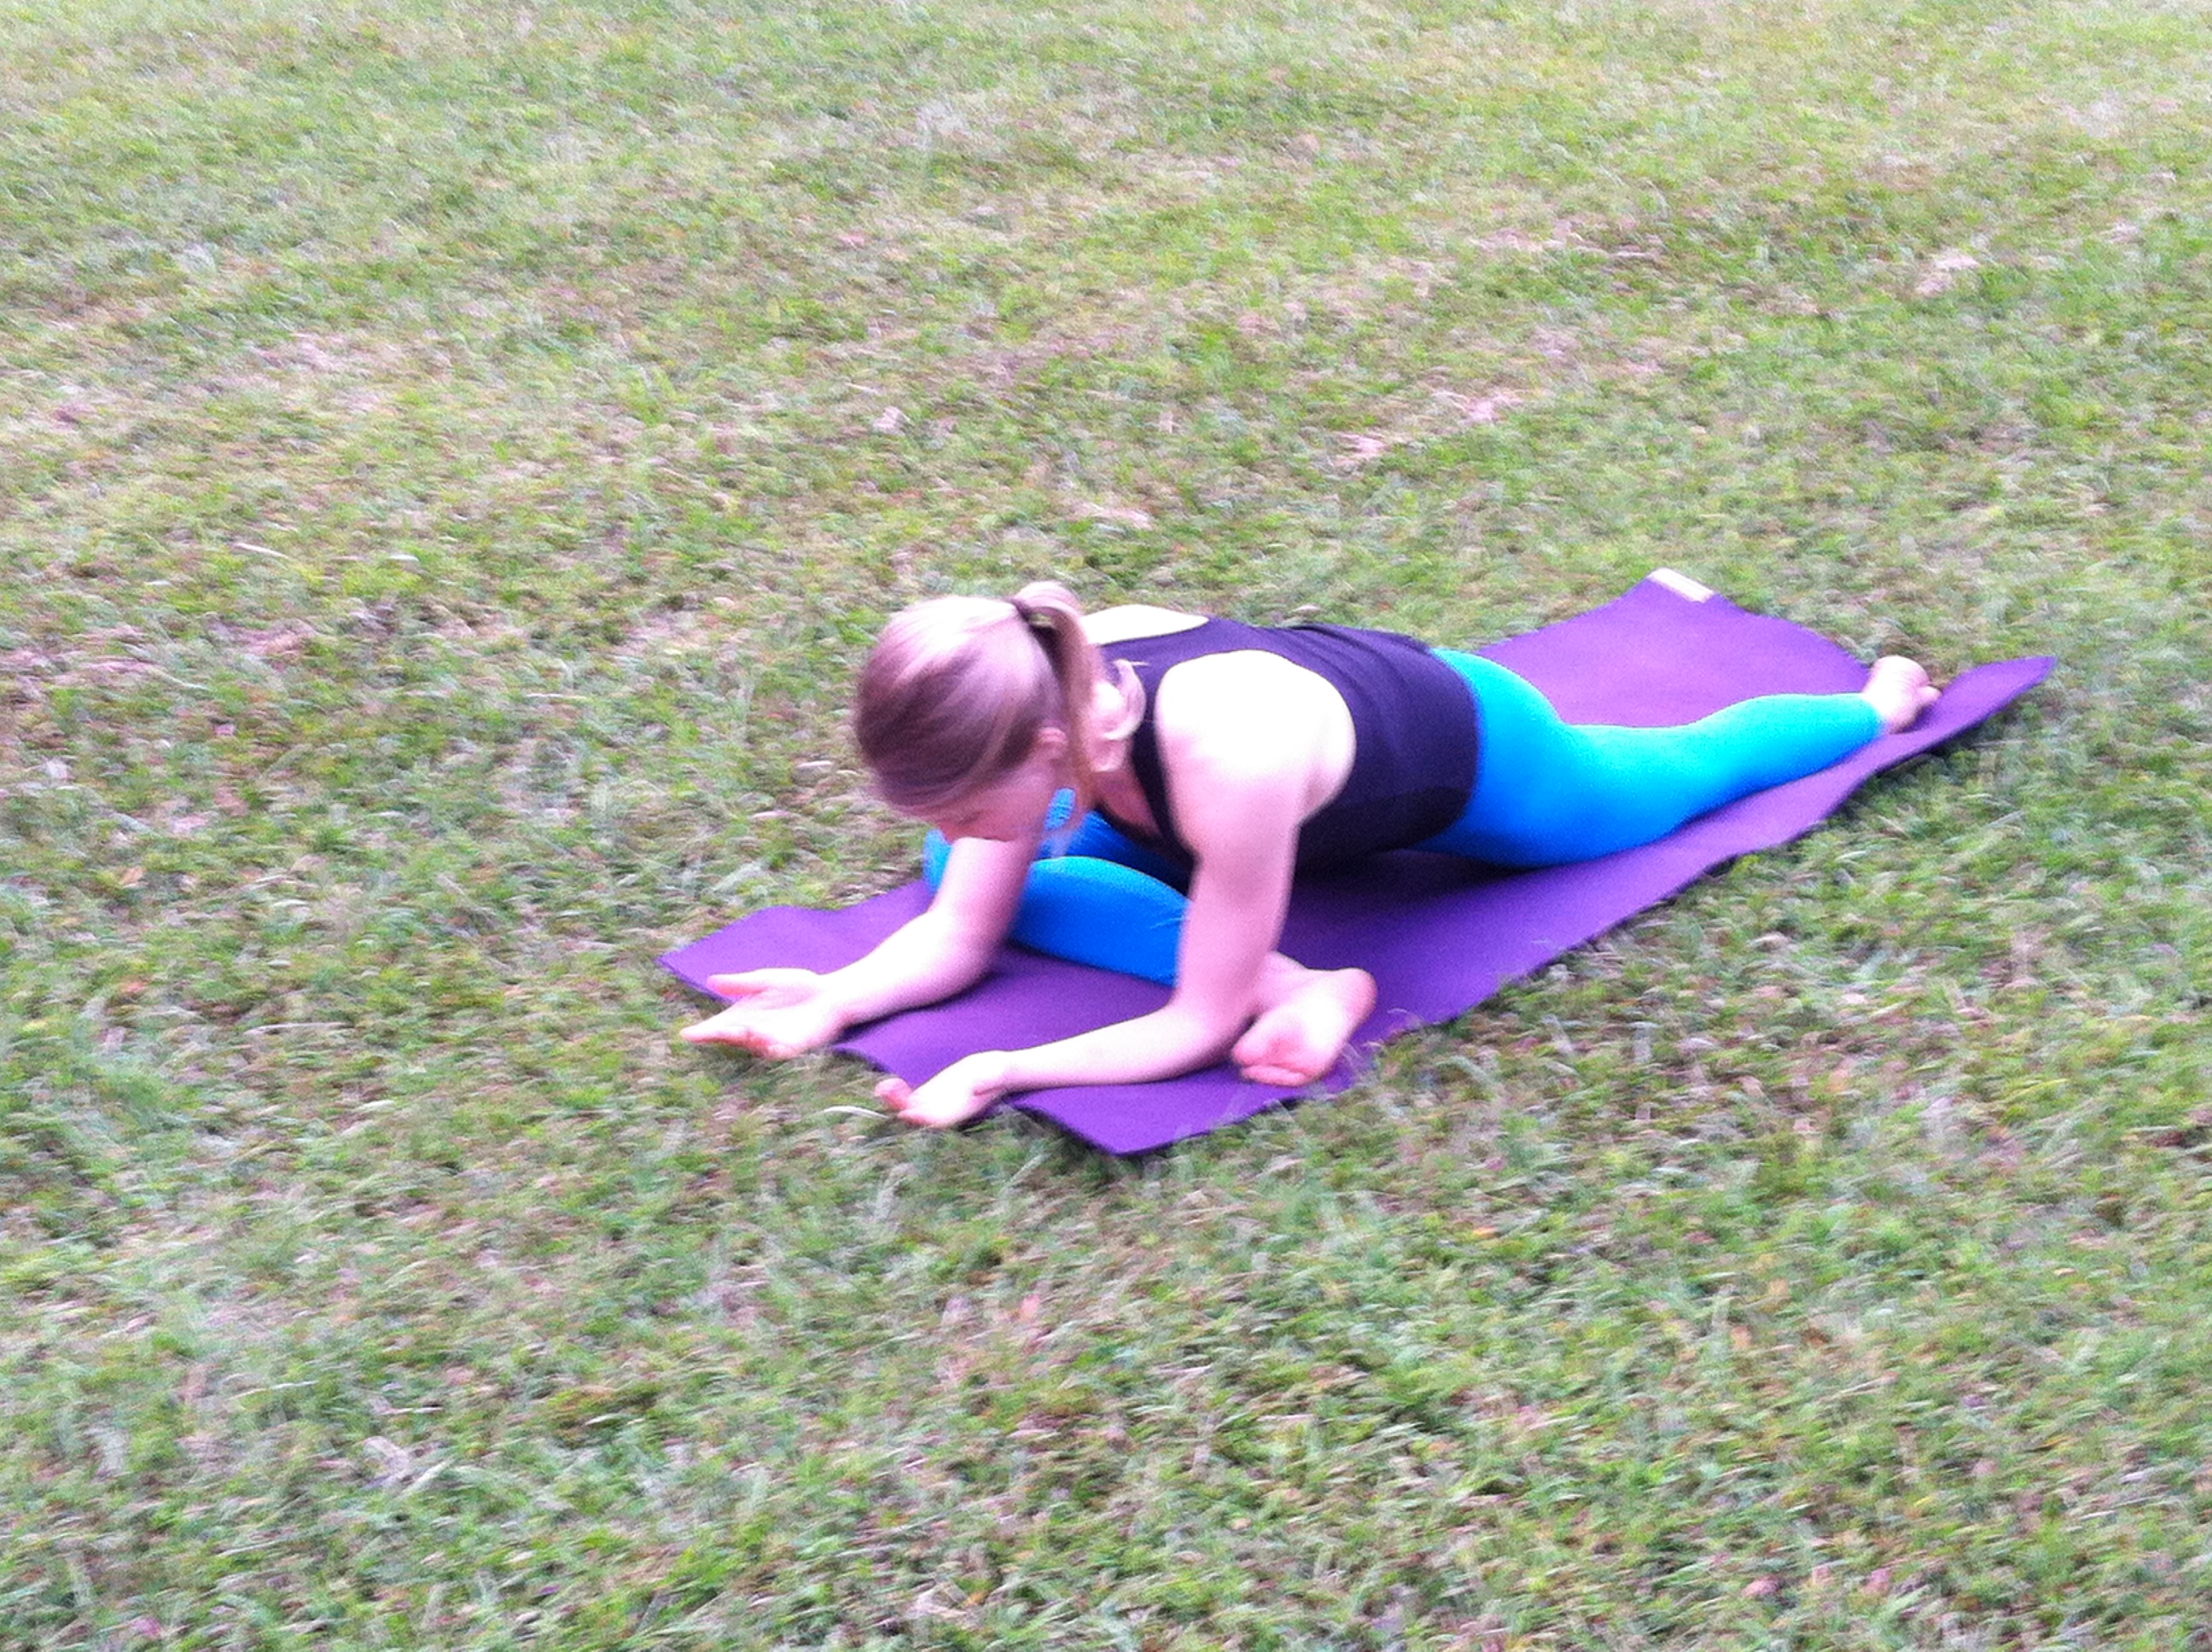
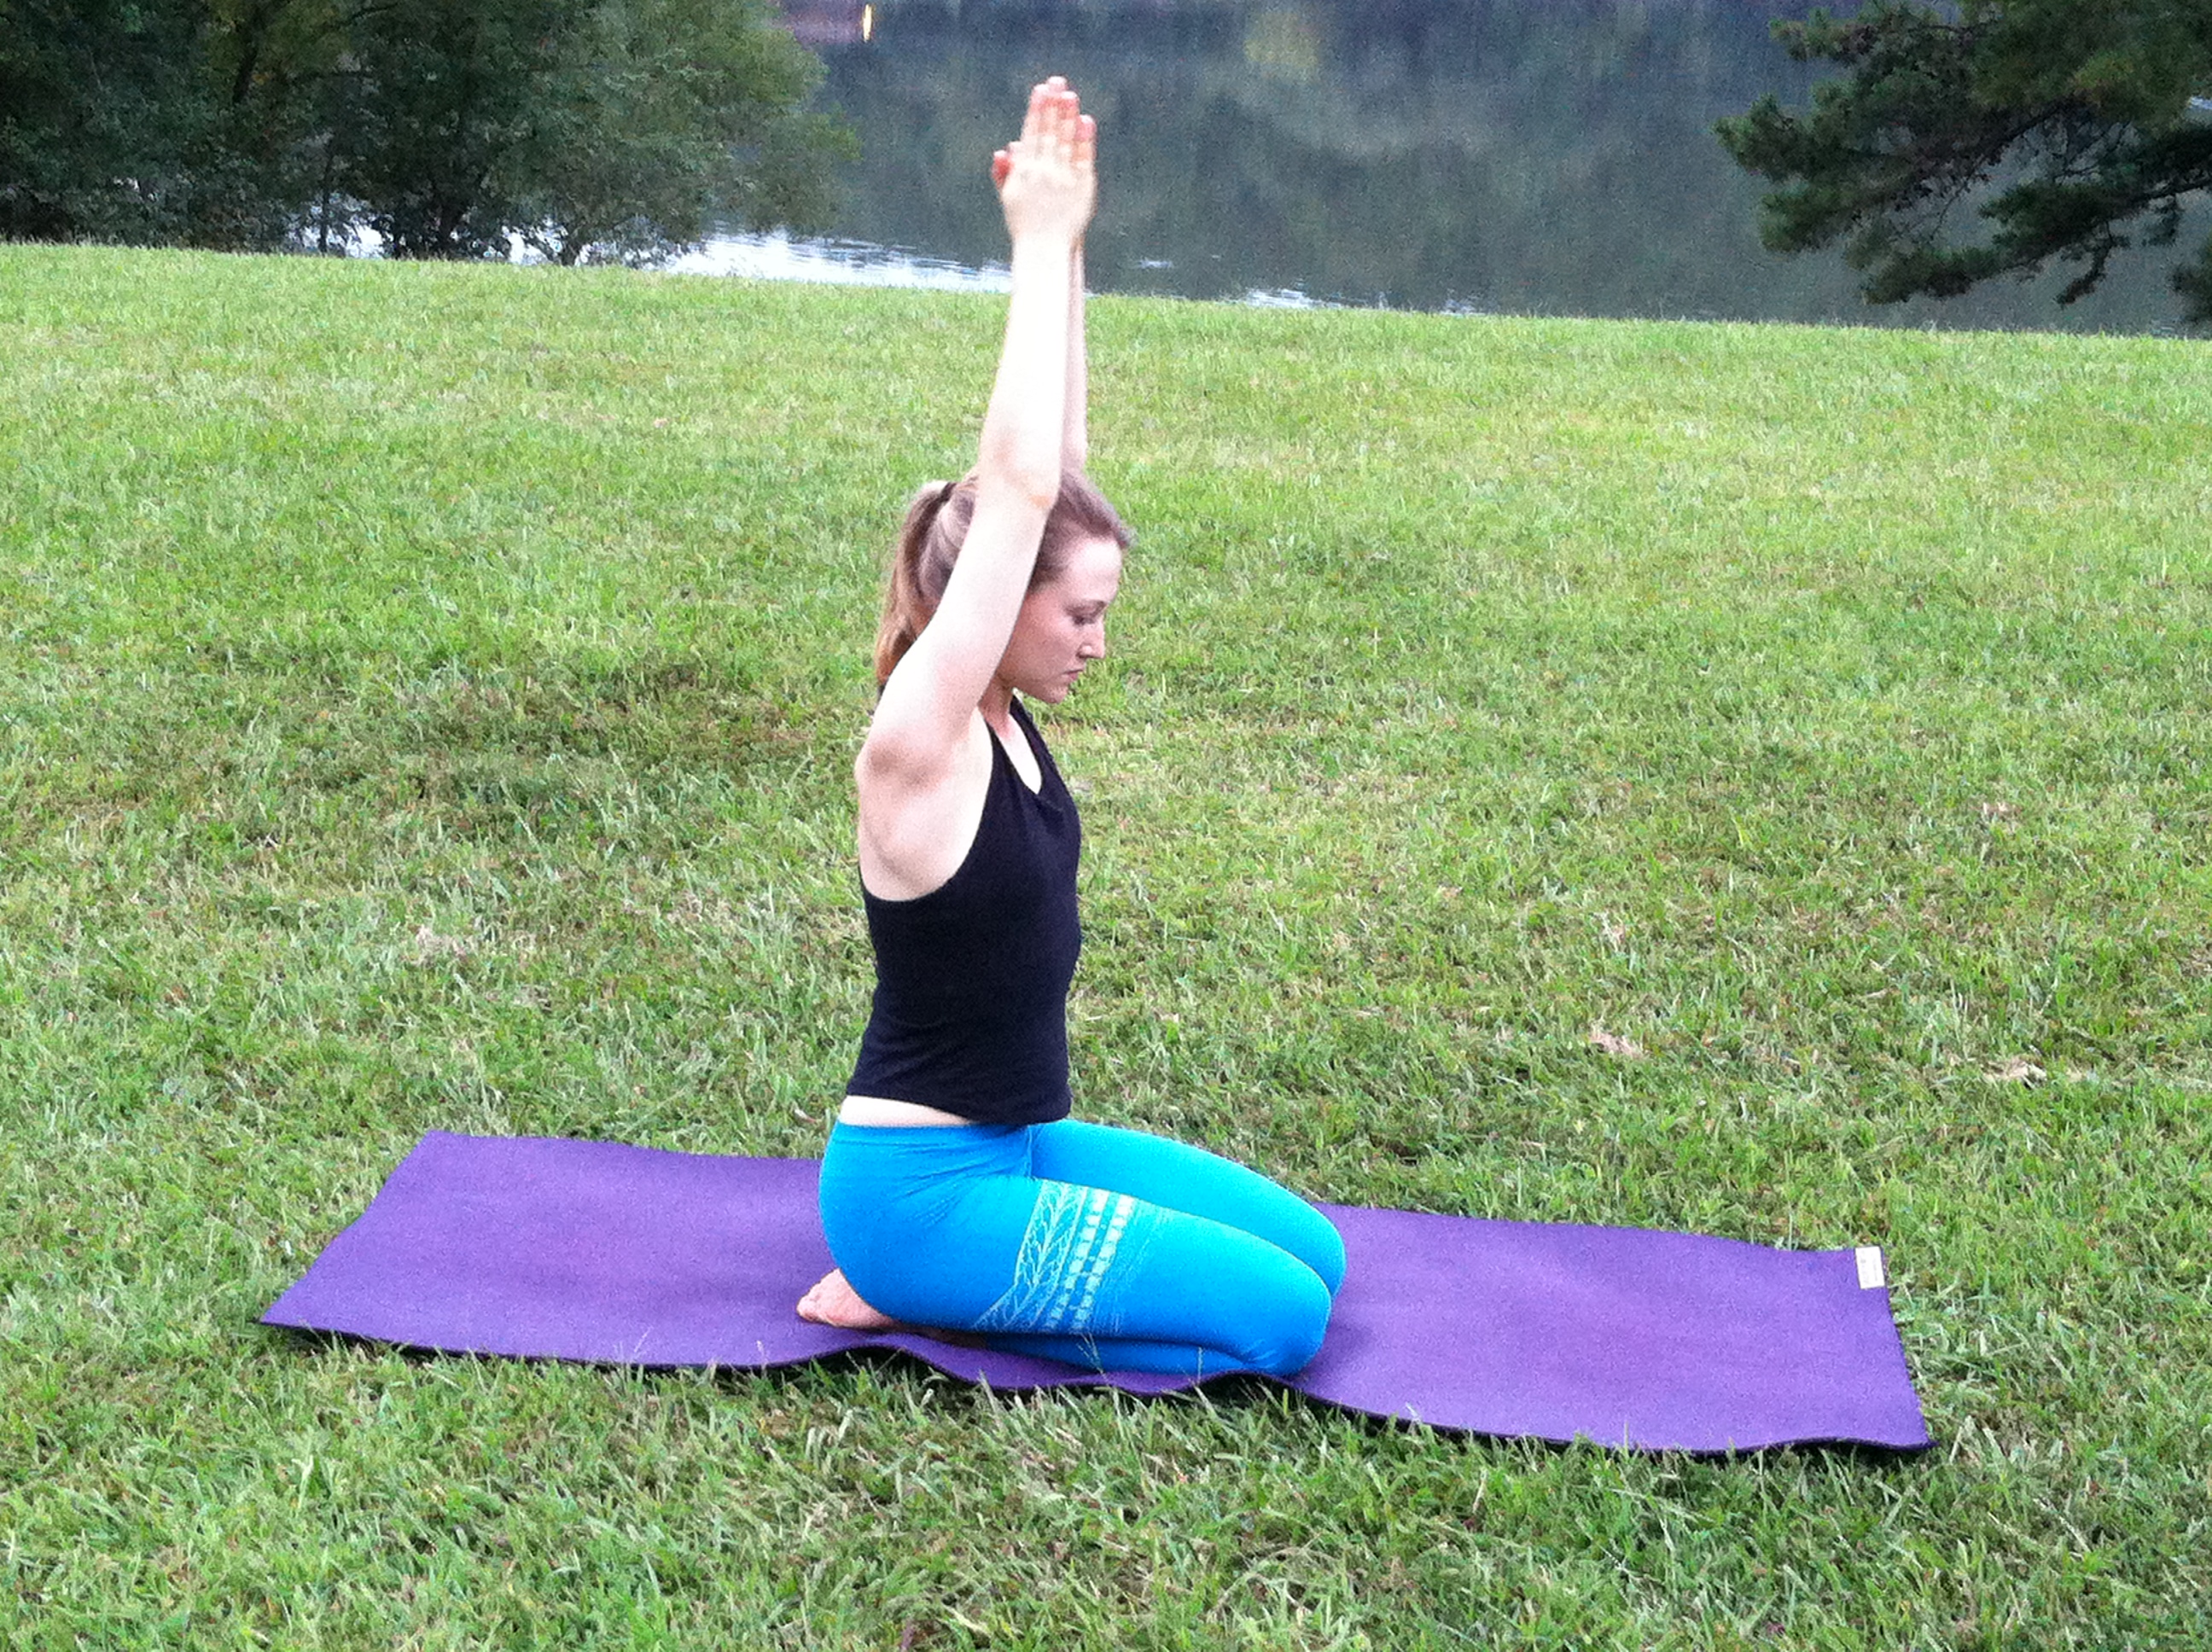
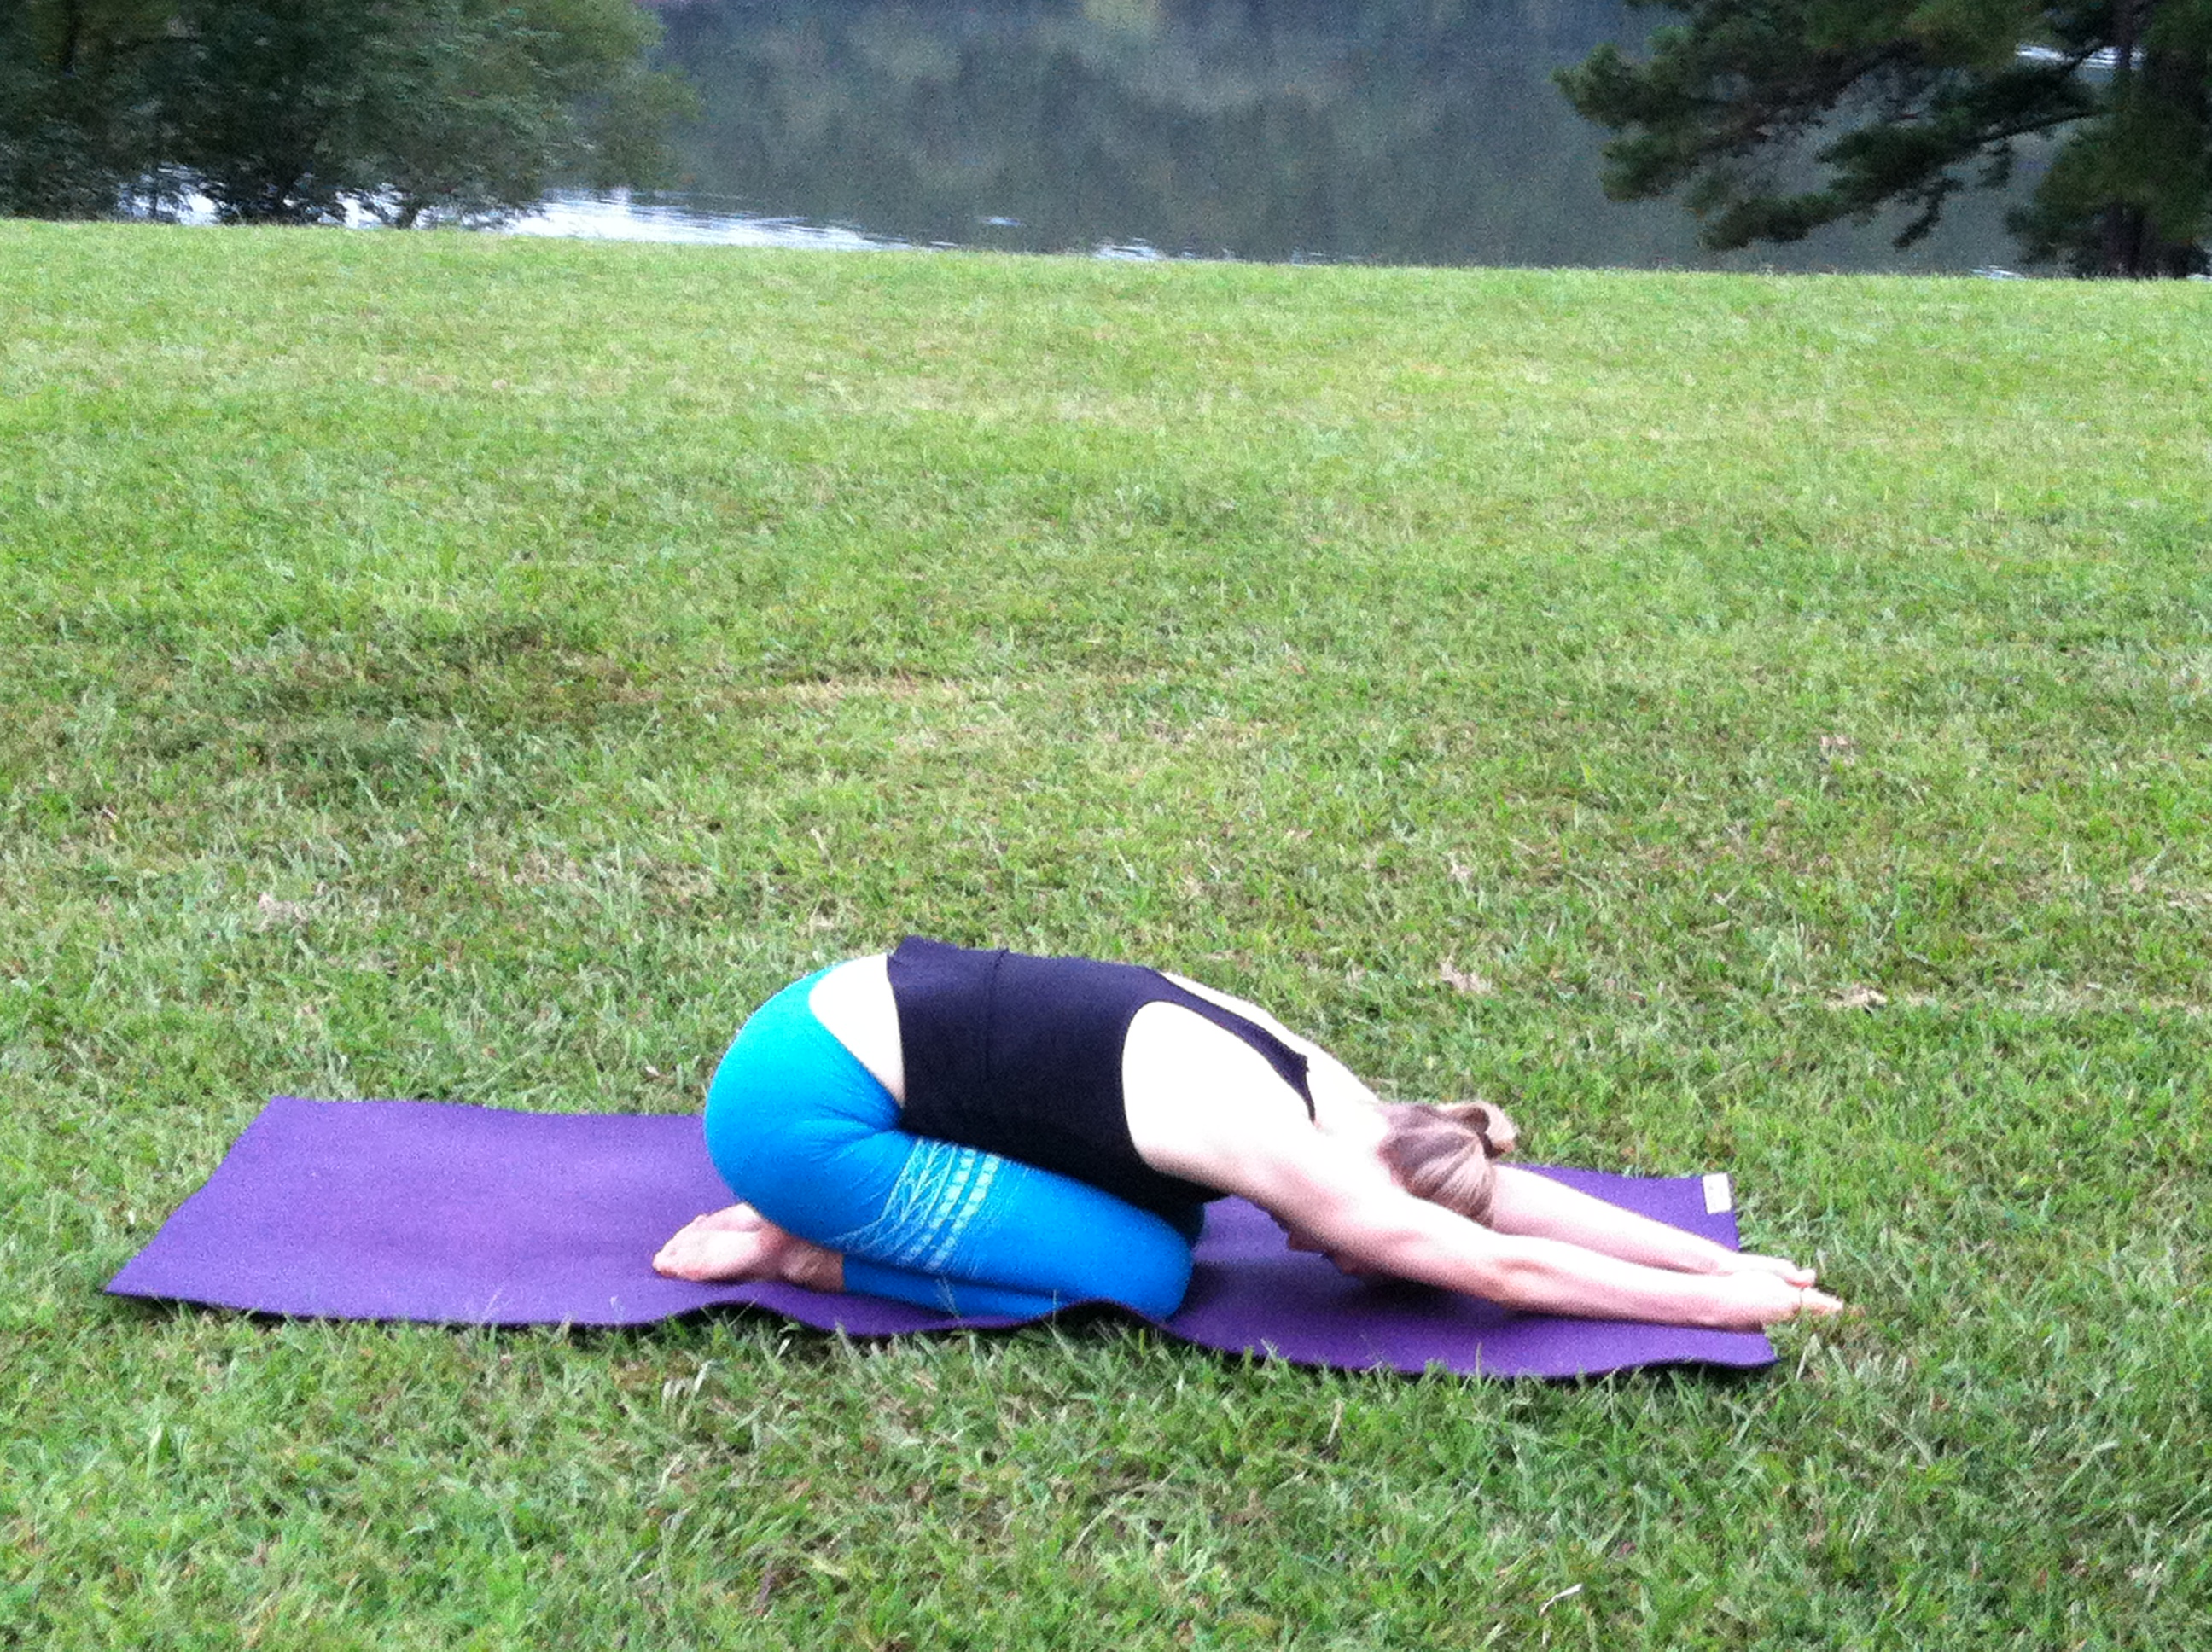
Tortoise
- Bring your knees together and lay the tops of your feet onto the mat.
- Drop your tailbone toward your heels.
- Inhale and lift your arms overhead. Squeeze biceps to ears and palms together. Cross your thumbs.
- Exhale and reach forward and hinge at the hips to fold over the knees while keeping your tailbone heavy toward your heels. Try to touch the forehead to the floor before the hands.
- Once your hands meet the mat, press into the edges of your pinkies and gently rotate your elbow creases upwards toward the sky.
- Breathe into your lower back and enjoy the lengthening of the spine and release of tension through neck and shoulders.
- To release, squeeze the thighs together lift the lower belly up and in. Inhale your torso up, keeping the biceps pressed toward the ears.
Staff
- Bring your legs straight out in front of you. Press the legs actively into the ground and flex and widen your toes to protect the knees.
- Place your fingertips on the mat on either side of your hips.
- Press the shoulder blades down and together while reaching the tips of the ears up toward the sky.
- Lift your lower belly gently up and in.
- Breathe!
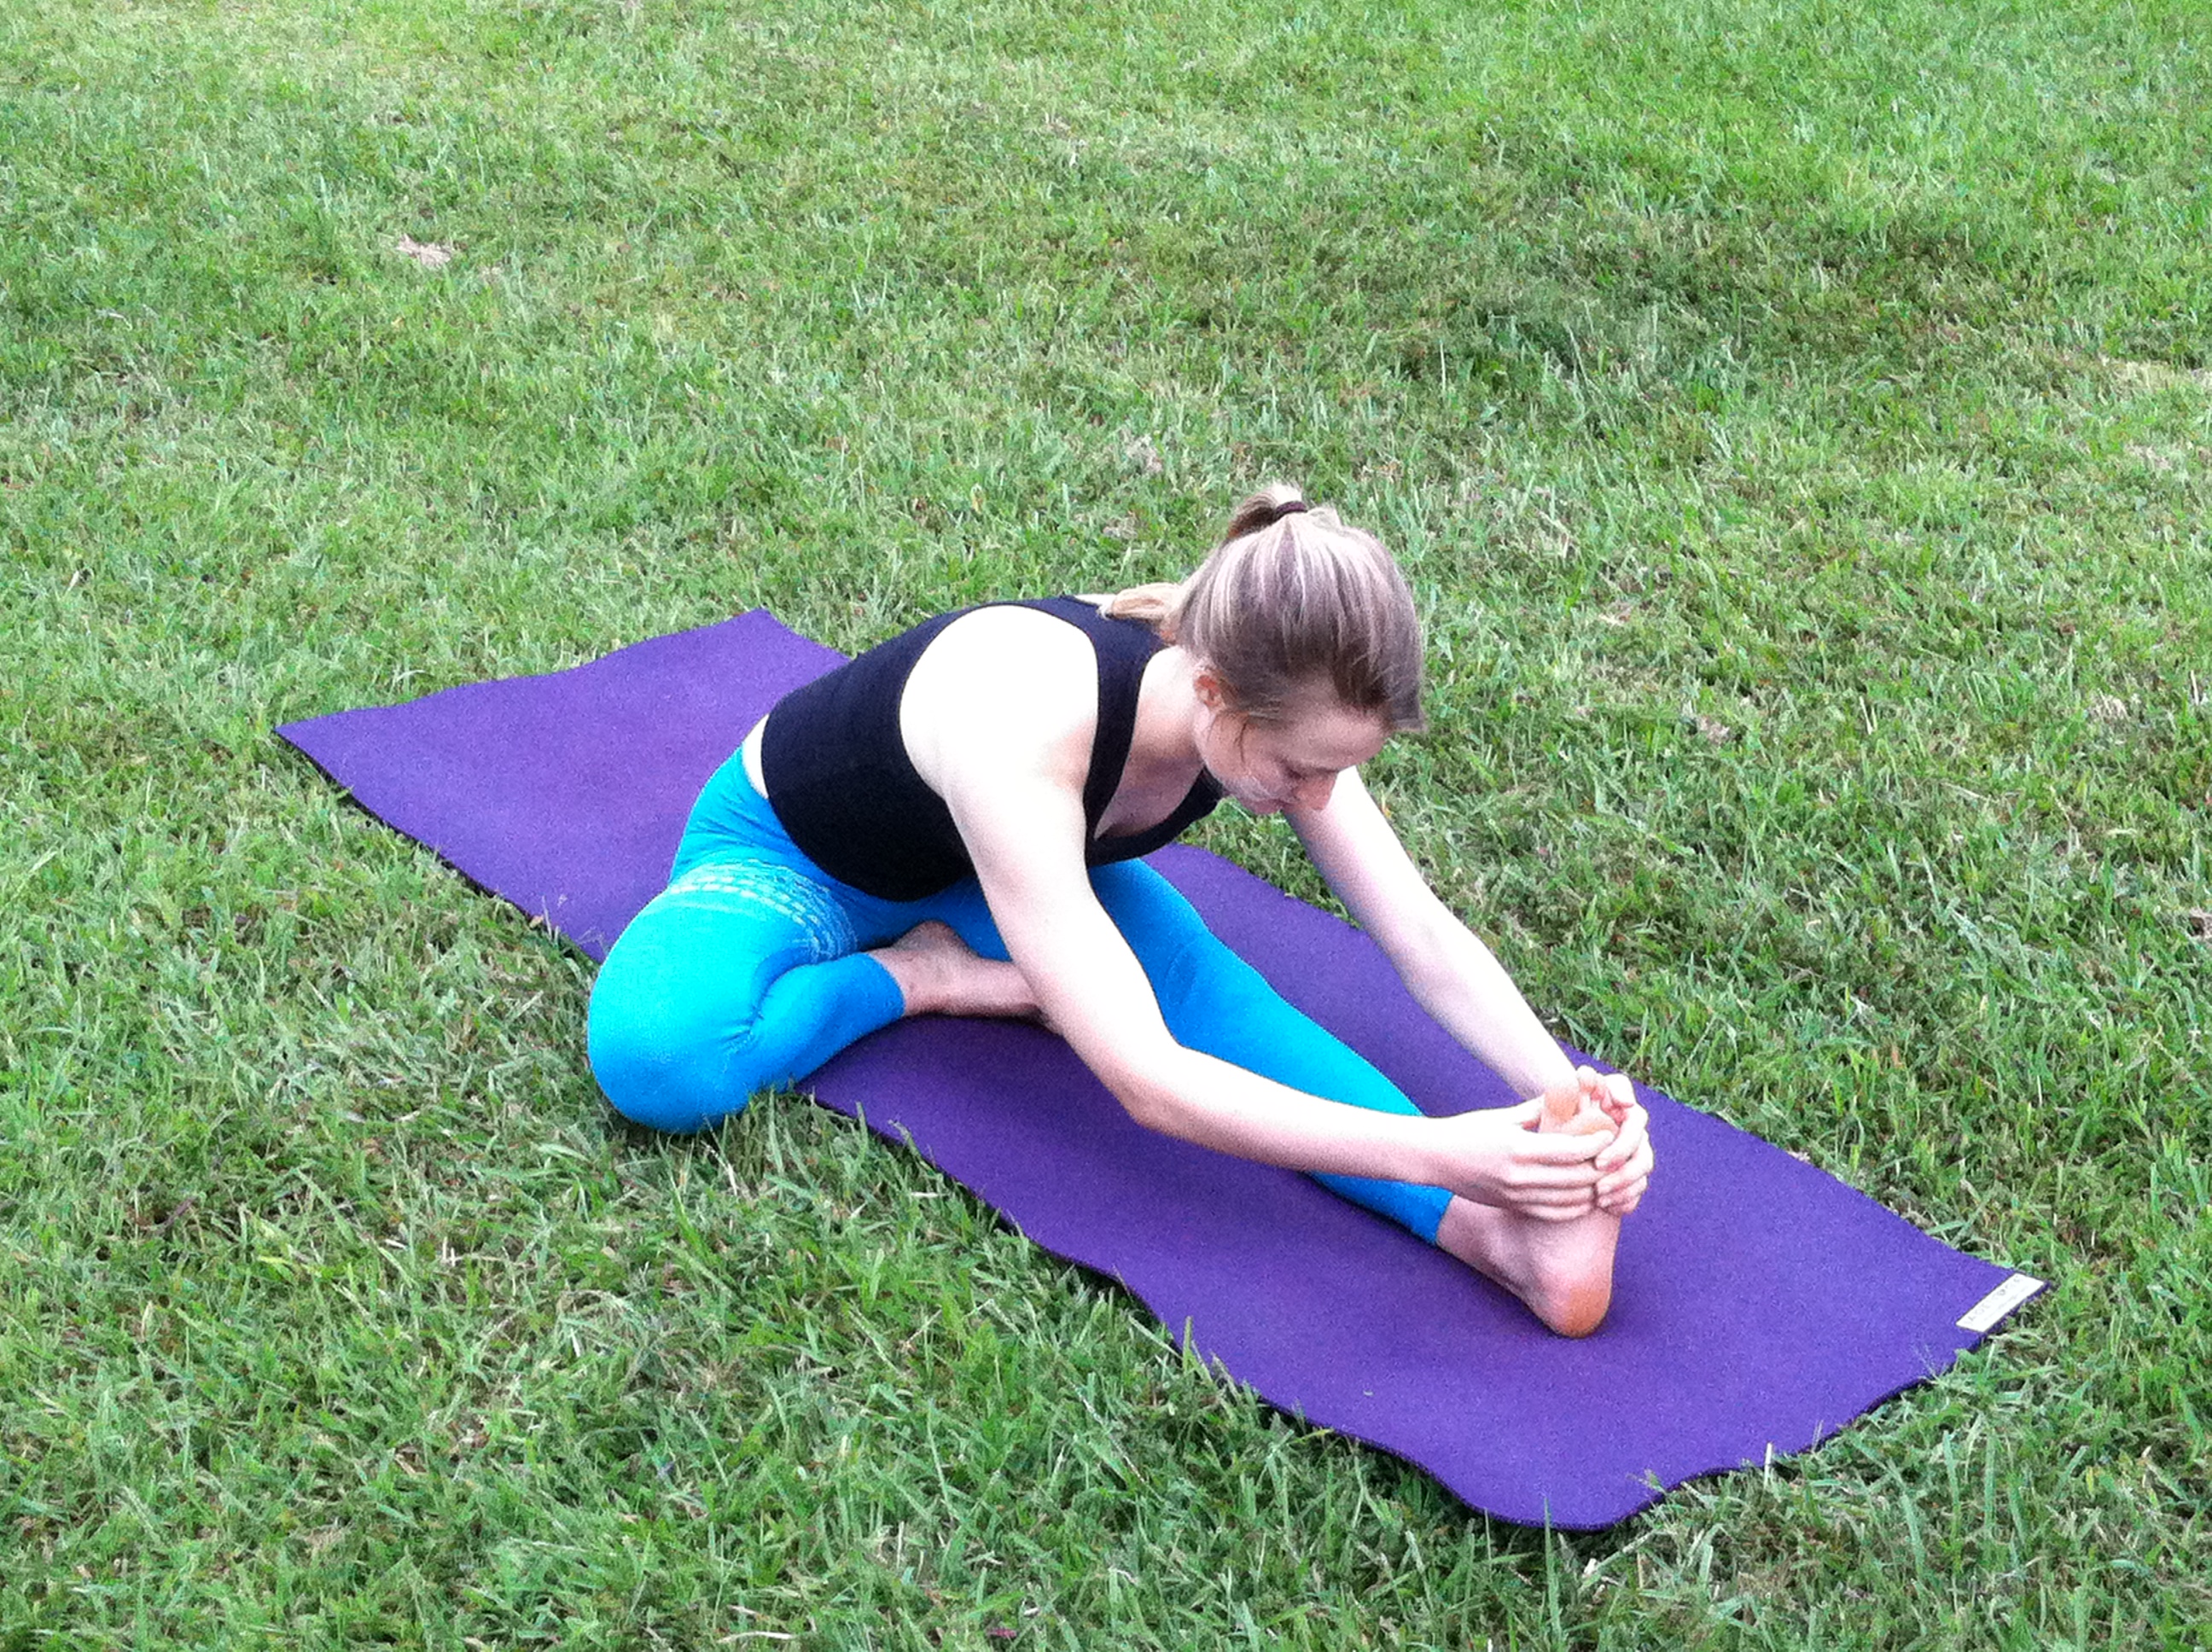
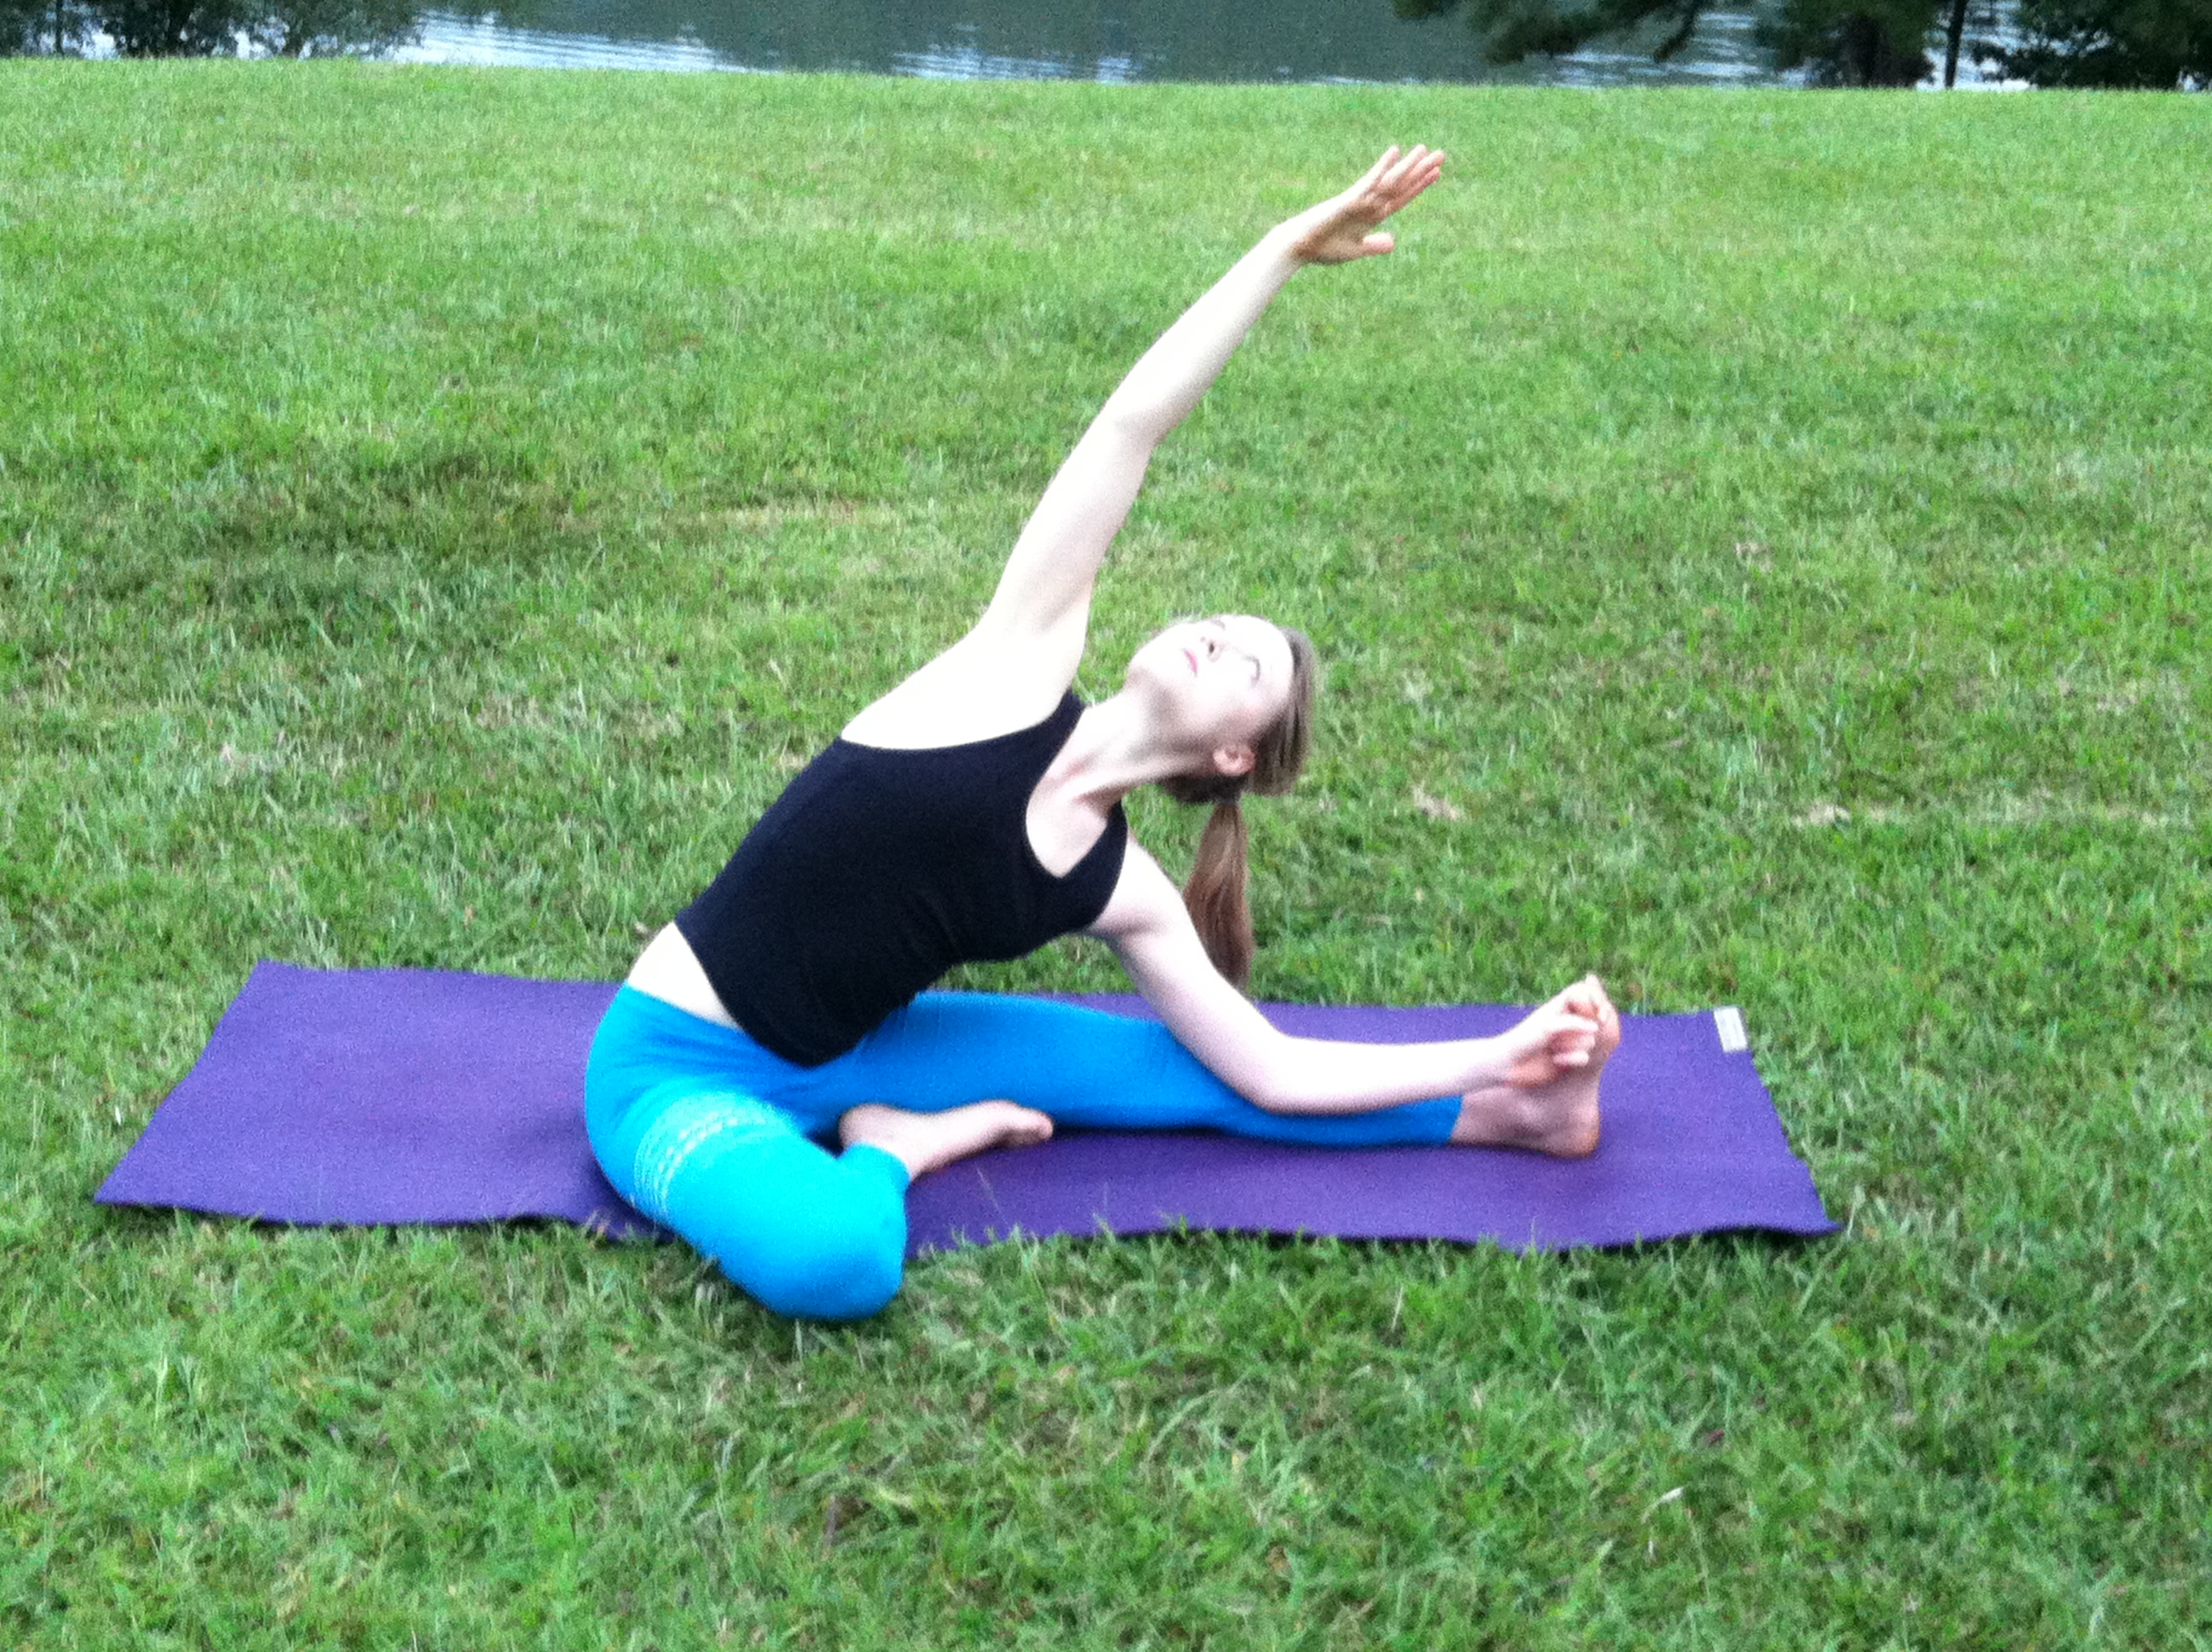
Janu Sirsasana with Extended Side Stretch
- Bend your right knee to plant your right foot into your left inner thigh. Flex your left toes.
- Micro twist your torso to your left, and exhaling, hinge at your hips to fold over the left leg.
- Grasp your shin, ankle, or foot, and continue reaching the heart forward over the leg. Avoid a rounded back.
- Reach your left arm toward left toes and inhale your right arm up and over to the left.
- Slightly twist your torso (belly button) toward the sky as you gaze at your right hand. Keep your neck soft and both sits bones equally grounded on the mat.
- Switch sides
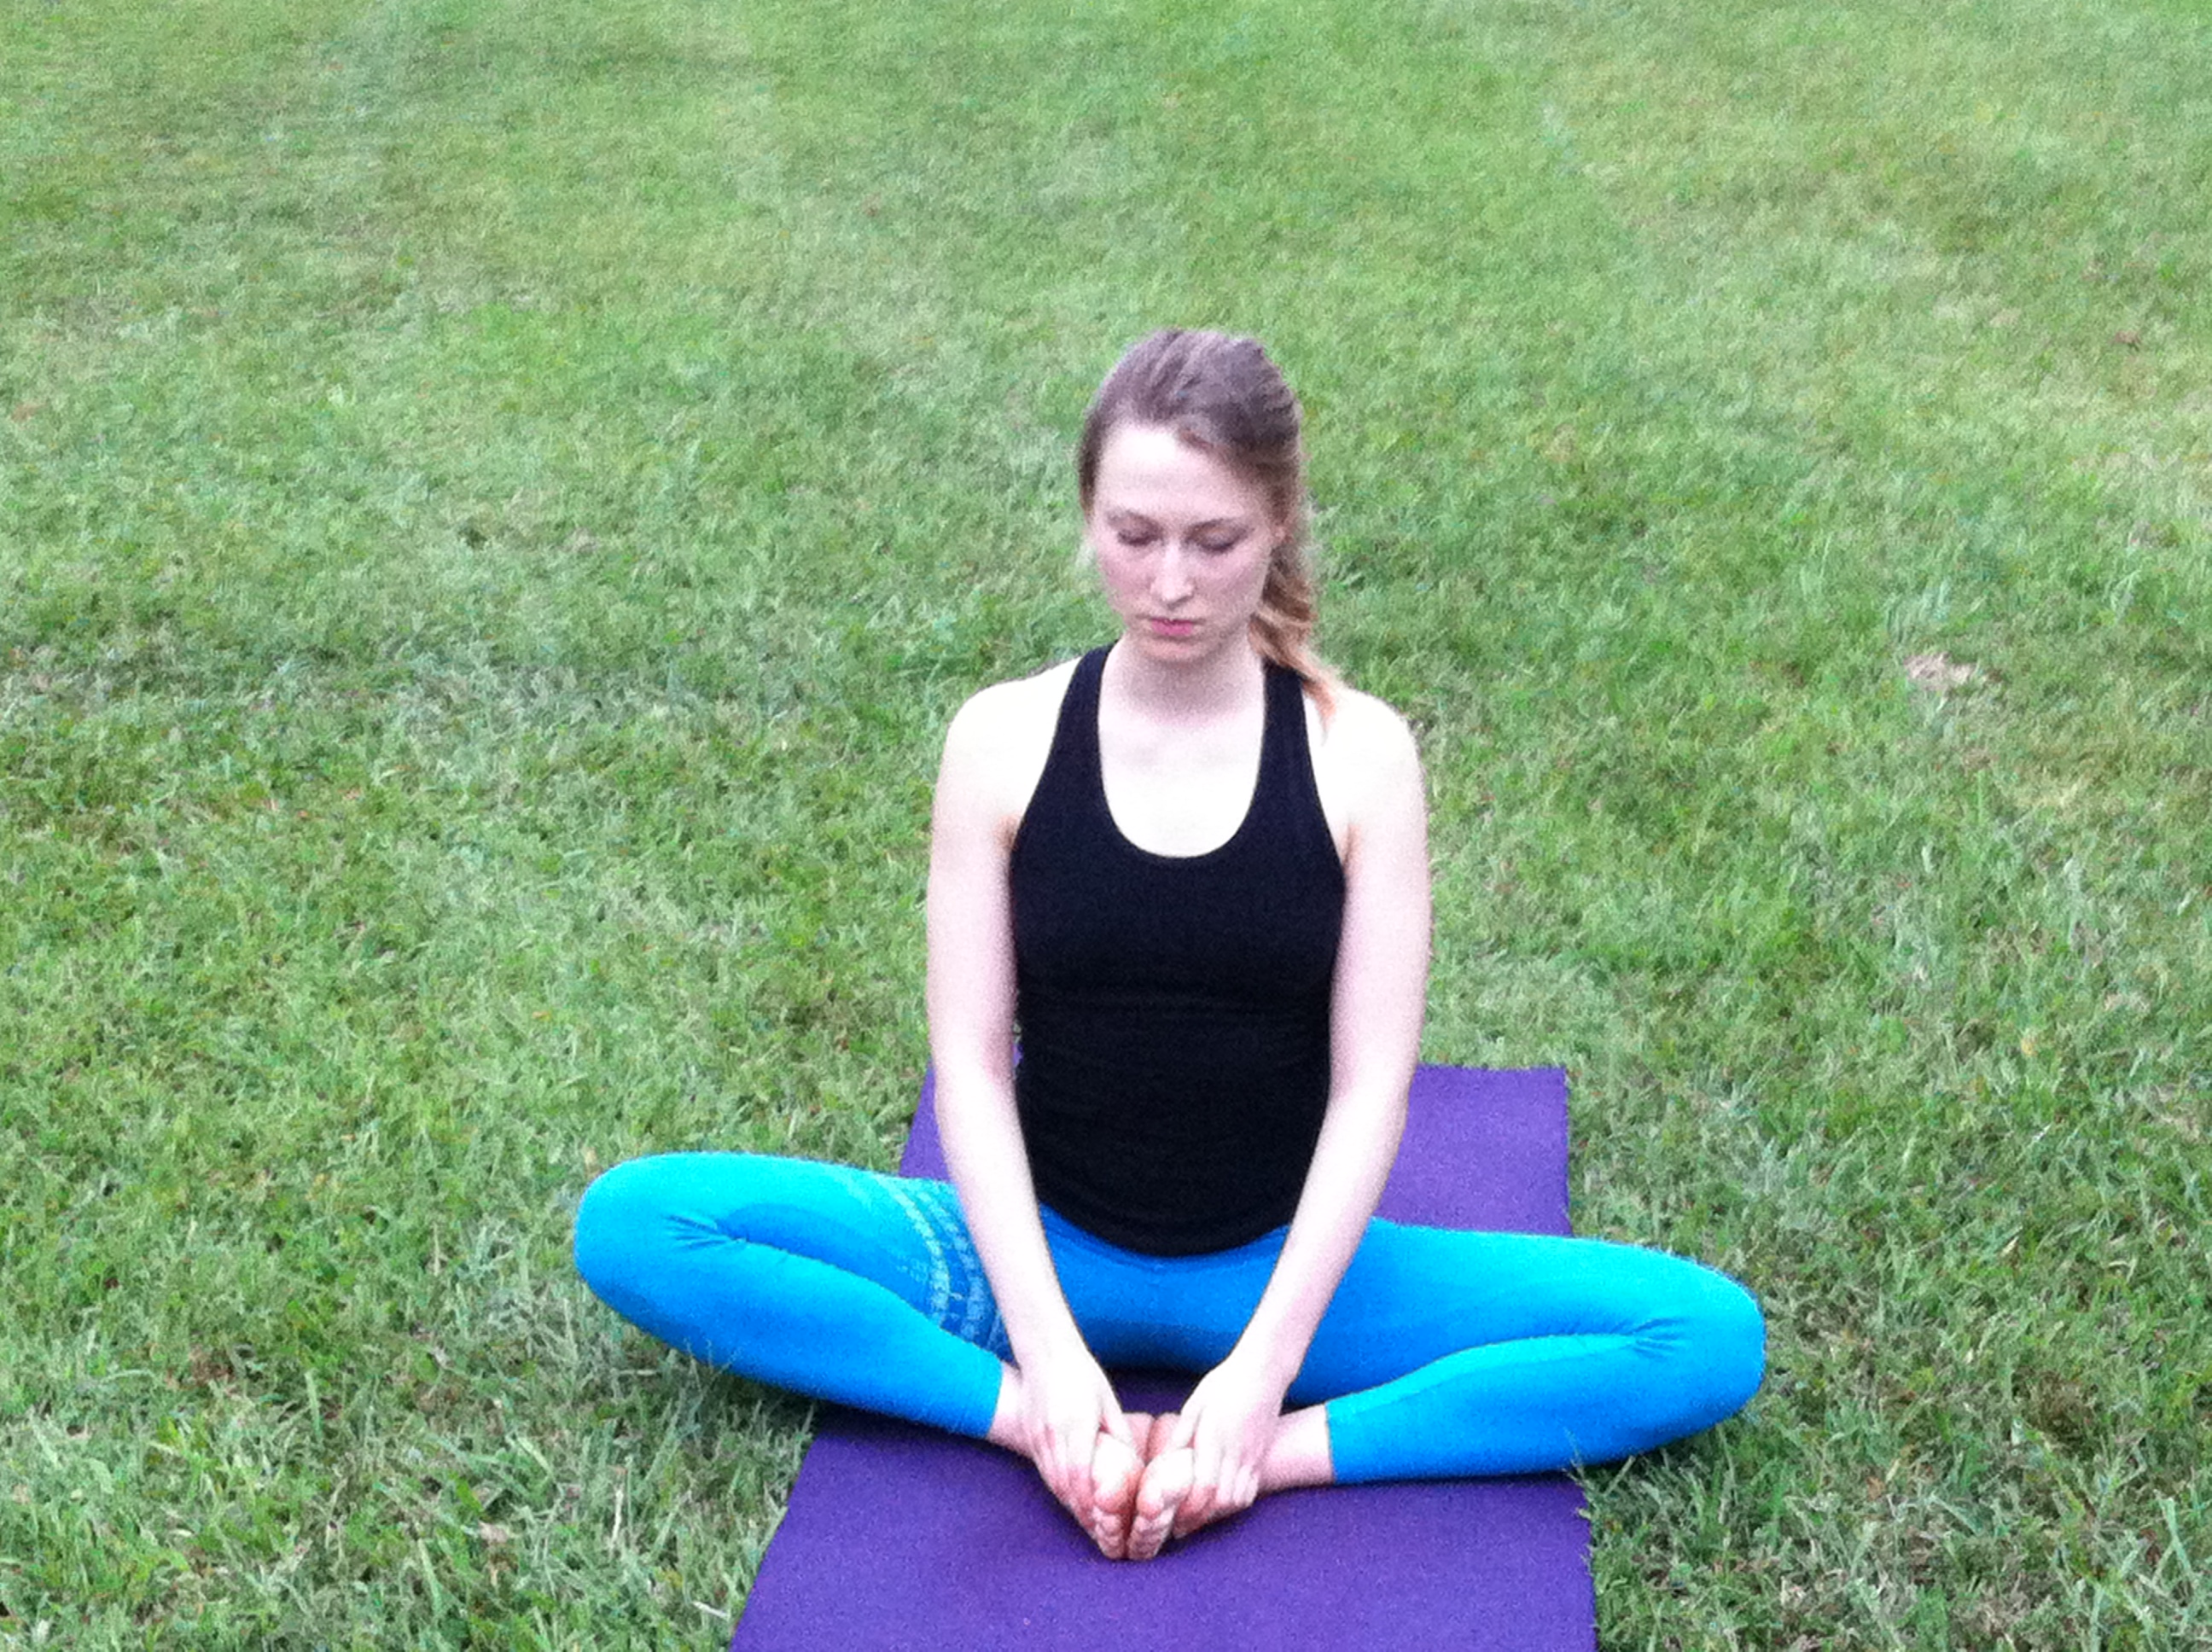
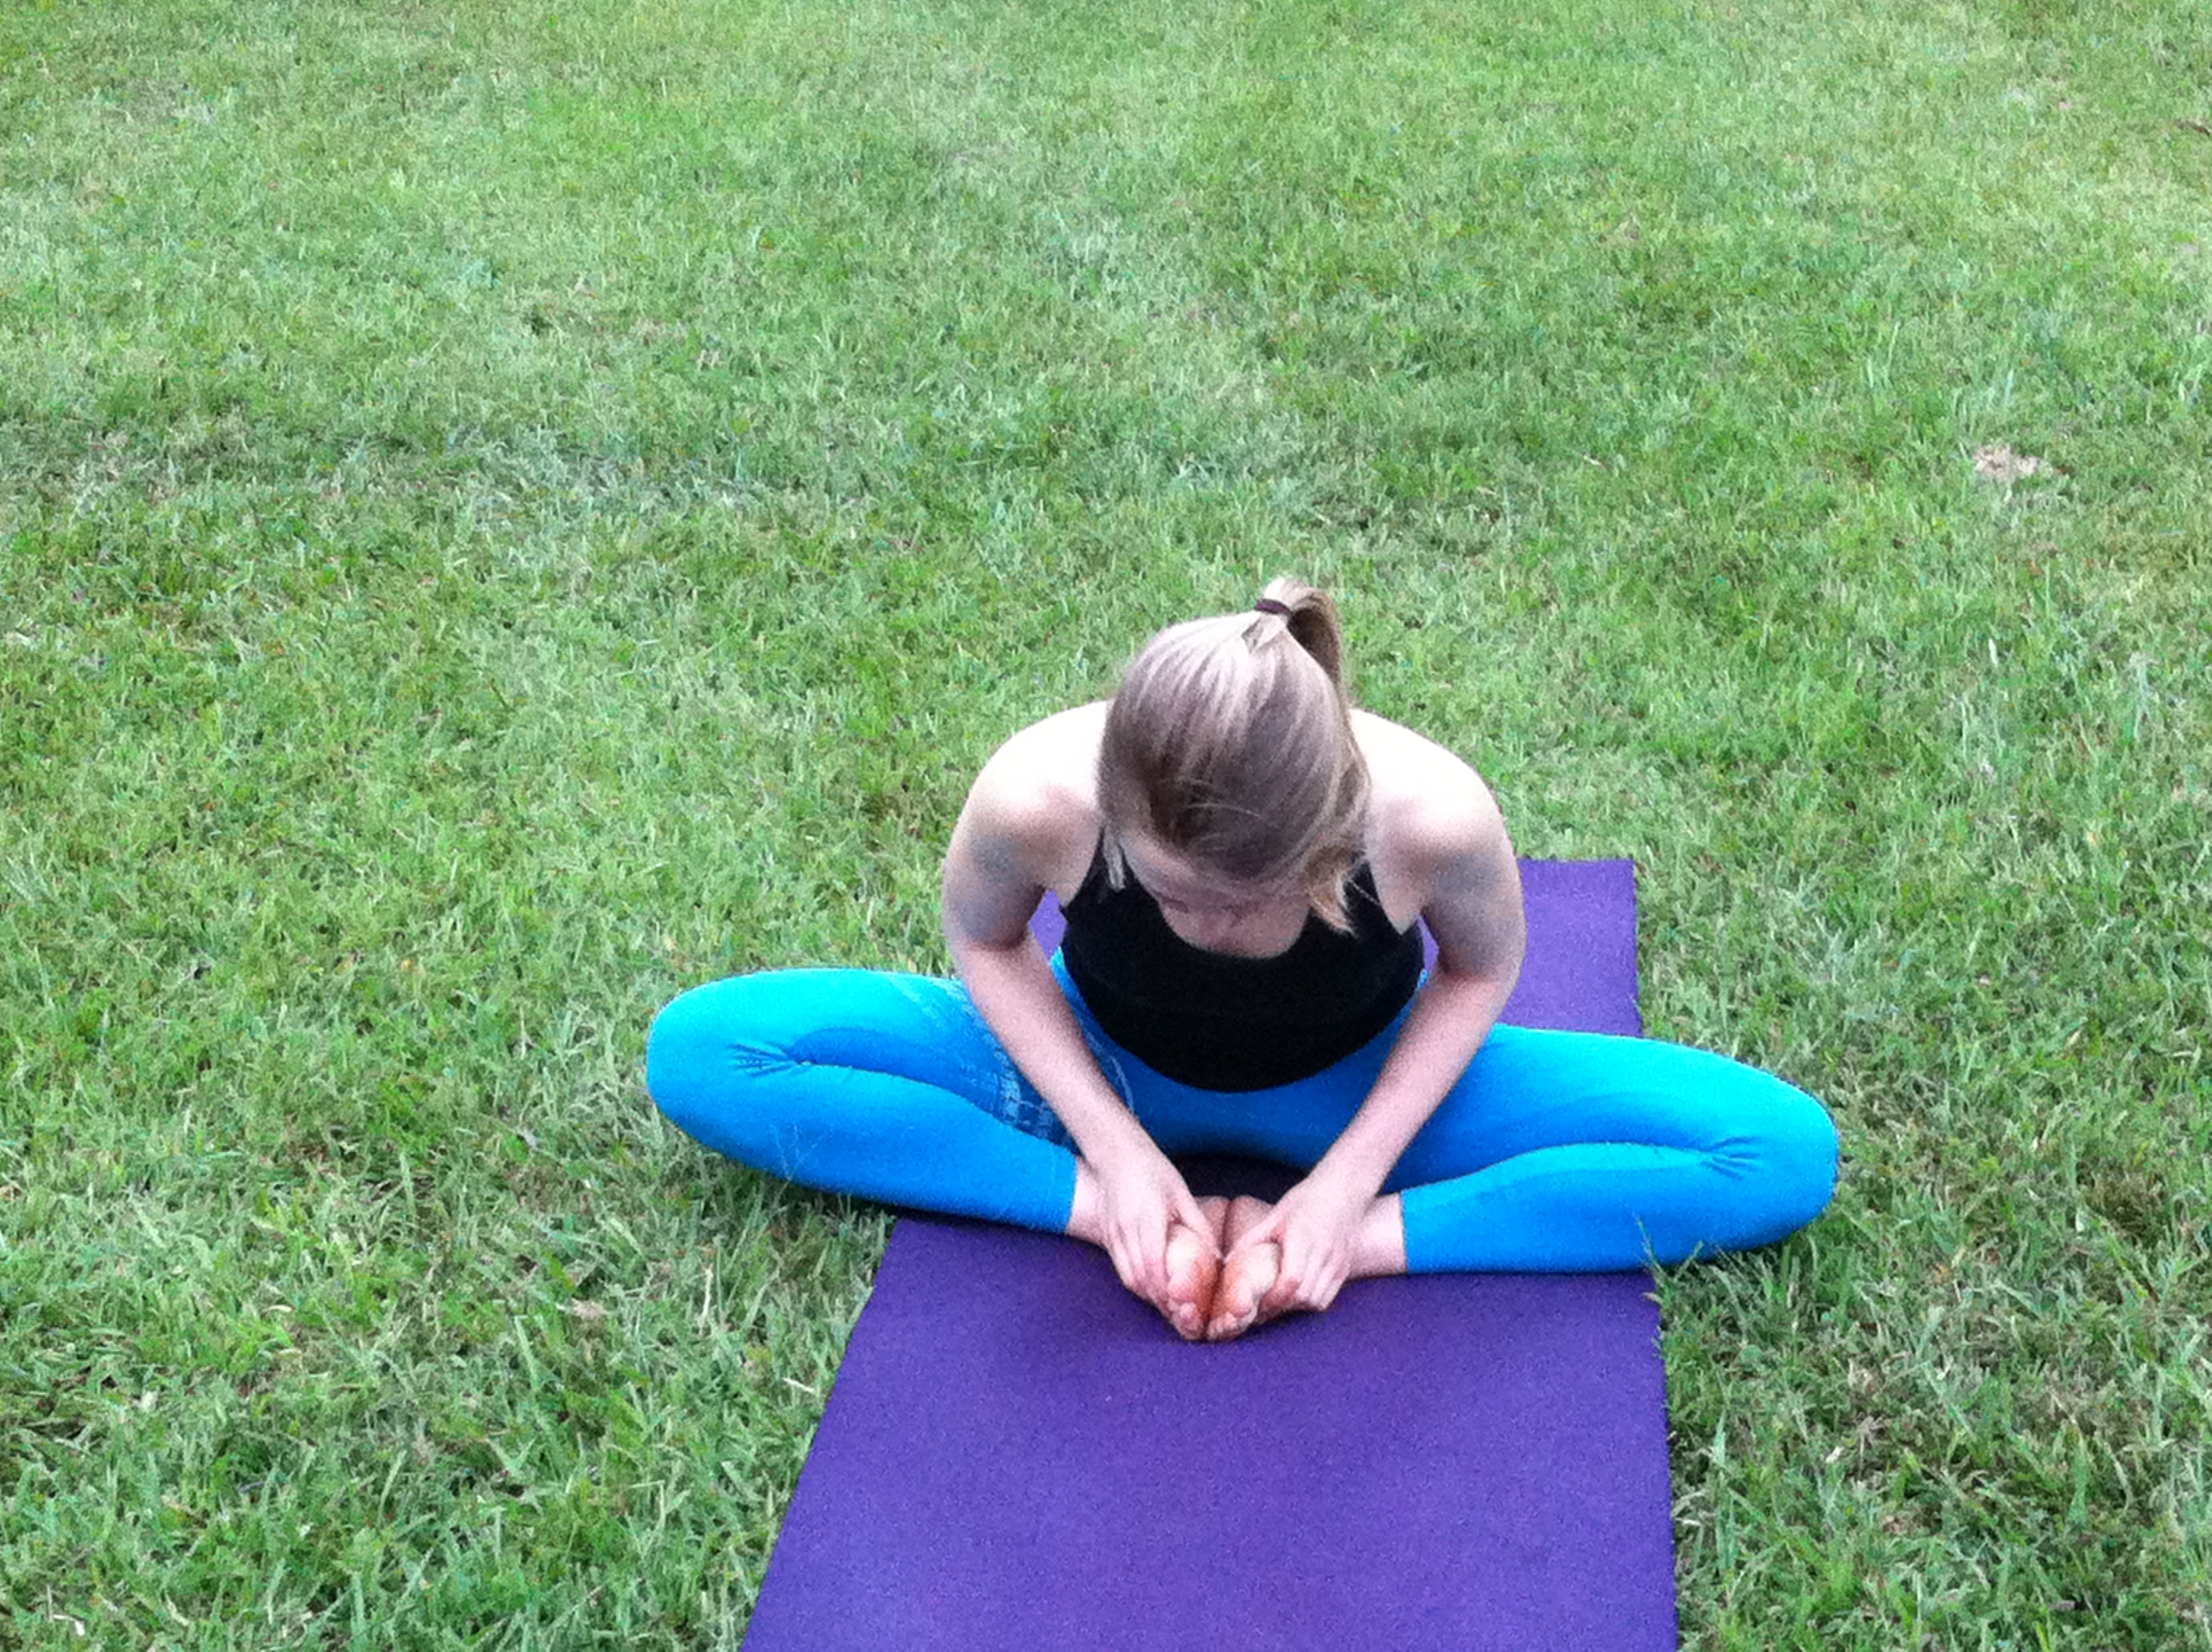
Bound Angle Pose
- Exhale, bend both knees, pull your heels toward your pelvis, then drop your knees out to the sides and press the soles of your feet together. If this is uncomfortable, you can place blocks or rolled blankets under your knees.
- Bring your heels as close to your pelvis as you comfortably can. Always keep the outer edges of the feet firmly on the floor.
- Never force your knees down. Instead release the heads of the thigh bones toward the floor. When this action leads, the knees follow.
- Inhale the shoulders up and exhale to let them drop back and together. Exhale to hinge forward at the hips for a deeper stretch.
Seated Twist
- Slide your left foot under your right leg to the outside of your right hip. Lay the outside of the left leg on the floor. Step the right foot over the left leg and stand it on the floor outside your left hip. The right knee will point directly up at the ceiling.
- Exhale and twist toward the inside of the right thigh. Press the right hand against the floor just behind your right buttock, and set your left upper arm on the outside of your right thigh near the knee. Pull your front torso and inner right thigh snugly together.
- With every inhalation lift a little more through the sternum, pushing the fingers against the floor to help. Twist a little more with every exhalation. Be sure to distribute the twist evenly throughout the entire length of the spine; don’t concentrate it in the lower back.
- Release with an exhalation, and twist to the other side.
Bridge
- Lie on your back, and if necessary, place a thickly folded blanket under your shoulders to protect your neck. Bend your knees and set your feet on the floor, heels as close to the sitting bones as possible.
- Exhale and, pressing your inner feet and arms actively into the floor, push your tailbone upward, firming (but not hardening) the buttocks, and lift the buttocks off the floor. Keep your thighs and inner feet parallel. Clasp the hands below your pelvis and extend through the arms to help you stay on the tops of your shoulders.
- Lift your chin slightly away from the sternum and, firming the shoulder blades against your back, press the top of the sternum toward the chin.

[/am4show]
