Lower Body Lifting For Power and Speed
by Teige West
In addition to drills and speed work, weightlifting will increase your endurance and performance during training and competition. Hurdling is unique compared to many sports because it involves sprinting and jumping, both of which engage muscles throughout the body—your arm motions are important, a solid core helps you maintain your posture, and of course, strong legs are absolutely necessary. In future articles we will cover arms and core, but first we will focus on the lower body.
[am4show not_have=’g5;’]
[/am4show][am4guest]
[/am4guest][am4show have=’g5;’]
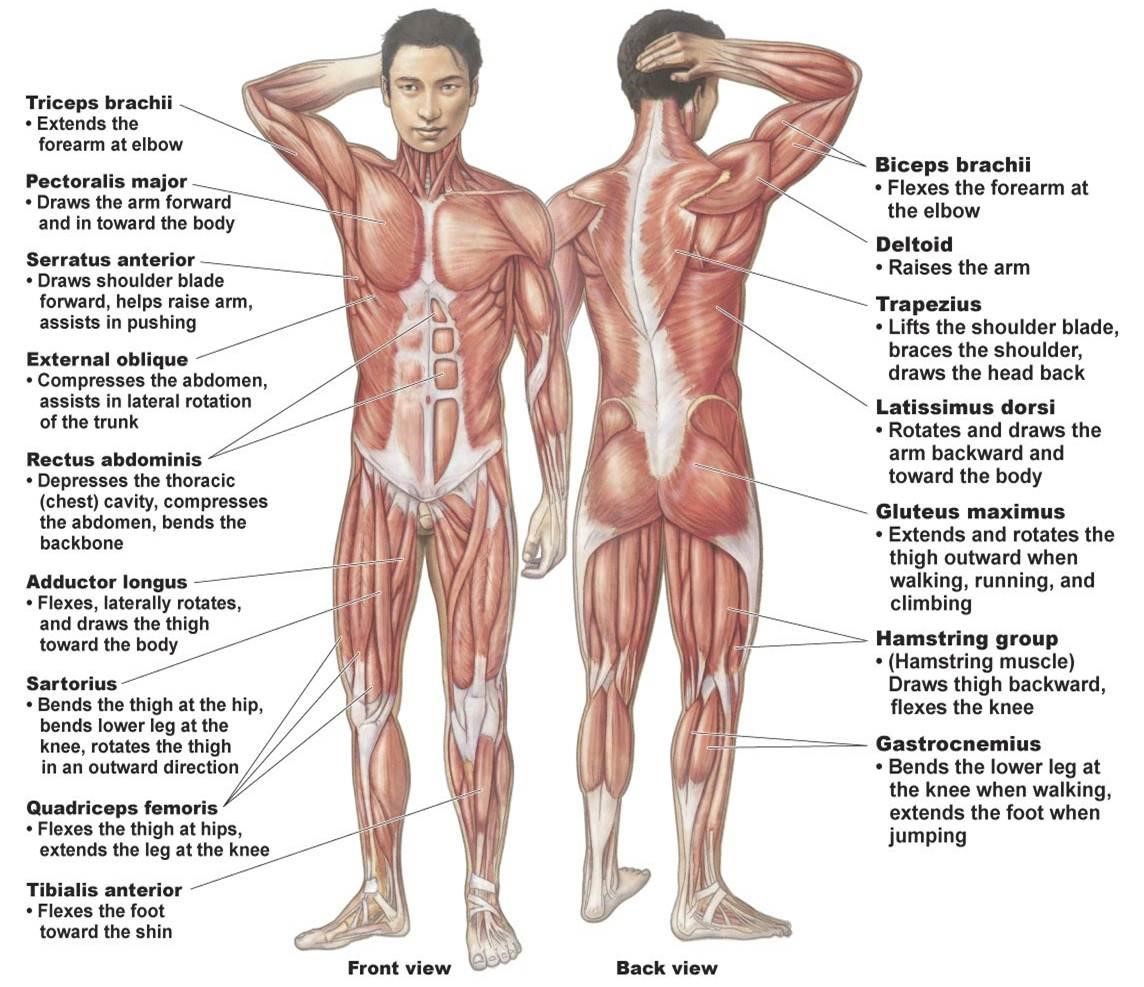
To maximize your power and speed, you should focus on building specific muscle groups: the glutes, the hamstrings, the quads, the adductors and the calves. All of these muscles are interconnected and each performs a particular purpose, so you want to choose a training plan that builds every group without neglecting a specific muscle. You can have the hamstrings of Rocky Balboa, but if your calves are weak, your jumping speed and power will suffer. Below is a diagram of the body’s musculature for reference.
Before beginning a strength training plan, you need to assess your fitness level, your hurdling experience and your age. If you have just taken up hurdling, are a young athlete or are coming off of a long-term injury, managing your expectations and starting slowly is so important. Looking ahead at where you need to go can be daunting at first—you want to jump in head first and level up with your teammates or friends, but remember, you are ultimately competing against yourself. Your goal is to get stronger, faster and better than you were last season. Sure, you want to make it to the finish line first, but you need a foundation before the house can be built. The below exercises start with bodyweight or free weight work. These are ideal for those coming off of a long rest period. Bodyweight work builds a solid foundation to move towards adding more weight and more reps. If you have a solid fitness base already, try the more difficult variation and the last set of exercises, which will increase your power.
After you assess your fitness level, you should make a year-long fitness plan that covers off-season and competition season. Trainers and coaches seem to have differing opinions on when you should lift and when you should focus solely on drills. Generally, in the off-season you should have a two-month plan to increase your power, followed by a two-month plan to increase your speed, which should end with a short rest period (1-2 weeks) before you begin competition. You want to begin competition season at your peak. Talk with your coach and/or trainers while making your plan. They know your abilities, your schedule and can assist you with a solid strategy to maximize your potential while avoiding injury. Some trainers recommend that you do not lift weights during competition season, the idea being that your focus should be technique, drills and recovery. The drawback to that approach is that you may lose muscle strength by the end of the season. The higher your fitness level and experience, the more likely that your body can handle and benefit from strength training during the on-season; but you should lift fewer days than during the off-season, and perhaps perform less intense exercises. You will still benefit from even one lifting day a week per muscle group. Talk with your trainer to determine the best tactic for you.
How much weight should you lift while doing the below exercises? The rule is that you should choose a weight level that allows you to perform the exercise at the recommended number of reps. If you are half-way through your second set and you are struggling hard to complete the movement, reduce your weights. Trying to push through while carrying a heavy load can lead to poor technique and injury. Start lighter than you think you may need. You can always increase weight. Many training plans recommend that you begin off-season training by working on power, then rest for a period of time, then start your two-month speed-focused lifting. The power phase requires fewer reps with higher weight. The speed phase requires more reps with less weight. Steadily increase your reps as your strength level improves. When you can do the most reps recommended, increase your weight. You should lift at least twice a week, ideally three times a week in the off-season, with at least 24 hours between sessions working the same muscles. Your body needs time to repair and rebuild.
Power: 3 sets of 4-6 reps
Speed: 3 sets of 10-15 reps
Before you begin lifting, you need to warm up. Jog slowly around the track or on a treadmill for 5- 10 minutes. You can also follow up with jumping jacks or jumping rope. After you warm up, stretch your legs and arms lightly.
Here are three groups of exercises: body/free weight, machine exercises and advanced work.
- Front squat
Stand with your feet shoulder-width apart. Bring your arms out in front of your body and lower your hips as low as you can. Slowly push yourself back into standing position. Variations: you can add weight to this squat by holding a weight plate in both hands in front of your body, or you can use a dumbbell grasped vertically in towards your chest. Works: glutes, hamstrings, front calf muscles, quads and your lower core. Adding a weight also works the upper body.
- Barbell Squat
This is almost identical to the front squat, except that a weighted barbell is held across the back of the shoulders. Stand with your feet shoulder-width apart, keeping the back straight. Lower your hips and push back up. Variation: There’s a version of this called the Siff squat that works the calves harder than the ‘normal’ squat. Stand with your feet shoulder-width apart. To perform a Siff, raise your heels so that you are standing on the balls of your feet. Lower into a squat and raise back up, keeping your heels off of the floor. Works: the glutes, the quads, the hamstrings and your core. The Siff squat works the same muscles and intensely targets the calf muscles.
- Lunge
Grasp two dumbbells in each hand and stand with legs staggered, your right foot in front and the left foot in the back, about a stride apart. Lower one knee towards the floor as far you can, then use your hips to raise back up. After you finish a set, reverse your stance so that your drop your opposite knee towards the floor. Be sure to keep your back straight as you lower your knee. A more difficult variation is to place your back leg on a raised surface, which allows for a deeper stretch. Works: quads, hamstrings, adductors, front and side calves and core.
- Calf Raises
There are two ways to perform this exercise. The less intense version is to use your body weight. Stand on your toes on a stair or lower riser with your feet shoulder-width apart. Make sure that your back is straight. Gently raise your body onto your toes, holding for two seconds. Raise your body back down. The other variation is to stand on a flat surface with your feet shoulder width apart. Grasp a dumbbell in each hand and slowly raise your body onto your toes, keeping your back straight. Hold two seconds and lower back down. There are calf raise machines in most gyms that use barbells or stacked weights and that are more difficult than these two, so as you progress, you may want to ask your trainer about those. Works: calf muscles, especially the back; engages hamstrings.
- Weighted Jumping Rope
Jumping rope is a great way to increase strength and speed. Beginners or anyone coming off of an injury should start with a nonweighted rope. This exercise is self-explanatory—most of us had to do this in school. Start with a time limit that allows you to complete your total workout for the day. Increase the time as your fitness level increases. It’s fine to start with 60 seconds and work up if you need to. If you already have a solid fitness base, use a weighted jumping rope or use ankle/body weights to make it more challenging. Works: many muscle groups across the entire body, including the upper back, chest, triceps, biceps, abs, glutes, quads, hamstrings and calves.
Machine Lifting
- Leg curls
These can be performed sitting or standing. While seated, lower the hamstring pad until it rests against your upper legs. Choose your desired weight and press your ankles against the ankle pads until your feet are underneath your body. If you have a standing press, press your ankle against the pad until your knee is at 90* with your body. Works: back muscles, glutes, hamstrings, calves.
- Leg Extension
This is similar to the curl. Sit on the machine, but place your ankles behind the ankle pads. Using your quads press your ankles upward, then return to starting position. Works: quads and front calf muscles.
- Leg press
This is basically an almost upside-down squat, but allows for more weight to be moved. You will sit in the machine so that your back and shoulders are towards the floor. Press your legs upward to move the weight away from you. Works: glutes, hamstrings, quads, calves.
- Leg adductors
Sit with your legs on either side of the machine pads. Squeeze your legs together and bring them back out. There are also adductor machines where you press outward. Works: adductor group, and can work the outside thighs when pressing outward.
Advanced Exercises
These are more intense than the above exercises. It’s very important to engage your core and keep your back straight. Do not perform these exercises alone, find a spotter. Many athletes have been injured when performing these with the wrong technique, so start these only when you have the fitness base and experience to do so, and after proper instruction from a trainer.
- Romanian deadlift
Place a weighted barbell in front of you on the floor. Stand with your legs shoulder-width apart. Engage your core, keep your back straight and pick up the barbell. Raise to a standing position. The barbell will rest at about mid-thigh level. Lean over, keeping the back straight, until the barbell is ankle-level. This is one rep. Works: most of the body, including the traps, deltoids, middle back, glutes, hamstrings, calves, quads.
- Clean Pull From the Floor
This is very similar to the Romanian deadlift; the difference is that a clean pull is a quick motion, whereas the deadlift is a slow pull. Rest a weighted barbell on the floor. Keep your back straight and your core engaged. Stand with your feet shoulder-width apart. Lean into a squatting position, grasp the barbell and quickly pull the barbell up to your waist in one quick motion, returning the barbell to the floor. Works: most of the body, including the traps, deltoids, middle back, glutes, hamstrings, calves, quads.
End your last lift with a short, light jog or other cardio such like slow jumping jacks if you are indoors, and then focus on stretching out the especially tight muscle groups. Hydrate, refuel and don’t forget to keep moving throughout the day to help prevent muscle soreness.
[/am4show]
